![]() You can share a folder only with users who already have an existing FileCloud account.
You can share a folder only with users who already have an existing FileCloud account.
![]() As a private share owner, you now have the ability to:
As a private share owner, you now have the ability to:
- View and manage re-shares; that is shares created from your shared folder by other users.
- Assign managers to view and manage re-shares; that is shares created from your shared folder by other users.
When you share the folder and its contents, you can leave the default settings as:
SHARE OPTIONS
- Expires = Never Expires
- Restrict Downloads = No Restrictions. This allows any user to download a file an unlimited number of times.
- Email File Change Notifications = YES. This sends an email notification when a file is opened or downloaded for a public share.
- Enable Password Protection = NO. This allows a user to access a file without first providing a password.
However, in the Share Permissions panel, you must make the following changes:
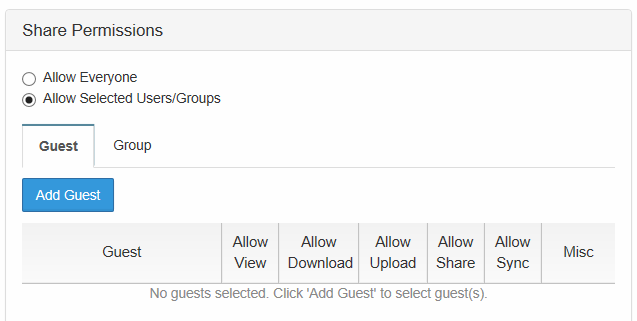
![]() For private sharing, select Allow Selected Users/Groups. You will be required to find the user or group FileCloud account and select one of the following options:
For private sharing, select Allow Selected Users/Groups. You will be required to find the user or group FileCloud account and select one of the following options:
Table 1. Permission options for private folder sharing
Permission | Description |
|---|---|
| Allow View | Read access will allow users to view, or browse files in the folder. Removing view access will remove the user from the share completely. |
| Allow Download | This will allow the user to save a file from the FileCloud folder to a local device such as a desktop or cell phone. |
| Allow Upload | This will allow the user to:
|
| Allow Share | This will allow the user to shared the folder contents again with others of their choosing.
|
| Allow Sync | Sync access will allow users to synchronize the contents of the shares using their FileCloud Sync app. Note: This option is only available for Shared Folders only. Individual files cannot be synced to other users. |
| Misc. - Allow Delete | This will allow users to delete a file from the folder. Notes:
|
| Misc. - Allow Manage | Assigns a user as a Share Owner.
|
To configure private folder sharing with existing FileCloud Users:
- Open a browser and log on to the User Portal.
- On the left navigation panel, click Files.
- Open the folder you want to share.
- If the folder is already being shared, in the Details pane on the right, in the Sharing section, click Manage, and then skip to step 8.
- If the folder is not yet being shared, in the Details pane on the right, in the Sharing section, click +Share.
- On the Confirm dialog box, click OK.
- On the Share Link dialog box, click Advanced Options.
- On the Manage Share for Folder window, in the Share Permissions panel, select Allow Selected Users/Groups.
- To add a user, select the Guest tab and then click Add Guest.
- To add a group, select the Group tab and then click Add Group.
- On the Search screen, type in the user's or group's account name.
- In the Share Notification dialog box, review the email to be sent to the selected user or group, and then click Send.
- In Shared Permissions, select the checkbox for each permission you want to grant.
- To save your changes, click Update.