Synchronizing Folders in ServerSync

When you select a folder on the FileCloud server to be synchronized, a local copy is placed in the location you choose.

When ServerSync runs:

  • Changes in local copies can be uploaded to the server, replacing the version on the server for others to see your changes.
  • Changes in server copies can be downloaded to your local file, replacing the local version with the one on the server so that you can see other people's changes.
  • You can add any number of folders for synchronization by repeating the Add a Folder process. 
  • Note that synchronization occurs one by one and not in parallel. So if you have a large number of folders setup, a synchronization cycle might take some time.


To manage folder settings:

  1. From the system icon tray, right-click the ServerSync icon, and then select Settings.
  2. On the Settings screen, in the Server Folders section, click Edit.
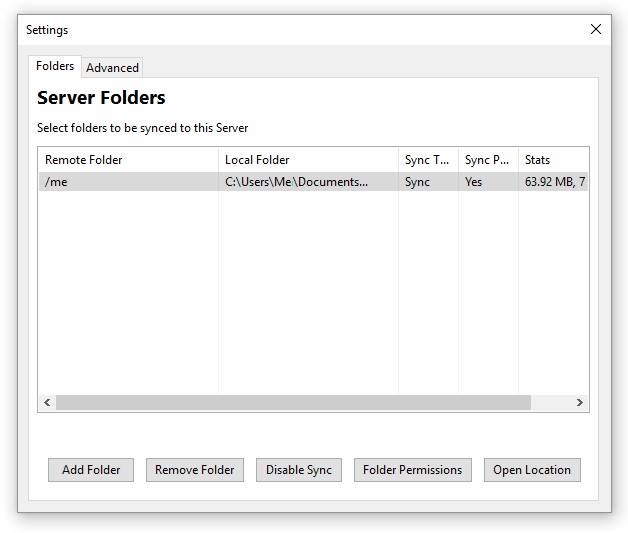
  3. On the Settings screen, on the Folders tab, perform any of the following actions:
OptionDescription

Add Folder

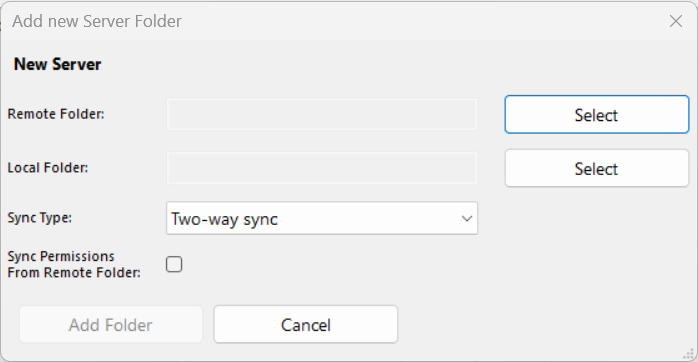
Opens a dialog box called Add new Server Folder.

  • Remote Folder - Allows you to choose folders on FileCloud.
  • Local Folder - Allows you to choose where you want the local copies saved
  • Sync Type - Allows you to choose two-way or one-way sync.

When server changes are downloaded to a local folder, the local folder modified date is changed to the current date, but the server folder keeps its original modified date. This is due to operating system constraints.


Sync TypeDescriptionOverwriting Files
Two-way syncAllows changes to be synchronized in both directions

Local changes can be uploaded to the server

Server changes downloaded to the local folder

(warning) When there are conflicts, you will be asked to choose which version you want to keep.


One-way sync (Remote to Local)Only changes from the server are synchronized down to the local folder

Server changes downloaded to the local folder

(warning) Any changes to local copies are lost when they are overwritten by the server copies.

  • Sync Permissions From Remote Folder - Allows you to specify whether you want to sync file permissions as well. This allows the administrator to manage permissions centrally using FileCloud and make them apply even on synchronized local folders.

To add a folder:

  1. In Remote Folder, click Select.
  2. In the file explorer window, all managed files for the server you are connected to are listed. Choose the one you want to sync, and then click Select.
  3. In Local Folder, click Select.
  4. In the file explorer window, choose from the directories on this local computer where you have enough space to store the server copies, and then click Select Folder.
  5. In Remote to Local, to allow changes to be synchronized in both directions, choose Sync.
Remove Folder

After selecting a folder, allows you to permanently stop synchronizing a folder with FileCloud server.

(warning) The folder and its contents are not removed from the local machine, in case you want to sync this folder again later.

To temporarily stop synchronizing a folder, use the Disable option.

Disable Sync

Allows you to disable synchronization of folders temporarily.

  • One or more folders can be disabled, instead of being completely removed.
  • Folders can be enabled again for synchronization by selecting the folder and clicking the "Enable Sync" button.
  • If all folders are disabled, then WARNING: No Server Folders selected for Sync is displayed on the Home screen.
Folder Permissions

First, you must select a folder.

Clicking Folder Permissions opens a new window to view and manage folder permissions.

  • If you have not imported permissions, then this window will not have any data to display.
Open Location

Opens a Windows File Explorer window showing the location of the folder you have chosen to keep local copies.

  • This folder is set when you add a folder and choose a local folder.