Integrate Microsoft Entra ID with FileCloud
Azure Active Directory is now Microsoft Entra ID.
Note: Microsoft Entra ID can only be integrated if FileCloud has an SSL certificate in place, as Microsoft requires HTTPS URLs when configuring FileCloud in Entra ID.
FileCloud can be integrated with Microsoft Entra ID.
- Microsoft Entra ID must be configured as an Identity Provider (IdP)
- FileCloud will act as the Service Provider (SP)
To integrate Microsoft Entra ID with FileCloud:
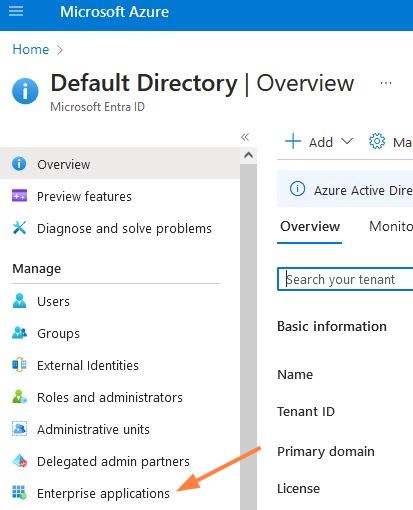
Log in to the Azure Portal (https://portal.azure.com).
- Search for Microsoft Entra ID, and then click the Microsoft Entra ID icon.

- If you see a directory list, select the directory you want to integrate with FileCloud.
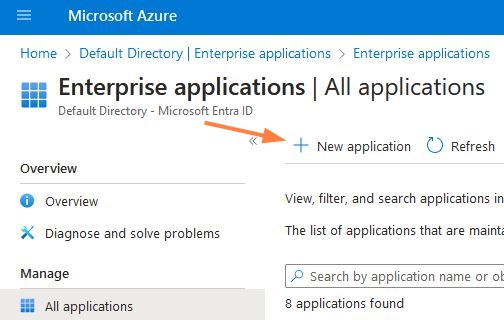
- Select Enterprise applications in the left navigation menu.
- Click New application.
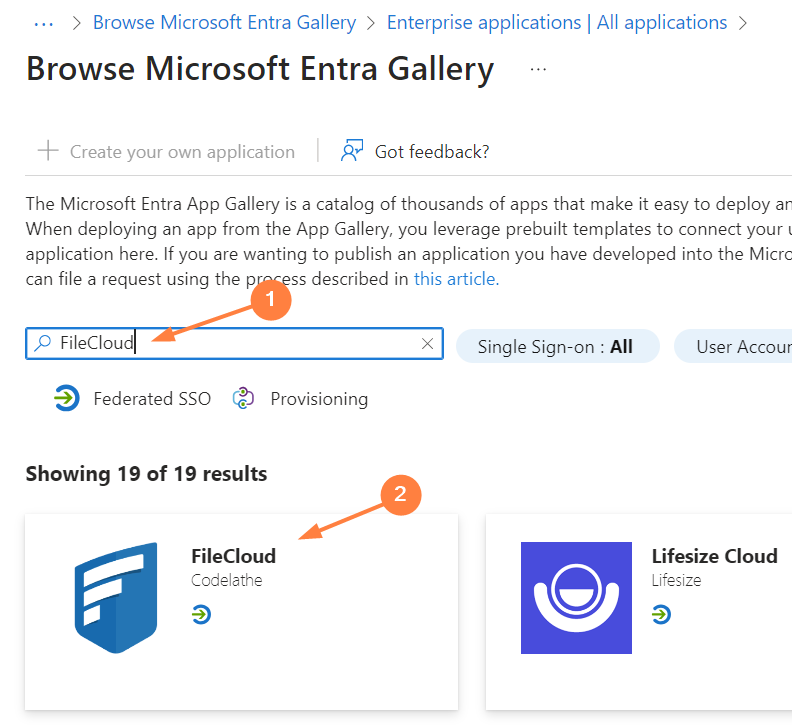
- In the Browse Microsoft Entra Gallery page, enter FileCloud in the search box, and click the FileCloud icon.
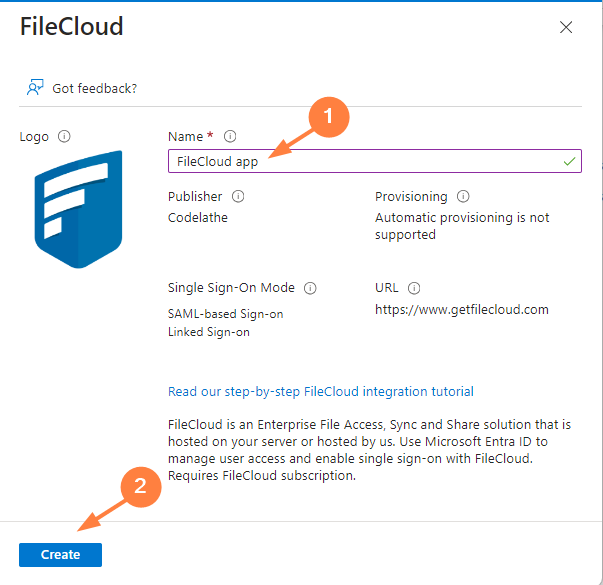
FileCloud information appears in the right panel. - Enter a name for your FileCloud app, and click Create.
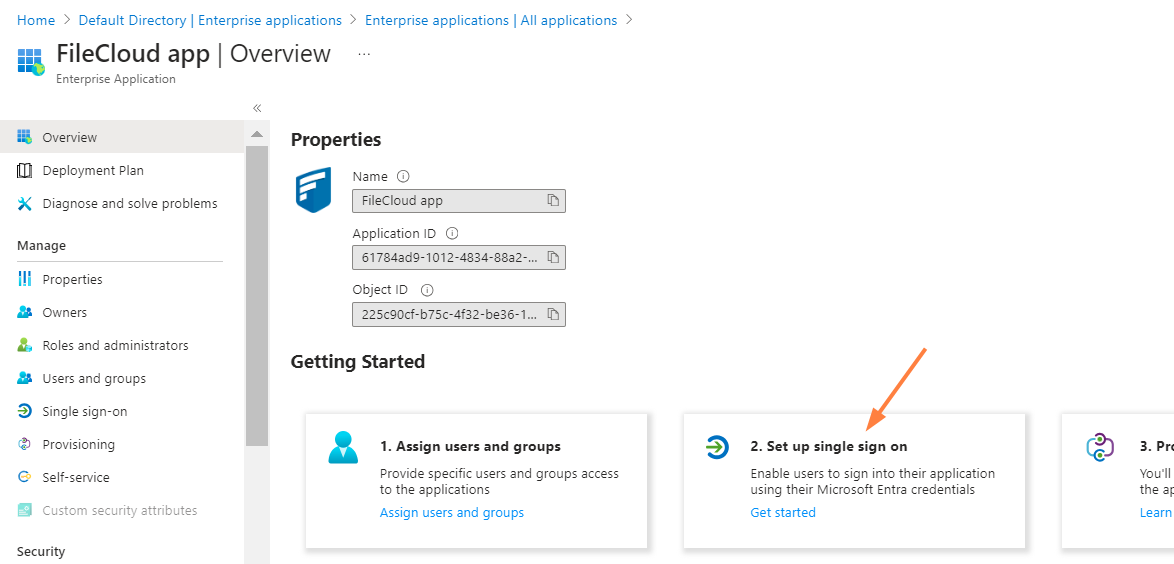
The Overview page for the new application opens. - In the Set up single sign on box, click Get started.
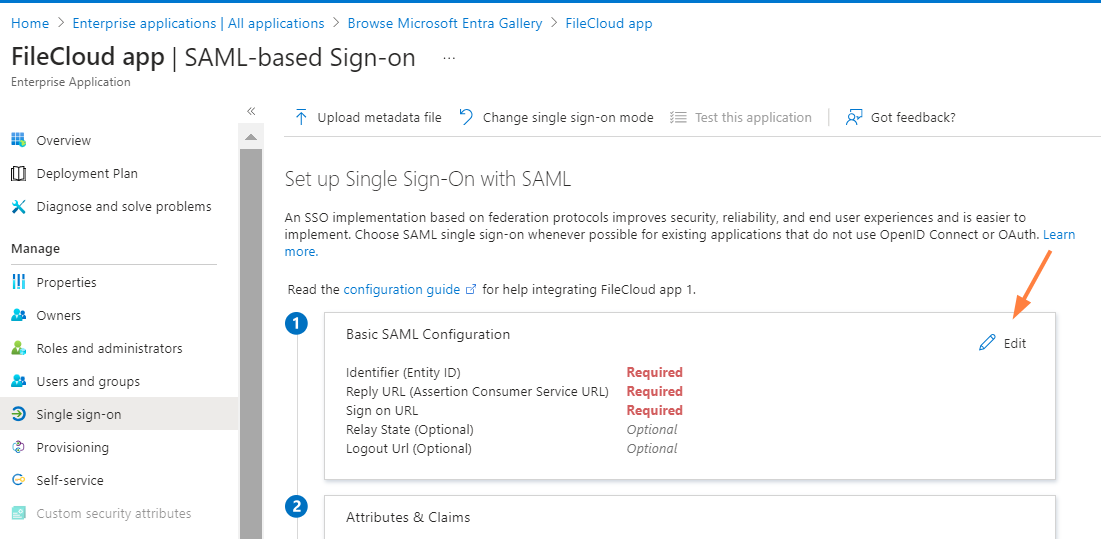
The Single sign-on screen opens. - Click SAML.

The SAML-based Sign-on screen opens. - In the Basic SAML Configuration box, click Edit.
In the right panel, the Basic SAML Configuration form opens.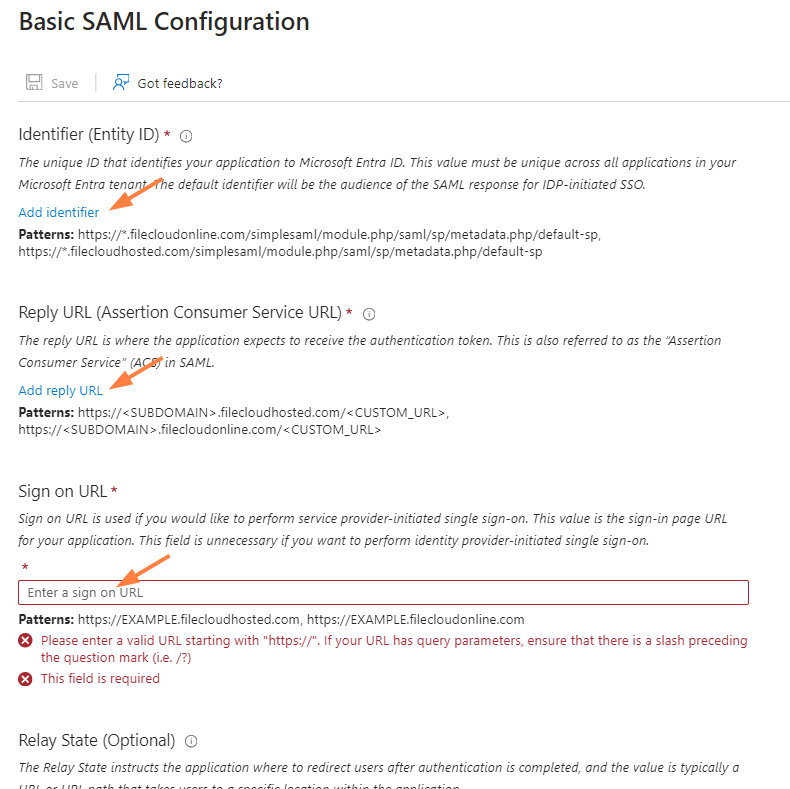
- Enter the top three fields, Identifier (Entity ID), Reply URL, and Sign on URL using your FileCloud domain, then click Save.
Identifier (Entity ID) - the FileCloud SSO endpoint, for example, https://yourdomain.com/simplesaml/module.php/saml/sp/metadata.php/default-sp
Reply URL - your FileCloud domain with the additional path indicated, https://yourdomain.com/simplesaml/module.php/saml/sp/saml2-acs.php/default-sp
Sign on URL - Your FileCloud site URL, for example, https://yourdomain.com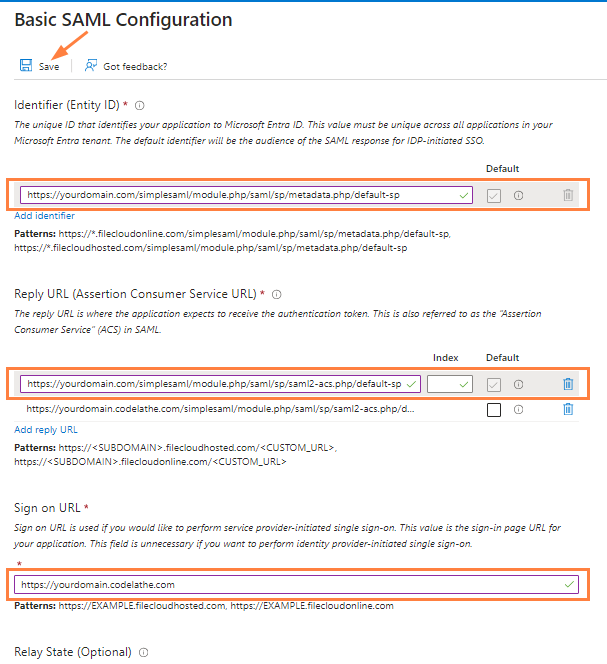
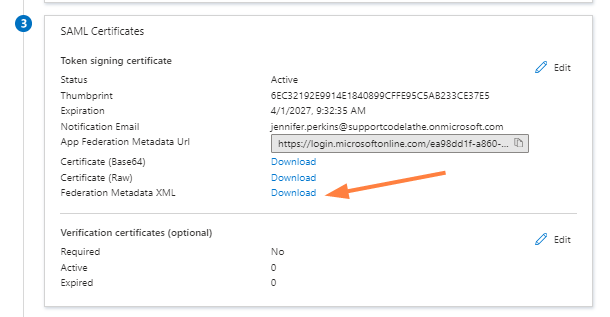
- Close the panel and scroll down to the SAML Certificates box.
- Download and save the Federation Metadata XML.
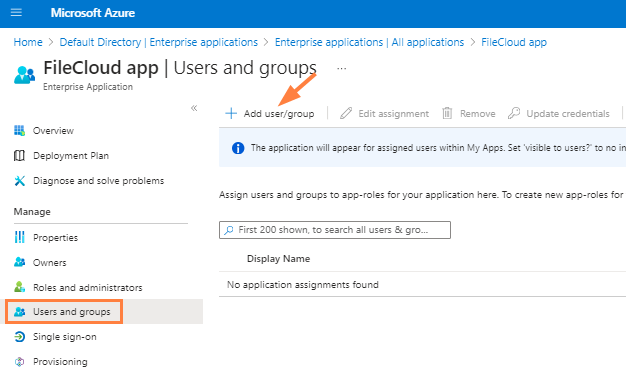
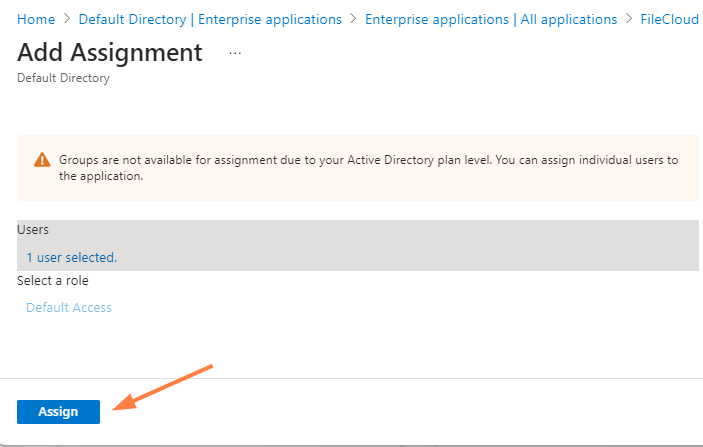
- Click Users and groups in the left navigation panel, and click Add user/group.
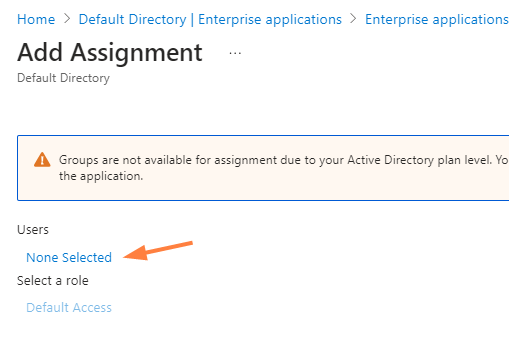
- In the Add Assignment page, click the link under Users or Groups to add users and groups.
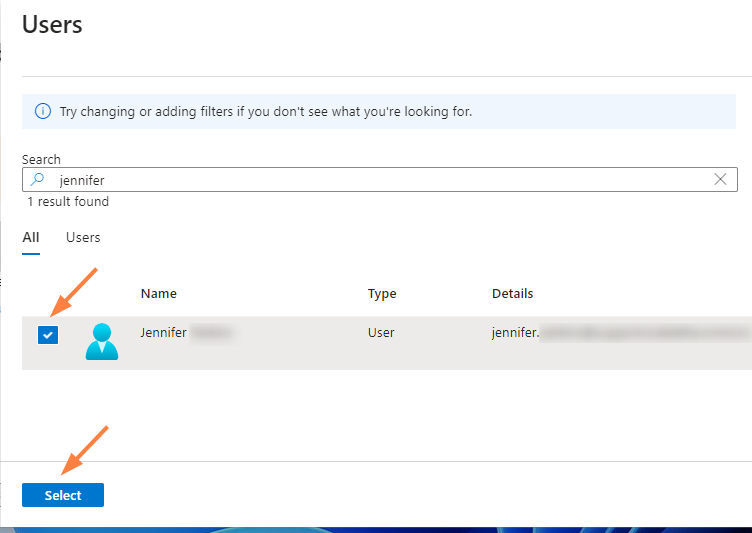
The Users or Groups page opens. - Search for and check the users or groups that you want to assign to the app, and choose Select (at the bottom of the page).
- At the bottom of the Add Assignment page, click Assign.
- In the FileCloud admin portal's left navigation bar, scroll down and click Settings. Then, on the Settings navigation page, click SSO
 .
.
The SSO settings page opens. In the Default SSO Type drop-down list, choose SAML.
Enter the following details:
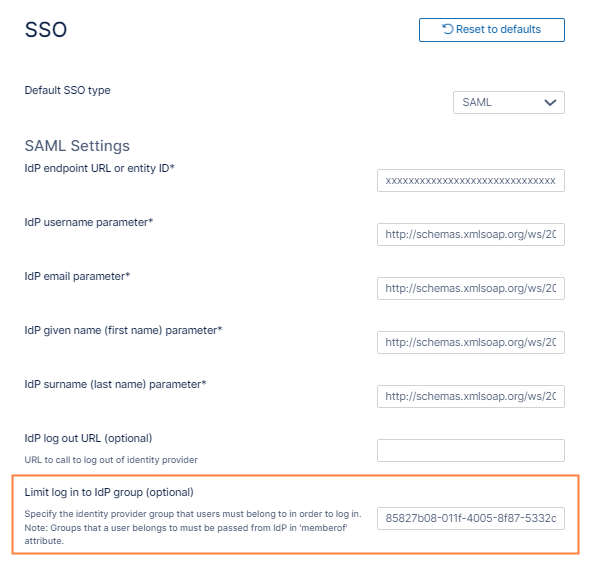
Settings Value Default SSO type SAML IdP endpoint URL or entity ID From the metadata XML downloaded, copy the entity ID on the first line of the XML document. IdP username parameter http://schemas.xmlsoap.org/ws/2005/05/identity/claims/name IdP email parameter http://schemas.xmlsoap.org/ws/2005/05/identity/claims/name IdP given name (first name) parameter http://schemas.xmlsoap.org/ws/2005/05/identity/claims/givenname IdP surname (last name) parameter http://schemas.xmlsoap.org/ws/2005/05/identity/claims/surname IdP Metadata Copy the complete contents of the metadata XML downloaded. To get the IdP endpoint URL, open your downloaded xml data and copy the entityID as shown in the screen shot below.

Save the above settings.
This completes the Microsoft Entra ID SSO integration with FileCloud.
Troubleshooting failed SSO login for a member of an IdP group
An IdP group is a group of users in Microsoft Entra ID who are authorized to log in to FileCloud. When a user logs in to FileCloud with SSO using Entra ID, FileCloud automatically checks the login user's FileCloud group name to see if it is the same as the user's IdP group name. However, this fails because Entra ID can only send the Group ID, not the group name, to FileCloud. To fix this, add a custom claim parameter named memberof in Entra ID to send the group's Object ID (Group ID) to be compared with the field Limit log in to IdP group in FileCloud SSO settings. Since the two values are identical, the user is able to log in to FileCloud.
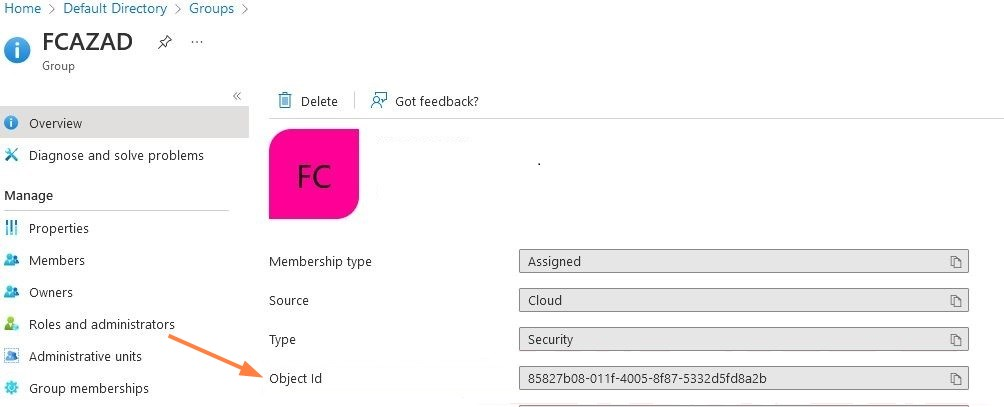
To get the group's Object ID, in Microsoft Entra ID:
- Log in the the Azure portal, and in the navigation panel, click Microsoft Entra ID.
- In the navigation panel, click Groups, and then click the Group to limit the login to.
- In the Overview screen for the group, copy the Object ID field:
- In the FileCloud admin portal's left navigation bar, scroll down and click Settings. Then, on the Settings navigation page, click SSO .
- In Limit log in to IdP group, enter the Object Id.
- In Microsoft Entra ID, go to the Enterprise Applications screen, and choose the FileCloud application
- In the navigation panel, click Single sign-on.
- Scroll down to Attributes and Claims, and click Edit.
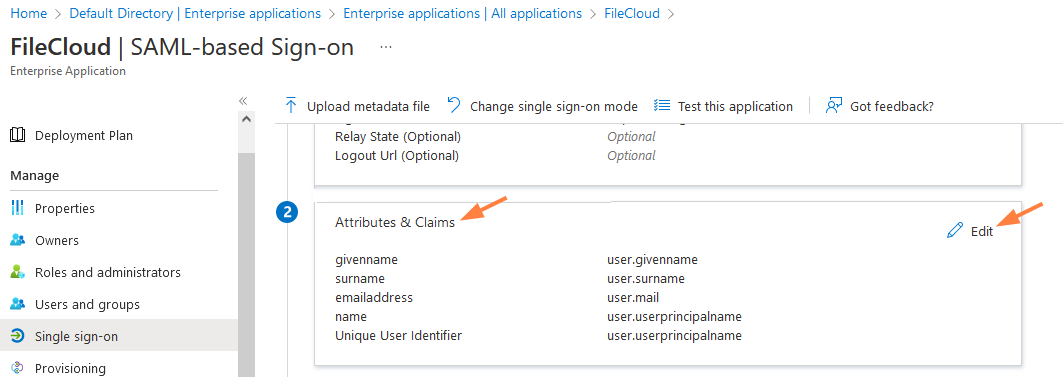
- Click Add a group claim.
A Group Claims form opens in the right panel. - In Source attribute, choose Group ID.
- Check Customize the name of the group claim.
- In Name, enter memberof.
- Click Save.
The new claim is listed under Additional claims with the value user.groups (which is equal to Object Id).
Now memberof will be sent to FileCloud with the value of the user group, and when FileCloud compares it with the Idp Group, the values match, so FileCloud will allow the login.