FileCloud High Availability

FileCloud High Availability Architecture


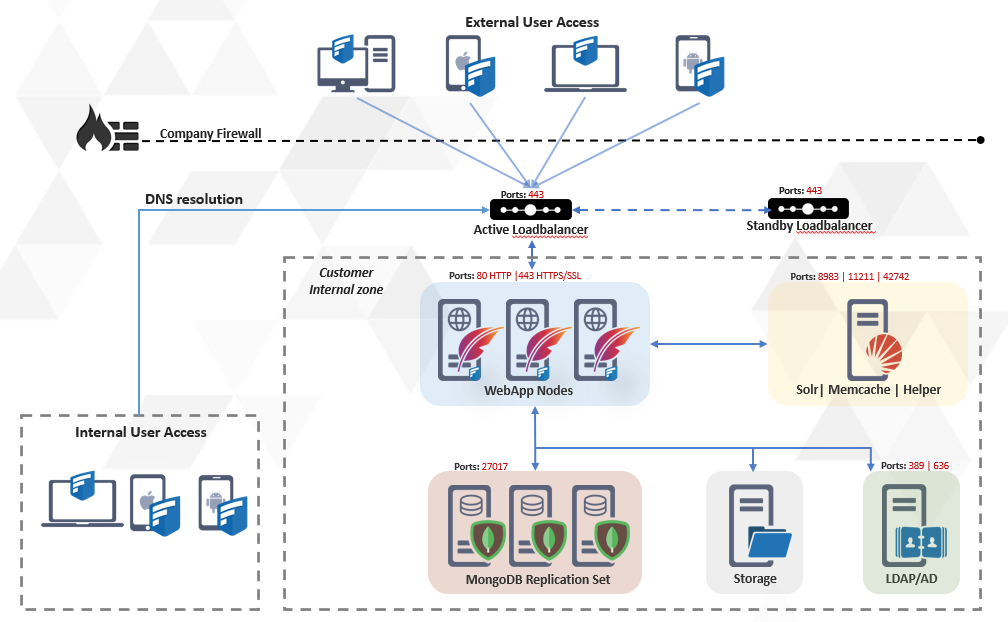
FileCloud servers can be configured for an HA environment to improve service reliability and reduce downtime in your IT environment. FileCloud supports HA in Linux and Windows environments.
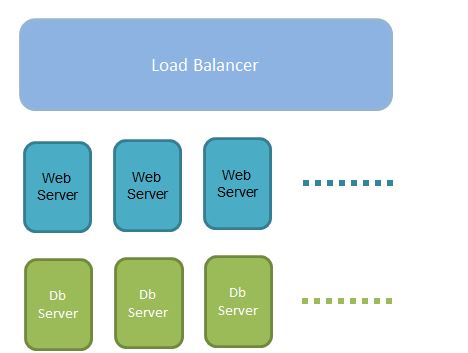
Load Balancers

The Load balancer routes traffic to the FileCloud Application nodes. Load balancers (LB) provide advantages to serving requests from your FileCloud servers because they allow you to better control how the traffic is handled in order to provide the best performance.. If one or more App server nodes fail, the load balancer will automatically reroute traffic to other App server nodes.

Typically there is no need to scale the number of load balancers because these servers can handle a very large amount of traffic. However, more than one load balancer can be used to provide additional reliability in the event that a load balancer fails.

In order to protect against load balancer hardware failure, multiple records for the load balancer host name in the DNS service can be used.

The idea here is that different clients will get different ordered lists of IP addresses corresponding to your domain name. This has the effect of distributing requests across the group of IPs in a specific manner. If an IP address does not respond in an appropriate amount of time, the client times out on that request and moves on to the next IP address until the list is exhausted or it finds a connection that's valid.

FileCloud Component: App server node

The FileCloud app server node consists of the Apache webserver as well as the FileCloud Application code to serve the client requests. The FileCloud app server nodes do not contain any application-specific data. The data is retrieved from the MondoDB replica sets. Because of this, the FileCloud app server nodes can be added or removed without disrupting the service.

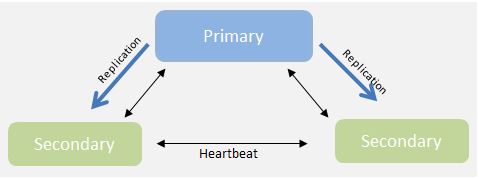
FileCloud Component: MongoDB Replica set

MongoDB database replica sets provide high availability with automatic failover support. Failover allows a secondary member to become primary in the event of failure to the primary DB node. The minimum number of DB nodes needed for MongoDB is three. All app server nodes connect to the primary node, and in the event of primary node failure, a new primary is elected and all the app server nodes will switch to the new primary.

This document describes  the classic 3-tier approach with the load balancer handling the client traffic, application server nodes serving requests, and redundant database servers storing application data.


Deployment Instructions

  1. You must have a at least three systems because the database replica set requires a minimum of three servers
  2. If you are using local storage, the local storage must be a location that is accessible by all the webserver nodes. The local storage CANNOT be a location inside any of the computers that run the FileCloud service. The location must be mounted on the same path string on each of the nodes (/mount/fcstorage or H:\storage)
  3. Ports 27017 (MongoDB Ports) must not be blocked by a firewall (ideally drop the firewall until the install is over)
  4. Temp storage should be commonly accessible as well (must be a network mounted location). The temp storage should be mounted on each of the nodes and the path must be specified in the amazons3storageconfig.php (on each node) with key "TONIDOCLOUD_NODE_COMMON_TEMP_FOLDER" set to the path to the temp storage, for example:
    define ("TONIDOCLOUD_NODE_COMMON_TEMP_FOLDER", "/mount/tempspace"); 
  5. Each Web node must have UNIQUE host name; otherwise, temp folder clean up will not work properly

The following setup will be created with this set of instructions:


Load Balancer 

The load balancer is not a part of this install, but for completeness sake, we are using HaProxy as an example.

Skip this section if you already have a load balancer setup

Go to Loadbalancer (HaProxy) install instructions.

Creating MongoDB Cluster

  1. MongoDB HA requires an odd number of nodes for voting of Primary.
  2. MongoDB requires a majority of nodes to be available in order to hold an election (or majority of votes which is controlled by the node's priority).
  3. The Timeout parameter might be needed to reduce latency in case of loss of nodes (mongodb://Ha-WS1,Ha-WS2,Ha-WS3/?replicaSet=rs0&connectTimeoutMS=1000
  4. Use host name instead of IP address to be robust.
  5. Ensure port 27017 is open in order for DB communication to work.

Ensure every node is at the same software level. (OS, FileCloud software level and its dependencies must be at the same level.)

  1. Install MongoDB on all the designated DB nodes. These nodes can be collocated with the Apache server or can be on a different machine. In this section, we will assume there are three nodes (which is the minimum number needed for a MongoDB cluster).
  2. Edit mongo.conf (In Linux it is at /etc/mongodb.conf and in Windows it is c:\xampp\mongodb\bin\mongodb.conf) in each DB node and enable DB replication.
    In case of Mongodb on Windows (all versions) uncomment replSet and set it like the following (or add this line if not present)

    replSet = rs0
    

    In case of Mongodb on Linux, uncomment line containing replication and add the replica set name as follows:

    replication:
     replSetName: rs0
  3. Important: Update the bind_ip value of the MongoDB node to listen to its local IP address:

    bind_ip = [local ip address]

    Note

    After making the above changes, please restart your MongoDB service.
  4. Open the mongo shell by running the mongosh command (in Linux it is /usr/bin/mongo and in Windows it is c:\xampp\mongodb\bin\mongo)

  5. This applies to ONLY one node. Select a node (say Ha-Ws1) and issue the following command. If you issue this in more than one system, the configuration will become invalid.
    Initialize the replica set with the following command 

    rs.initiate()
    rs.add(“ip address of other Ha-Ws2”)
    rs.add(“ip address of other Ha-Ws3”) 
  6. In each of the three database server nodes, connect to the mongo shell and enter rs.status() to see the actual value (One of the nodes should show as Primary and other two nodes should show as Secondary)
    It should show appear similar to:

    rs.status()
    {
            "set" : "rs0",
            "date" : ISODate("2014-09-03T20:52:14Z"),
            "myState" : 2,
            "members" : [
                    {
                            "_id" : 0,
                            "name" : "<ip of other DB>:27017",                       
                            "health" : 1,
                            "state" : 2,
                            "stateStr" : "PRIMARY",
                            "uptime" : 749,
                            "optime" : Timestamp(1409777412, 1),
                            "optimeDate" : ISODate("2014-09-03T20:50:12Z"),
                            "errmsg" : "syncing to: ha-db1.codelathe.com:27017",
                            "self" : true
                    },
                    {
                            "_id" : 1,
                            "name" : "<Ip of other DB>:27017",
                            "health" : 1,
                            "state" : 2,
                            "stateStr" : "SECONDARY",
                            "uptime" : 749,
                            "optime" : Timestamp(1409777412, 1),
                            "optimeDate" : ISODate("2014-09-03T20:50:12Z"),
                            "errmsg" : "syncing to: ha-db1.codelathe.com:27017",
                            "self" : true
                    },

    It is important that the "name" field for each of the members in the replica match the name used in the connection string.

    For example, if hostnames are used "mongodb://node0,node1,node2/?replicaSet=rs0&connectTimeoutMS=1000"

    then the rs.status() output should show the "name" field as node0, node1, node2 . Also note that the hostname must be accessible from each of the nodes.

    The name can be changed using mongo client commands in primary. For example, to change the name field of the first member of the replica set (0th element of the output of rs.conf)

    cfs = rs.conf()
    cfg.members[0].host="host0:27017"
    printjson(cfg)
    rs.reconfig(cfg)
    rs.status()


Configuring FileCloud With MongoDB Cluster

After MongoDB cluster is installed and configured, use the following steps to configure FileCloud to use this cluster as its database.

  1. If the app servers are different from DB servers, install the app server portion (Apache web server) of FileCloud on the app server nodes, using latest FileCloud server installer. If they are collocated, proceed to next step.
  2. Open the file $XAMPPROOT/config/cloudconfig.php (In linux it is /var/www/html/config/cloudconfig.php, in windows it is c:\xampp\htdocs\config\cloudconfig.php)

    // ... Cloud Database
    define("TONIDOCLOUD_DBSERVER", "mongodb://ip of Ha-ws1,ip of Ha-ws2,ip of Ha-ws3/?replicaSet=rs0&connectTimeoutMS=1000");
    // ... Audit Database
    define("TONIDOCLOUD_AUDIT_DBSERVER", "mongodb://ip of Ha-ws1,ip of Ha-ws2,ip of Ha-ws3/?replicaSet=rs0&connectTimeoutMS=1000");
    // … Settings Database
    define("TONIDOCLOUD_SETTINGS_DBSERVER", "mongodb://ip of Ha-ws1,ip of Ha-ws2,ip of Ha-ws3/?replicaSet=rs0&connectTimeoutMS=1000");

    Example: "mongodb://192.168.0.2,192.168.0.3,192.168.0.4/?replicaSet=rs0"

  3. Edit localstorageconfig.php and add/replace the following keys (In linux it is /var/www/html/config/localstorageconfig.php, in windows it is c:\xampp\htdocs\config\localstorageconfig.php)

    define("TONIDO_LOCALSTORAGE_DBSERVER", "mongodb://ip of Ha-ws1,ip of Ha-ws2,ip of Ha-ws3/?replicaSet=rs0&connectTimeoutMS=1000");
    

    Example: "mongodb://192.168.0.2,192.168.0.3,192.168.0.4/?replicaSet=rs0"

  4. <Step required only for S3 storage> : If you are using Amazon S3 for backend storage, then edit amazons3storageconfig.php and add/replace the following keys (In linux it is /var/www/html/config/amazons3storageconfig.php, in windows it is c:\xampp\htdocs\config\amazons3storageconfig.php)
    If this file is not found, copy the storage sample file and rename it (on each of the nodes). A temp space must be mounted to the same mount point on each of the nodes (For example /mount/fctemp in linux or F:\fctemp in windows).

    define("TONIDOCLOUD_NODE_COMMON_TEMP_FOLDER", "/mount/fctemp"); 


Set Up Managed Storage

Since the FileCloud app server nodes do not store any of the application data, the managed storage must be an external location (A NAS, ISCSI , SAN , Amazon S3 or Open stack)

In this example, we assume that either NAS or NFS mount is already available and mounted on each of the webserver nodes.

  1. Open the FileCloud Admin portal at http://<load balancer IP/ui/admin/index.html and log in.
  2. Navigate to Settings>Storage, set the mounted path, and click Save.
  3. Once the setup is complete, create user accounts by connecting to the admin portal. and tThen log into the user accounts using the load balancer IP (which will route the traffic to one of the app server nodes).
  4. To test app server HA, turn off one of the app servers by logging into the app server (for example, Ha-WS1) and stopping Apache (using service apache2 stop) . The service will be accessible because HaProxy will reroute traffic to Ha-WS2 or Ha-WS3 (depending on the routing selected).

Checking the Health of the HA System

FileCloud servers can be configured for a High Availability (HA) environment to improve service reliability and reduce downtime in your IT environment.

The admin portal has been enhanced to display all information about the health of each node.

  • Administrators can run a system check and it will show one record for each node of the HA system, with data about its health.
  • Cron will continue adding node information to the checks.
  • This data will help you determine node information such as code level and MQ status.

Since Cron is providing the data for the system check, it can take a few minutes for Cron to run and collect the data.

To see the System Check:

  1. Open a browser and log in to the admin portal. 
  2. From the left navigation pane, under SYSTEM, select Checks

Other Considerations

NTFS Service

If you are using NTFS, then the NTFS service must be started on ALL nodes. The local webserver will use the local NTFS service in order to handle NTFS permissions. Please note, if you are doing real time indexing of network folders, you should only enable indexing on one NTFS helper.

Document Preview

If you have enabled document preview, then Open Office service must be started in ALL nodes.  The local webserver will use the local Open Office service to handle document preview