Web Editing with Google Apps
Beginning with FileCloud 21.3, you can integrate FileCloud with Google Apps to make an additional Web Edit option. Google Apps cannot replace your current WOPI client, but may be added as an additional option, so that when users select to Web Edit docx, xlsx, pptx files, both the WOPI client and the Google app are listed as options for opening it:
In FileCloud's mobile apps, files can be viewed but not edited in Google Apps.
- Editing of some large files is not supported in Google Apps. See Files you can store in Google Drive for specific size limitations.
- To open a Google Apps editor in incognito windows, you may first have to grant Google Docs the correct permissions or unblock third party cookies.
To integrate with Google Apps:
You must have a Google account that you can use to sign in to the Google Cloud Console in order to integrate your system with Google Apps.
- Access the Google Cloud Console at https://console.cloud.google.com and sign in.
- Go to Home > Dashboard.
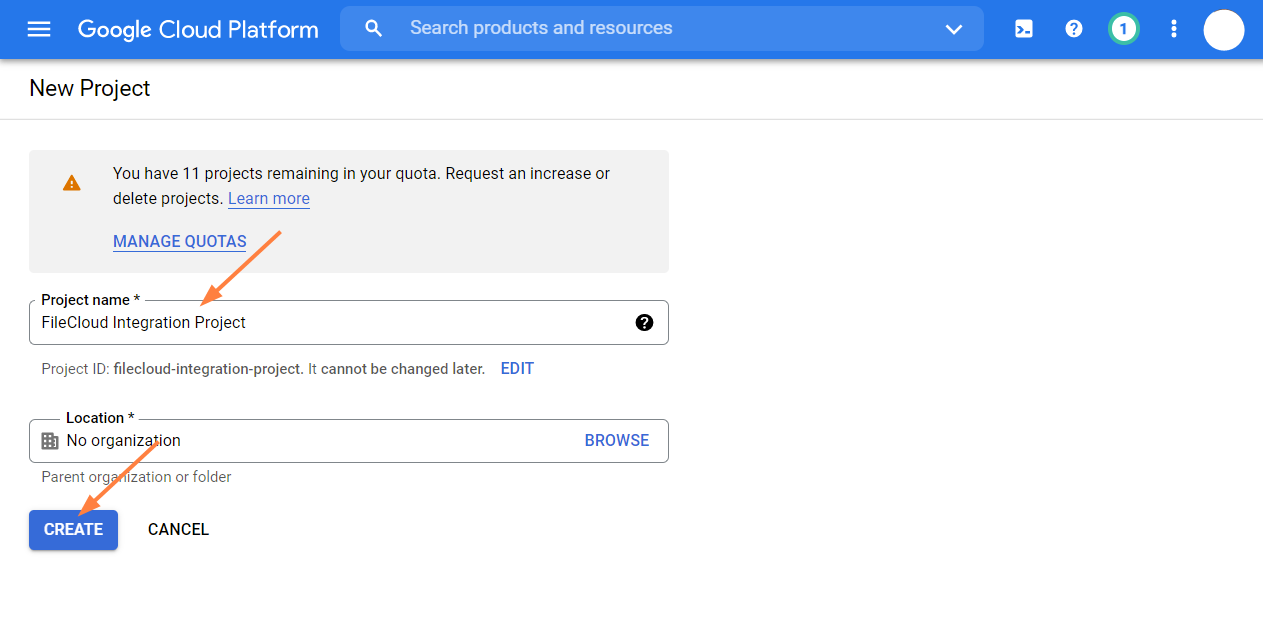
- Click Create Project.

A New Project screen opens. - Give the project a name and click Create.
The project opens in the dashboard. - In the navigation panel, click APIs & Services > Dashboard.
(If the navigation panel is not visible, click the three bars in the upper-left corner of the screen to open it.) - Click Enable APIs and Services.

- Search for Google Drive API , select it, and enable it.

- Then go back to the main navigation pane, and choose APIs & Services > OAuth consent screen.

- For User Type, choose Internal or External depending on the following guidelines:
- Internal means the integration is limited to Google Workspace users within the organization (email domain). External allows any Google account.
- Free google accounts only allow External users, because there is no Google Organization. Paid google accounts can use both, but Internal is only allowed if there’s a Google Organization set up.
- External requires the Google Project to be published into production status. It also may require the Google Project to be verified if it displays an icon or display name for the project on the OAuth consent screen.
- Click Create.

An Edit app registration screen for the OAuth consent screen opens.
- Fill in the required information, and then click Save and Continue.
The registration screen for Scopes opens:
- Click Add or Remove Scopes.
An Update Selected Scopes screen opens. - Scroll to the bottom of the screen and manually add https://www.googleapis.com/auth/drive.file. Then click Add to Table.
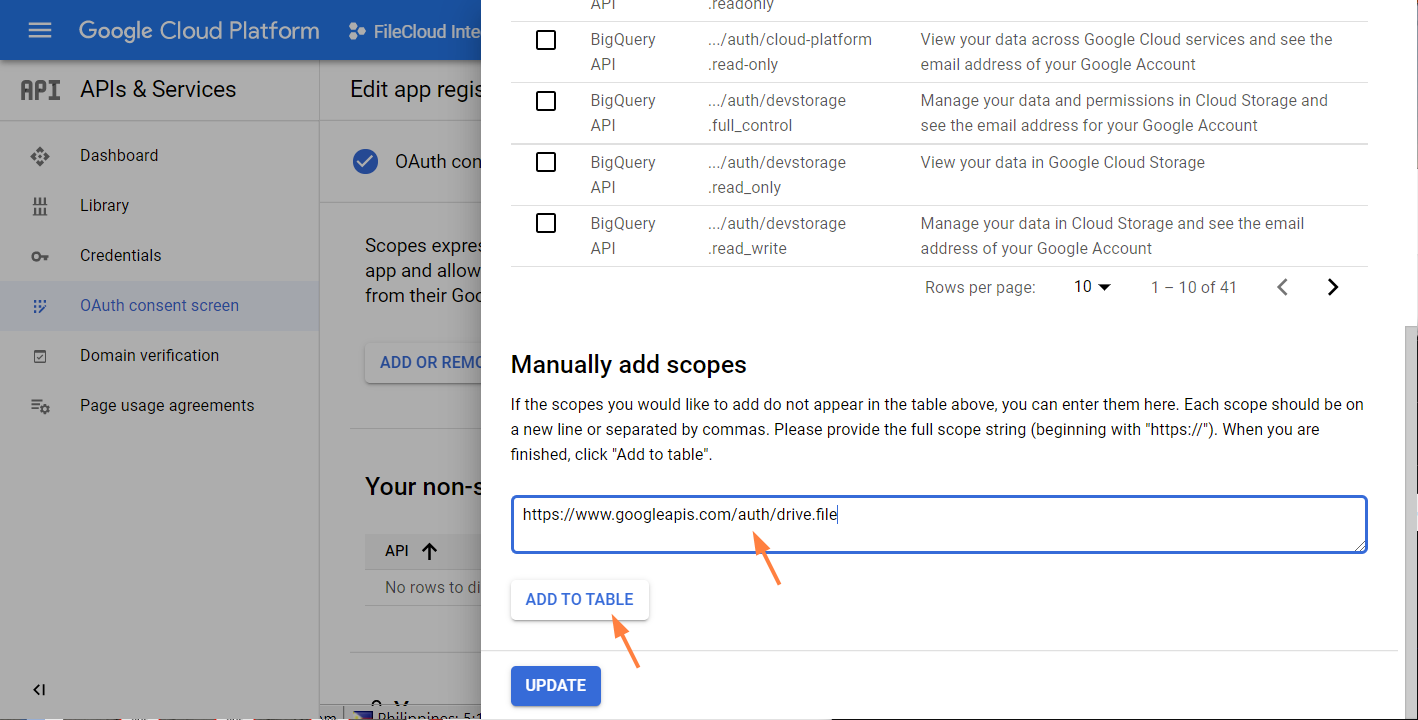
- Check it in the table and click Update.
It appears under Your non-sensitive scopes.
- Scroll to the bottom of the screen and click Save and Continue.
- In the Test Users screen, click Save and Continue.
- In the navigation panel, click OAuth consent screen again, and click Publish App, and then click confirm.

- In the navigation panel, click Credentials, and in the Credentials screen, click Create Credentials, and choose OAuth client ID.

The Create OAuth Client ID screen opens.
- In Application type, select Web application.
In Name, enter any name.
In URIs under Authorized redirect URIs enter your FileCloud URL appended with /core/googledocsoauth, for example, https://www.myfilecloud.com/core/googledocsoauth. - Click Create.
An OAuth client created message box opens:
- Click Download JSON, and download and save the JSON file.
Now we need set up Google Apps in FileCloud by adding the OAuth file and the HTML verification file.
- Go to https://www.google.com/webmasters/verification/home
- Click Add a Property, put your FileCloud URL (no endpoint appended this time).

- Click Continue.

- Download the HTML verification file.
- Now open the FileCloud Admin UI and go to Settings > Web Edit, and scroll down to Google Apps Access.
- Check Enable Google Apps.
- For Google OAuth Client ID, click Choose File to select the JSON file you downloaded and saved in the previous procedure, and then click Upload to upload it.
- For Google's Domain Verification File, click Choose File to select the HTML file that you just downloaded.

- Now go back to the https://www.google.com/webmasters/verification page where you have just downloaded the HTML file.
- Confirm you are not a robot.
- Click Verify.
Your users can now view and use the Open in Google [app] option for docx, xlsx, and pptx files.