Solr High Availability Setup with Pacemaker and Corosync
This setup requires two Linux Solr hosts with an NFS resource mounted on them, a quorum device, and an HAProxy load balancer. These resources must be in an active/passive configuration.
In the following documentation, the Solr servers run on Linux CentOS 7, but you may use any Linux distribution that enables you to set up a Pacemaker/Corosync cluster.
Introduction
FileCloud provides advanced search capabilities using Solr (an open source component) in the backend. For some cases, service continuity requires a high availability setup for Solr, which you can configure using the following instructions.
Prerequisites
- The cluster in the setup used in these instructions includes the following. Your setup should have similar components.
solr01 – Solr host cluster node
solr02 – Solr host cluster node
solr03 – quorum device cluster node
solr-ha – HAProxy host
NFSShare – NFS resource mounted on solr01 and solr02
- Install all patches available for FileCloud.
Perform the following steps for sor01, solr02, and solr03.
To update all packages, run:
yum update
- Reboot the system.
To install the package which provides the nfs-client subsystems, run:
yum install -y nfs-utils
To install wget, run:
yum install -y wget
Install Solr
On solr01:
- Perform a clean install of your Linux operating system.
To download the FileCloud installation script, filecloud-liu.sh, enter:
wget http://patch.codelathe.com/tonidocloud/live/installer/filecloud-liu.sh
To create the folder /opt/sorfcdata, enter:
mkdir /opt/solrfcdata
Mount the NFS filesystem under /opt/sorfcdata:
mount -t nfs ip_nfs_server:/path/to/nfs_resource /opt/solrfcdata
Install solr by running the FileCloud installation script:
Run:
sh ./filecloud-liu.sh
- Follow the instructions in the windows until you reach the selection screen:
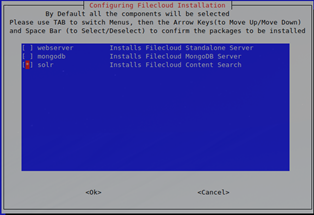
- Select solr only, then wait a few minutes until you receive confirmation that installation is complete.
Bind solrd to the external interface instead of localhost only:
On solr01 and solr02 open:
/opt/solr/server/etc/jetty-http.xml
and change:
<Set name="host"><Property name="jetty.host" default="127.0.0.1" /></Set>
to:
<Set name="host"><Property name="jetty.host" default="0.0.0.0" /></Set>
Change from systemV daemon control to systemd.
To stop Solr on solr01 and solr02, enter:
/etc/init.d/solr stop
To remove the existing service file in /etc/init.d/solr, enter:
rm /etc/init.d/solr
To create a new solrd.service file, enter:
touch /etc/systemd/system/solrd.service
To edit the solrd.service file, enter:
vi /etc/systemd/system/solrd.service
Enter the following service definition into the file:
### Beginning of File ### [Unit] Description=Apache SOLR [Service] User=solr LimitNOFILE=65000 LimitNPROC=65000 Type=forking Restart=no ExecStart=/opt/solr/bin/solr start ExecStop=/opt/solr/bin/solr stop ### End of File ###
- Save the solrd.service file.
- Verify that the service definition is working. Perform the following steps on solr01 and solr02:
Enter:
systemctl daemon-reload systemctl stop solrd
- Confirm that no error is returned.
Restart the server by entering:
systemctl start solrd systemctl status solrd
- Confirm that the output returned resembles:
Remove the content of folder /opt/solrfcdata on solr02 only.
systemctl stop solrd rm -rf /opt/solrfcdata/*
Update the firewall rules on solr01 and solr02 if necessary:
firewall-cmd --permanent --add-port 8983/tcp firewall-cmd --reload
Set Up the Pacemaker Cluster
On solr01, solr02, and solr03, open the /etc/hosts file and add the following. Substitute the IP address for each cluster node with the correct one).
cat /etc/hosts 127.0.0.1 localhost localhost.localdomain localhost4 localhost4.localdomain4 ::1 localhost localhost.localdomain localhost6 localhost6.localdomain6 192.168.101.59 solr01 192.168.101.60 solr02 192.168.101.61 solr03
To install the cluster packages for solr01 and solr02, for each, enter:
yum -y install pacemaker pcs corosync-qdevice sbd
To enable and start the main cluster daemon for solr01 and solr02, for each, enter:
systemctl start pcsd systemctl enable pcsd
Set the same password on solr01 and solr02 for hacluster (the HA cluster user):
[passwd] hacluster
On solr01 and solr02, open network traffic on the firewall.
firewall-cmd --add-service=high-availability –permanent firewall-cmd --reload
On solr01 only, authorize the cluster node.
On solr01 only, enter.
pcs cluster auth solr01 solr02
- When prompted, enter your username and password.
Confirm that the following is returned:
solr01 Authorized solr02 Authorized
To create the initial cluster instance on solr01, enter:
pcs cluster setup --name solr_cluster solr01 solr02
To start and enable the cluster instance on solr01, enter:
pcs cluster start --all pcs cluster enable --all
Set up the Qdevice (Quorum Node)
Install corosync on solr03:
yum install pcs corosync-qnetd
Start and enable the pcs daemon (pcsd) on solr03:
systemctl enable pcsd.service systemctl start pcsd.service
Configure the Qdevice daemon on solr03:
pcs qdevice setup model net --enable –start
If necessary, open firewall traffic on solr03:
firewall-cmd --permanent --add-service=high-availability firewall-cmd --add-service=high-availability
Set the password for the HA cluster user on solr03 to the same value as the passwords on solr01 and solr02:
[passwd] hacluster
On solr01, authenticate solr03:
pcs cluster auth solr03
When prompted, enter your username and password.
On solr01, add the Qdevice (solr03) to the cluster:
pcs quorum device add model net host=solr03 algorithm=lms
On solr01, check the status of the Qdevice (solr03)
pcs quorum status
Confirm that the information returned is similar to:
Quorum information ------------------ Date: Wed Aug 3 10:27:26 2022 Quorum provider: corosync_votequorum Nodes: 2 Node ID: 1 Ring ID: 2/9 Quorate: Yes Votequorum information ---------------------- Expected votes: 3 Highest expected: 3 Total votes: 3 Quorum: 2 Flags: Quorate Qdevice Membership information ---------------------- Nodeid Votes Qdevice Name 2 1 A,V,NMW solr02 1 1 A,V,NMW solr01 (local) 0 1 Qdevice
Install soft-watchdog
On solr01 and solr02, set up automatic soft-watchdog module to load whenever you reboot:
echo softdog > /etc/modules-load.d/watchdog.conf
Reboot solr01 and solr02 to activate soft-watchdog. First reboot solr01, and wait for confirmation. Then reboot solr02.
reboot
Enable the stonith block device (sbd) mechanism in the cluster
The sbd mechanism manages the watchdog and initiates stonith.
In solr01 and solr02, enter the enable sbd command:
pcs stonith sbd enable
On solr01, restart the cluster to activate enabling of sbd.
pcs cluster stop --all pcs cluster start --all
On solr01, check the status of sbd:
pcs stonith sbd status
Confirm that the information returned is similar to:
SBD STATUS <node name>: <installed> | <enabled> | <running> solr01: YES | YES | YES solr02: YES | YES | YES
Create cluster resources
On solr01, create nfsmount.
pcs resource create NFSMount Filesystem device=192.168.101.70:/mnt/rhvmnfs/solrnfs directory=/opt/solrfcdata fstype=nfs --group solr
Note: Set the parameter device to the nfs server and nfs share which is being used in the configuration.
On solr01, check the status of nfsmount.
pcs status
Confirm that the information returned is similar to:
Cluster name: solr_cluster Stack: corosync Current DC: solr01 (version 1.1.23-1.el7_9.1-9acf116022) - partition with quorum Last updated: Wed Aug 3 12:22:36 2022 Last change: Wed Aug 3 12:20:35 2022 by root via cibadmin on solr01 2 nodes configured 1 resource instance configured Online: [ solr01 solr02 ] Full list of resources: Resource Group: solr NFSMount (ocf::heartbeat:Filesystem): Started solr01 Daemon Status: corosync: active/enabled pacemaker: active/enabled pcsd: active/enabled sbd: active/enabled
Change the recovery strategy for nfsmount.
pcs resource update NFSMount meta on-fail=fence
On solr01, create the cluster resource solrd.
pcs resource create solrd systemd:solrd --group solr
On solr01, check the status of solrd:
pcs status
Confirm that the information returned is similar to:
Cluster name: solr_cluster Stack: corosync Current DC: solr01 (version 1.1.23-1.el7_9.1-9acf116022) - partition with quorum Last updated: Wed Aug 3 12:25:45 2022 Last change: Wed Aug 3 12:25:22 2022 by root via cibadmin on solr01 2 nodes configured 2 resource instances configured Online: [ solr01 solr02 ] Full list of resources: Resource Group: solr NFSMount (ocf::heartbeat:Filesystem): Started solr01 solrd (systemd:solrd): Started solr02 Daemon Status: corosync: active/enabled pacemaker: active/enabled pcsd: active/enabled sbd: active/enabled
On solr01, set additional cluster parameters:
pcs property set stonith-watchdog-timeout=36 pcs property set no-quorum-policy=suicide
Configure haproxy on its dedicated host
Note: Make sure solr-ha is cleaned up before you install haproxy on it.
On solr-ha, install haproxy:
yum install -y haproxy
On solr-ha, configure haproxy to redirect to an active solr node.
Back up /etc/haproxy/haproxy.cfg.
mv /etc/haproxy/haproxy.cfg /etc/haproxy/haproxy.cfg_bck
Create a new empty copy of /etc/haproxy/haproxy.cfg, and enter the content below into it. Make sure that the parameters solr01 and solr02 point to the full DNS name or to the IP address of the cluster nodes.
#### beginning of /etc/haproxy/haproxy.cfg ### global log 127.0.0.1 local2 chroot /var/lib/haproxy pidfile /var/run/haproxy.pid maxconn 4000 user haproxy group haproxy daemon stats socket /var/lib/haproxy/stats defaults mode http log global option httplog option dontlognull option http-server-close option forwardfor except 127.0.0.0/8 option redispatch retries 3 timeout http-request 10s timeout queue 1m timeout connect 10s timeout client 1m timeout server 1m timeout http-keep-alive 10s timeout check 10s maxconn 3000 frontend solr_front *:8983 default_backend solr_back backend static balance roundrobin server static 127.0.0.1:4331 check backend solr_back server solr01 solr01:8983 check server solr02 solr02:8983 check #### beginning of /etc/haproxy/haproxy.cfg ###
On solr-ha, start haproxy.
systemctl enable haproxy systemctl start haproxy
Solr service is now available on host solr-ha on port 8983. However, it is really running on solr01 or solr02.