Setting up FileCloud Managed S3 Storage
Optimized file upload is available for managed S3 storage beginning in FileCloud 23.241. The settings added for optimized uploads are noted in the table in Step 3, below.
As an administrator, you can integrate FileCloud Server to store user data on an Amazon S3 storage server.
|
|
|---|

![]() Getting Started with Amazon Simple Storage Service
Getting Started with Amazon Simple Storage Service
WARNINGS:
- Only change the FileCloud storage type to S3 for new installations.
- Do not change the FileCloud storage type to S3 if FileCloud has been in use and data is already stored.
- Be very careful when changing the storage path, If done improperly it could lead to data loss.
- When changing the storage type from local to Amazon S3, the files and folders that have already been saved to local storage will not automatically be moved to S3 storage.
- For existing files and folders, the administrator must manually export them from local storage before changing the storage type.
- After changing the storage type to S3, the administrator must manually import pre-existing files and folders.
- If the S3 Bucket Name, S3 Secret or S3 Key is changed after initial S3 configuration then please restart Cron and fcorchestrator (message queue) service.
- The S3 Bucket should NEVER be modified outside of FileCloud subsystem.
- Do not add/edit/modify files directly using S3 tools. Doing so will destabilize your FileCloud installation.
Integrate Amazon S3 Storage
In this step you will need to access WWWROOT. It is typically located at:
Windows | Linux |
|---|---|
| c:\xampp\htdocs | /var/www/html |
To enable Amazon s3 storage as the backend:
- To make sure that your server does not have any time variations, set up the time on your server to be synchronized.
Open the following file for editing:
WWWROOT/config/cloudconfig.php
Find the following line:
define("TONIDOCLOUD_STORAGE_IMPLEMENTATION", "local");Change it to this line:
define("TONIDOCLOUD_STORAGE_IMPLEMENTATION", "amazons3");- Save and close the file.
Find the following file:
WWWROOT/config/amazons3storageconfig-sample.php
Rename it to:
WWWROOT/config/amazons3storageconfig.php
![]() Nothing needs to be added or edited in amazons3storageconfig.php
Nothing needs to be added or edited in amazons3storageconfig.php
Now configure your S3 credentials and storage settings.
To configure S3 storage credentials and settings:
- In the FileCloud admin portal's left navigation bar, scroll down and click Settings. Then, on the Settings navigation page, click Storage
 .
.
The Managed Storage settings page opens by default. - Type in or select the S3 settings for your environment (the settings that appear above the Save S3 Settings button).
Definitions of the settings appear in the table below. - Click Save S3 Settings.
- Enter values for the settings below it or leave the default settings.
Definitions of the settings appear in the table below. - Click Save.
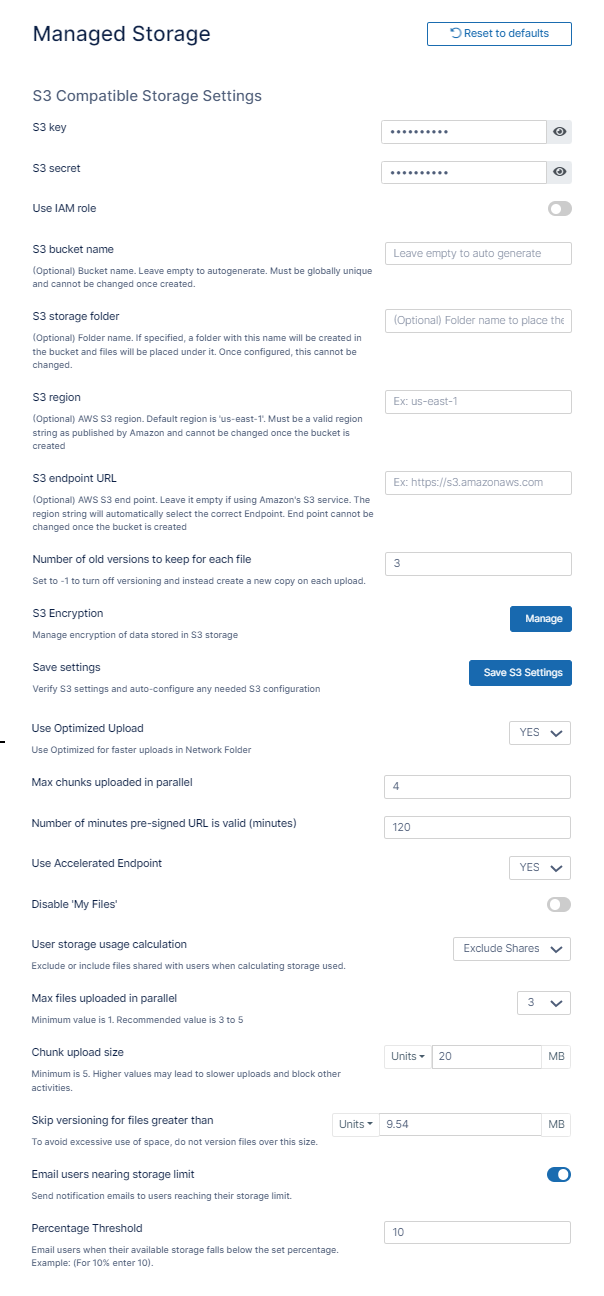
Field | Description | FileCloud Version |
|---|---|---|
| S3 key | This is your amazon authentication key (To get your access key, visit Amazon security portal) . For IAM user, it requires at least the following permissions. | |
| S3 secret | This is your amazon authentication secret (To get your access key, visit Amazon security portal). For IAM user, it requires at least the following permissions . | |
| Use IAM role | Either check Use IAM role or type in authentication credentials in S3 Key and S3 Secret. Note: To use an IAM role, you must attach it to your E2 instance. See the page Attach an IAM role to an instance in the AWS documentation for instructions. | |
| S3 bucket name | Provide a bucket name. The bucket should be new (in some circumstances, previously used buckets in FileCloud could be used). It is very important that the S3 bucket is never modified outside of the FileCloud subsystem. | |
| S3 storage folder | Optional: All files will be stored inside this root storage folder.
|
|
| S3 region | Optional: Provide the region string. If the region is not provided, then US Standard region will be used.
| |
| S3 endpoint URL | Optional: This is the S3 endpoint.
To use an AWS end point, it must be one of the values published AWS S3 endpoints | |
| Number of old versions to keep for each file | If a file with the same path and name is uploaded, FileCloud versions the file. This setting determines number of recent versions that FileCloud should retain. To disable versioning completely, set the number of versions to 0. | |
| S3 Encryption | Allows you to manage encryption. | |
| Save settings | Click this button after you have entered the S3 settings above it to validate them and configure any automated values. | |
| Use Optimized Upload | Optimized upload is available in FileCloud 23.241, and uses a faster method for uploading files to S3 storage. If you enter Yes to use optimized storage, you must also configure a Cross Origin Resource Sharing (CORS) policy for your S3 bucket. The CORS policy enables you to access resources from other domains while you are using the optimized upload settings. To configure the CORS policy, see Step 2, above. | 23.241 |
| Max chunks uploaded in parallel | Only appears if Use Optimized Upload is set to Yes. | 23.241 |
| Number of minutes pre-signed URL is valid (minutes) | Only appears if Use Optimized Upload is set to Yes. | 23.241 |
| Use Accelerated Endpoint | Only appears if Use Optimized Upload is set to Yes. | 23.241 |
| Disable 'My Files' | If you are only using the "Network Folders" features of FileCloud and don't want to show "My Files", you can enable this checkbox. If there are existing data in "My Files" section, the data will no longer be accessible. Certain functions that depend on My Files will no longer be available. | |
| User storage usage calculation | When the user storage usage is reported, the shares used by the user can also be counted towards the quota. This can be changed by selecting the appropriate drop-down option. | |
| Max files uploaded in parallel | Number of files that can be uploaded at the same time when multiple files are uploaded. Default is 3. The recommended number is 3 to 5. Higher values may slow down the upload process and lower system efficiency. | 23.241 |
| Chunk upload size | The maximum size in MB for chunks uploaded. Default is 40. If size is set too high, the upload process may be slow down and other operations may be blocked. | 23.241 |
| Skip versioning for files greater than | Any file larger than the specified value will not be versioned. | |
| Email users nearing storage limit | If this option is enabled then automatic emails with notifications are sent to users reaching their storage limit. | |
| Percentage Threshold | Defines at what point the percentage of unused managed storage space is considered low. For example, if the value is set to 20, then storage is considered low if more than 80% of managed storage space is used. When unused storage is less than this value, an automatic email notification is sent to the admin. If the above option, Email Users Nearing Storage Limit is enabled, an automatic email notification is also sent to the user if their available storage falls below the set percentage. |
To protect data at rest in FileCloud Server, you can use S3 Managed Storage Encryption.
- The communication from FileCloud to AWS will use SSL encryption resulting in complete protection for data in transit.
- Once encryption is set up correctly, the field S3 Encryption appears.
FileCloud supports the following server side encryption types:
| Encryption Type | Notes |
|---|---|
| Server-Side Encryption with Amazon S3-Managed Keys (SSE-S3) | All data is encrypted at rest using AES256 bit encryption. The data can only be accessed using the supplied key/secret credentials. The data will be accessible via S3 Console (which should NOT done for FileCloud Managed storage data) |
| Server-Side Encryption with AWS KMS-Managed Keys (SSE-KMS) | Similar to SSE-S3 but the key itself is managed using Amazon's KMS service. This allows management of specific keys and their permissions for encrypting the data. The data is still encrypted at rest and is accessible via S3 Console with appropriate credentials. |
| Server-Side Encryption with Customer-Provided Keys (SSE-C) | The data is encrypted using the customer supplied 32 bit encryption key. This option has SLOWER performance due to restrictions on how this data can be decrypted (Amazon server is NOT be able to decrypt the data; the data has be first downloaded to FileCloud server and then decrypted). The data is NOT accessible via S3 console as well.
|
WARNINGS:
- Enabling encryption will start a process that attempts to encrypt all available data in the bucket as well as all new data.
- This process can take some time depending on the amount of existing data in the bucket.
- It is recommended that you modify the encryption setting when there is minimal activity on the FileCloud Server.
Although changing the Encryption setting can be done at any time, we recommend using off-peak hours to avoid any unexpected access issues.
To enable S3 encryption:
You must enable an additional extension in the php.ini file |
|
AND Your xampp folder is installed in a location other than c:\xampp You must add a key to the cloudconfig.php file
|
|
Then go to Enabling S3 Storage Encryption | |
Upload large files on an Amazon S3 storage server
Beginning with FileCloud 23.241, this process is only effective when you choose Legacy for Upload Method. When you choose Optimized for Upload Method, the value in Chunk Upload Size is used.
The maximum number of parts per upload accepted by AWS is 1000; to successfully upload files and images in excess of 500 GB, set up an appropriate chunk size. You may set the size as high as 5000 MB.
To set a custom chunk size:
- Open the file amazons3storageconfig.php located in:
Windows: c:\xampp\htdocs\config\
Linux: /var/www/html/config/ Uncomment the following line, and set the value to the necessary chunk size in MB, up to 5000.
define("TONIDOCLOUD_S3_MULTIPART_CHUNKSIZE_IN_MB", 5);
Troubleshoot
If you encounter issues where documents stored in AmazonS3 share object storage cannot be edited using a text editor, you can use a workaround to correct this.
Workaround:
- Change the Header set in the Content-Security-Policy
- Use the Amazon S3 console to add a cross-origin resource sharing (CORS) configuration to an S3 bucket.
Change the Content-Security-Policy
Content Security Policy (CSP) is an HTTP header that allows site operators control over where resources can be loaded from on their site.
- The use of this header is the best method to prevent cross-site scripting (XSS) vulnerabilities.
To change the Header set in CSP:
- Open a command-line prompt.
Type in the following code (or copy and paste):
Content-Security-Policy: "default-src 'self' *.live.com *.amazonaws.com; style-src 'unsafe-inline' 'self';script-src 'unsafe-inline' 'unsafe-eval' 'self';font-src 'self' data:;img-src 'self' data
Add a CORS Policy
To configure your bucket to allow cross-origin requests, you add CORS configuration to the bucket. A CORS configuration is an XML document that defines rules that identify the origins that you will allow to access your bucket, the operations (HTTP methods) supported for each origin, and other operation-specific information.
![]() For more information about CORS, see Cross-Origin Resource Sharing (CORS) in the Amazon Simple Storage Service Developer Guide.
For more information about CORS, see Cross-Origin Resource Sharing (CORS) in the Amazon Simple Storage Service Developer Guide.
To allow the use of a text editor:
![]() The CORS configuration is an XML file. The text that you type in the editor must be valid XML.
The CORS configuration is an XML file. The text that you type in the editor must be valid XML.
- Sign in to the AWS Management Console and open the Amazon S3 console at https://console.aws.amazon.com/s3/.
- In the Bucket name list, choose the name of the bucket that you want to create a bucket policy for.
- Choose Permissions, and then choose CORS configuration.
In the CORS configuration editor text box, type or copy and paste the following CORS configuration:
<CORSConfiguration>
    <CORSRule>
    <AllowedOrigin>*</AllowedOrigin>
    <AllowedMethod>GET</AllowedMethod>
    <AllowedHeader>*</AllowedHeader>
    <MaxAgeSeconds>3000</MaxAgeSeconds>
    </CORSRule>
</CORSConfiguration>
Click Save.
If you are having problems in playing mp4 videos, you should add a line to the .htaccess file.
To add a line to the .htaccess file:
- Open the following file:
Windows: C:\xampp\htdocs\.htaccess
Linux: /var/www/html/.htaccess
Add the following line:
Header set Content-Security-Policy: "default-src 'self' *.live.com *.amazonaws.com; style-src 'unsafe-inline' 'self';script-src 'unsafe-inline' 'unsafe-eval' 'self';font-src 'self' data:;img-src 'self' *.live.com data: *.duosecurity.com *.amazonaws.com"
Add a CORS Policy
To configure your bucket to allow cross-origin requests, you add CORS configuration to the bucket. A CORS configuration is an XML document that defines rules that identify the origins that you will allow to access your bucket, the operations (HTTP methods) supported for each origin, and other operation-specific information.
![]() For more information about CORS, see Cross-Origin Resource Sharing (CORS) in the Amazon Simple Storage Service Developer Guide.
For more information about CORS, see Cross-Origin Resource Sharing (CORS) in the Amazon Simple Storage Service Developer Guide.
To allow the use of a text editor:
![]() The CORS configuration is an XML file. The text that you type in the editor must be valid XML.
The CORS configuration is an XML file. The text that you type in the editor must be valid XML.
- Sign in to the AWS Management Console and open the Amazon S3 console at https://console.aws.amazon.com/s3/.
- In the Bucket name list, choose the name of the bucket that you want to create a bucket policy for.
- Choose Permissions, and then choose CORS configuration.
In the CORS configuration editor text box, type or copy and paste the following CORS configuration:
<CORSConfiguration>
    <CORSRule>
    <AllowedOrigin>*</AllowedOrigin>
    <AllowedMethod>GET</AllowedMethod>
    <AllowedHeader>*</AllowedHeader>
    <MaxAgeSeconds>3000</MaxAgeSeconds>
    </CORSRule>
</CORSConfiguration>
Click Save.