SAML Single Sign-On Support

Updates to SAML SSO

As of  FIleCloud Version 19.1, the ability to limit users to SSO by group is available.

As of FIleCloud Version 19.2, FileCloud can detect an SSO email and automatically redirect the user to the corresponding IDP provider with prefilled login information for the user.

As of FIleCloud Version 19.3, you can override the default SSO port. 

As of FileCloud Version 20.3.2, to achieve high availability, you can configure FileCloud to support multiple memcache servers.

You can use SAML SSO to control the authorization and authentication of hosted user accounts that can access FileCloud Web based interface.

  • SAML is an XML based open standard data format for exchanging authentication and authorization data between parties.
  • FileCloud supports SAML (Security Assertion Markup Language) based web browser Single Sign On (SSO) service
  • FileCloud acts as a Service Provider (SP) while the Customer or Partner acts as the identity provider (IdP).  FileCloud SAML SSO service is based on SAML v2.0 specifications.

SSO Login Diagram

The following process explains how the user logs into a hosted FileCloud application through customer-operated SAML based SSO service.

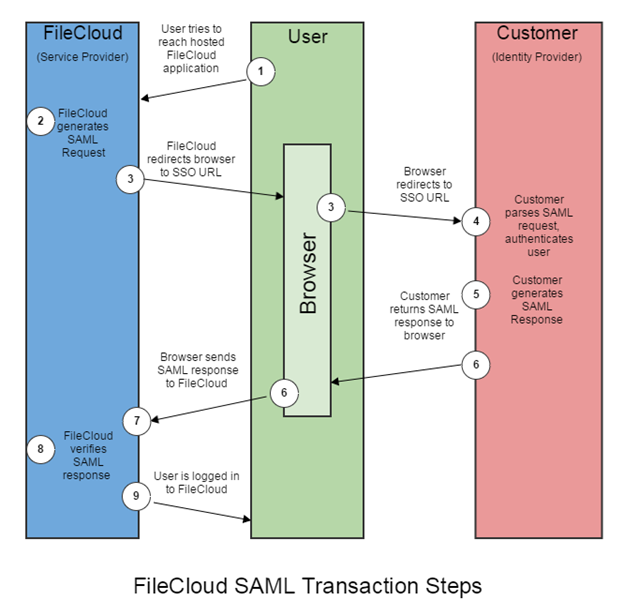
  1. The user attempts to reach the hosted FileCloud application through the URL.
  2. FileCloud generates a SAML authentication request. The SAML request is embedded into the URL for the customer’s SSO Service.
  3. FileCloud sends a redirect to the user’s browser. The redirect URL includes the SAML authentication request and is submitted to customer’s SSO Service.
  4. The Customer’s SSO Service authenticates the user based on valid login credentials.
  5. The customer generates a valid SAML response and returns the information to the user’s browser.
  6. The customer SAML response is redirected to FileCloud.
  7. The FileCloud authentication module verifies the SAML response.
  8. If the user is successfully authenticated, the user will be successfully logged into FileCloud.

When the IdP successfully authenticates the user account, FileCloud (SP) authentication module verifies that the user account exists in FileCloud.

  • If the user account does not exist in FileCloud, then a new user account is created and the user is logged into FileCloud.

SSO Configuration Steps

In order to successfully configure SAML SSO, the following steps must be followed.
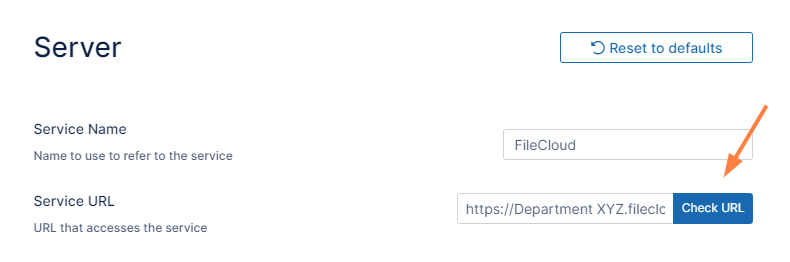
Configuring the Apache server requires you to add the Alias directive to the simplesaml.php configuration file.

Pre-requisite: The mcrypt module must be installed on the FileCloud Server.

  • In Windows, it should be installed by default.
  • In Linux, if mcrypt is not installed, it must be installed

To add the Alias directive:

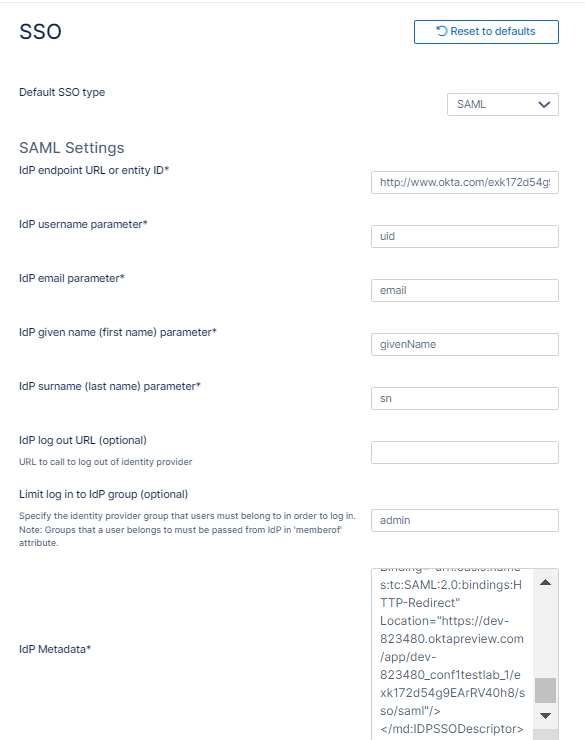
Use the following table to understand the typical entries in Linux and windows.

(lightbulb) You can change these settings if the FileCloud is installed under a different WEB ROOT Folder.

OSInstructions
Windows
  1. Navigate to the following directory

    c:\xampp\apache\conf\extra
  2. Open the following file for editing

    httpd-filecloud.conf 
  3. Add the following line at the end of the file

    Alias /simplesaml "/xampp/htdocs/thirdparty/simplesaml/www"
  4. Save the file.
  5. Open the FileCloud Control Panel.
  6. Use the control panel to stop and start the Webserver.
Linux
  1. Go to the following directory:

    /etc/apache2/sites-enabled/
  2. Open the following file for editing:

    000-default.conf
  3. Add the following line within <VirtualHost *:80> for HTTP connection or <VirtualHost *.443> for HTTPS connection. You can place it under the line DocumentRoot /var/www/html.

    Alias /simplesaml /var/www/html/thirdparty/simplesaml/www --→ (Ubuntu 16.04 and higher versions)
    Alias /simplesaml /var/www/thirdparty/simplesaml/www --→> (Ubuntu 14.04 and lower versions)
    
  4. To restart the apache webserver, run the following command:

    /etc/init.d/apache2 restart

To ensure the correct FileCloud URL is set, and that it uses HTTPS:

  1. In the admin portal, go to Settings > Server.
  2. In the Server URL field, confirm that your URL begins with HTTPS.
  3. Click Check URL to make sure your URL is valid.


To set the SSO type in FileCloud:

  1. Log into the FileCloud admin portal.

  2. In the left navigation panel, click Settings.

  3. Select the SSO tab.

  4. In Default SSO Type, select SAML.

Active Directory Federation Services (ADFS) Support

When SAML SSO Type is selected and ADFS is enabled in FileCloud:

  • FileCloud will act as a Service Provider (SP)
  • FileCloud also acts as a claims aware application.

As a claims-aware application, FileCloud:

  • Accepts claims in the form of ADFS security tokens from Federation Service
  • Can use ADFS claims to support Single Sign On (SSO) into FileCloud

To specify the identity claims that are sent to the FileCloud refer to the IdP Configuration section below.

(lightbulb) When ADFS is used, the IdP (Identity Provider) in these instructions refers to Active Directory Federation Server.

To configure IdP settings in FileCloud:

  1. Log into the FileCloud admin portal.

  2. In the left navigation panel, click Settings.

  3. Select the SSO tab.

  4. In Default SSO Type, verify it is set to SAML.

  5. Set other parameters according to your IdP settings.


Use the following tables to understand the IdP settings.

FileCloud ParametersIdP Settings

ADFS as IdP

Data can be obtained from Federation Metadata

IdP End Point URLIdentity Provider URL

Identity Provider URL (Entity ID)

e.g. http://yourADFSdomainName/adfs/services/trust

Idp Username Parameter

Identifies the Username (must be unique for each user)

  • Usually uid or agencyUID
  • Default value: uid

NOTE: The username must be unique. If username sent by Idp is in email format, the email prefix will be used for username. The email prefix in this case must be
unique.

Identifies the Username (must be unique for each user)
Usually SAMAccountName or User Principal Name defined in claim rules.

NOTE: The username must be unique. If username sent by Idp is in email format,
the email prefix will be used for username. The email prefix in this case must be
unique. 

value: http://schemas.xmlsoap.org/ws/2005/05/identity/claims/upn or upn


IdP Email Parameter

Identifies the email of the user (must be unique)

Default value: mail

Identifies the email of the user (must be unique)

http://schemas.xmlsoap.org/ws/2005/05/identity/claims/emailaddress or emailaddress


IdP Given Name Parameter

Identifies the given name of the user

Default value: givenName

Identifies the given name of the user.

http://schemas.xmlsoap.org/ws/2005/05/identity/claims/givenname or givenname

IdP Surname Parameter

Identifies the surname of the user

Default value: sn

Identifies the sur name of the user

http://schemas.xmlsoap.org/ws/2005/05/identity/claims/surname or surname

IdP Log Out URL (Optional)URL for logging out of IdP

URL for logging out of IdP

Note: For this setting to be effective, you must also add a setting to the FileCloud config file:

  1. Open the configuration file:
    Windows: XAMPP DIRECTORY/htdocs/config/cloudconfig.php
    Linux: /var/www/config/cloudconfig.php
  2. To make the IdP Log Out URL setting effective, add:

    define("TONIDOCLOUD_SAML_SIGNED_LOGOUT", 1);

Limit Logon to IdP Group

(available in FileCloud Version 19.1 and higher)

IdP Group Name

  • Specifying a group name means that a user can login through SAML SSO only when the Identity Provider indicates that the user belongs to the specified IdP group
  • The IdP must send this group name through the memberof parameter
  • The memberof parameter can include a comma separated value of all groups to which the user belongs
Show the IdP Logon Screen

Identifies which Logon screen the user will see:

  • FileCloud screen = not selected
  • IdP screen = selected

Identifies which Logon screen the user will see:

  • FileCloud screen = not selected
  • IdP screen = selected
IdP MetadataIdentity Provider metadata in XML FormatFederation metadata in xml format
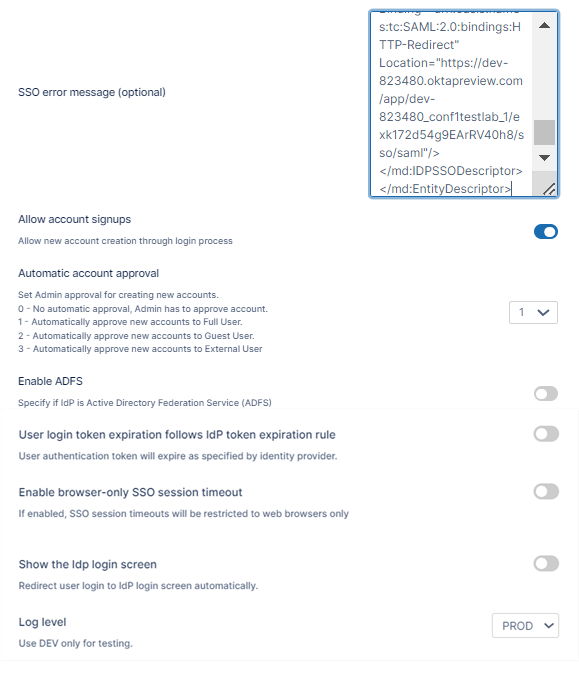
SSO Error Message (Optional)

Added in FileCloud 20.1

Custom error message that appears when a signin is invalid. Enter in HTML format.

In a multiple IDP environment, this is the error message for the default IDP. To include a message specific to each IDP, include the parameter <MESSAGE>.  See Integrating Multiple IDPs for help configuring multiple IDPs with error messages specific to each one..

Custom error message that appears when a signin is invalid. Enter in HTML format.

In a multiple IDP environment, this is the error message for the default IDP. To include a message specific to each IDP, include the parameter <MESSAGE>.  See Integrating Multiple IDPs for help configuring multiple IDPs and error messages specific to each one.

Allow Account Signups

Added in FileCloud 20.1

When TRUE, during the login process, if the user account does not exists, a new FileCloud user account is created automatically.When TRUE, during the login process, if the user account does not exists, a new FileCloud user account is created automatically.

Automatic Account Approval

Added in FileCloud 20.1

This setting works with the Allow Account Signups setting to determine:

  • If the account created by the user is disabled until the Administrator approves it
  • If the account is approved with a specific level of access automatically without intervention from the Administrator.
  • Possible values are:
    0 - No Automatic approval, Admin has to approve account
    1 - Automatically approve new accounts to Full User
    2 - Automatically approve new accounts to Guest User
    3 - Automatically approve new accounts to External User

See Integrating Multiple IDPs for help configuring multiple IDPs with automatic account approval settings specific to each one.


This setting works with the Allow Account Signups setting to determine:

  • If the account created by the user is disabled until the Administrator approves it
  • If the account is approved with a specific level of access automatically without intervention from the Administrator.
  • Possible values are:
    0 - No Automatic approval, Admin has to approve account
    1 - Automatically approve new accounts to Full User
    2 - Automatically approve new accounts to Guest User
    3 - Automatically approve new accounts to External User


See Integrating Multiple IDPs for help configuring multiple IDPs with automatic account approval settings specific to each one.

Enable ADFSNoYes
User login token expiration match Idp expiration

If enabled the user token expiration will be set based on Idp expiration settings

If not enabled user token expiration will be set based on FileCloud Session Timeout
(FileCloud admin UI - Settings - Server - Session Timeout in Days)

Default: No (Not enabled) 

If enabled the user token expiration will be set based on ADFS expiration settings

If not enabled user token expiration will be set based on FileCloud Session Timeout
(FileCloud admin UI - Settings - Server - Session Timeout in Days)

Default: No (Not enabled) 

Enable Browser-Only SSO Session Timeout

Added in FileCloud 23.232.1

If enabled, SSO session timeouts apply to browser sessions but not to client sessions.

If enabled, SSO session timeouts apply to browser sessions but not to client sessions.

Show the Idp Login ScreenIf enabled, automatically redirect user to Idp log-in screen.

If enabled, automatically redirect user to Idp log-in screen.

Log Level

Set the Log mode for the SAML Calls.

Default Value: prod (Do not use DEV for production systems)

Set the Log mode for the SAML Calls.

Default Value: prod (Do not use DEV for production systems)


Use the following URL (Entity ID) to register FileCloud as an SP with IdP or ADFS.  The URL below also provides the metadata of the FileCloud SP.

You can customize the user log-in screen to display the SSO log-in option along with the direct log-in option or to only display the SSO log-in.

To display the SSO log-in option along with the direct log-in option:

  1. From the left navigation pane, click Customization
  2. Select the General  tab, and then the Login sub-tab.

  3. Check Show SSO Link and Show Login Options.
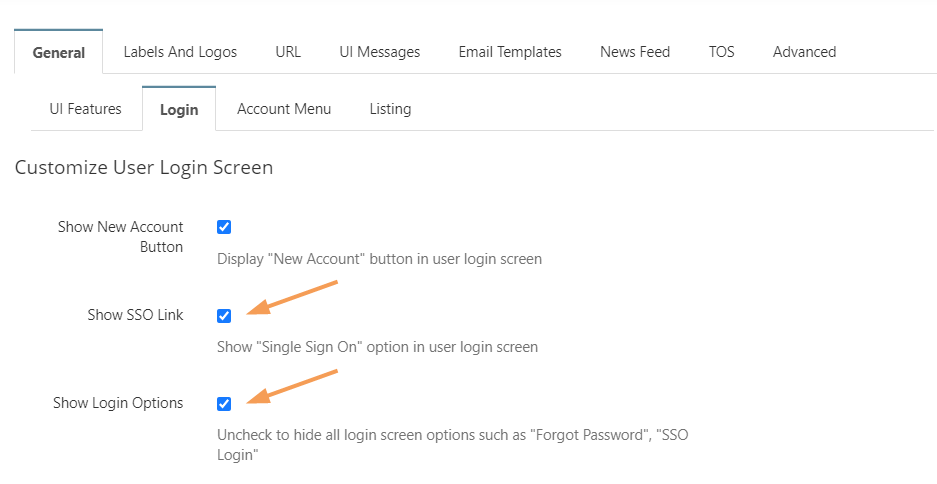
  4. Save your changes.
    Now, when users access the user portal log-in page, they will see:


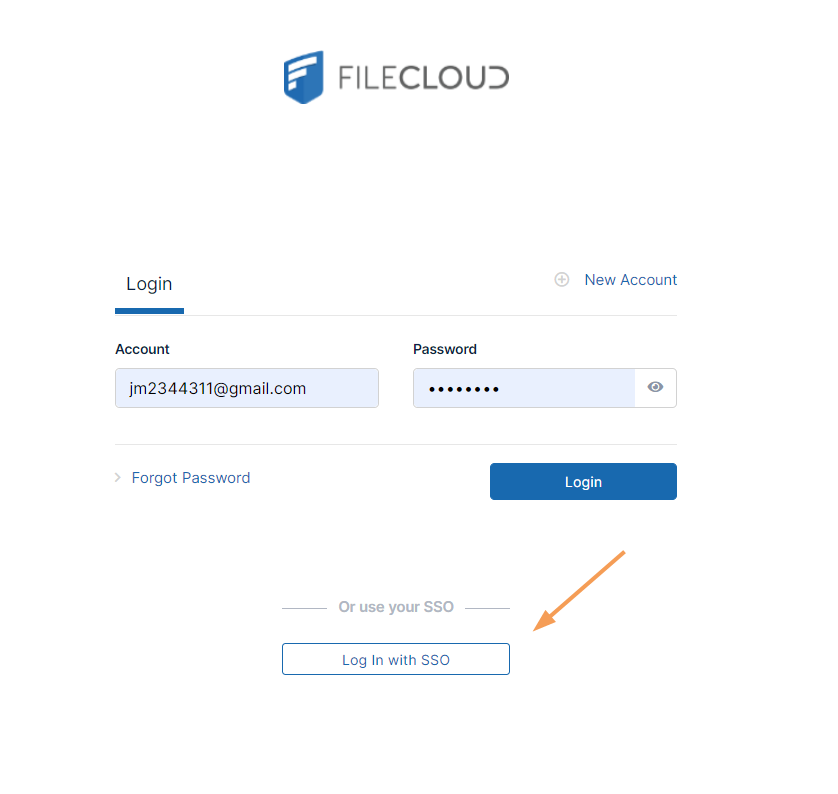
    On clicking the Single Sign-On link on the login page, the user is redirected to the SAML SSO Service web page. 


The SSO log-in option in the admin portal:

Starting with FileCloud 13.0, FileCloud admin interface also supports Single Sign-On. 


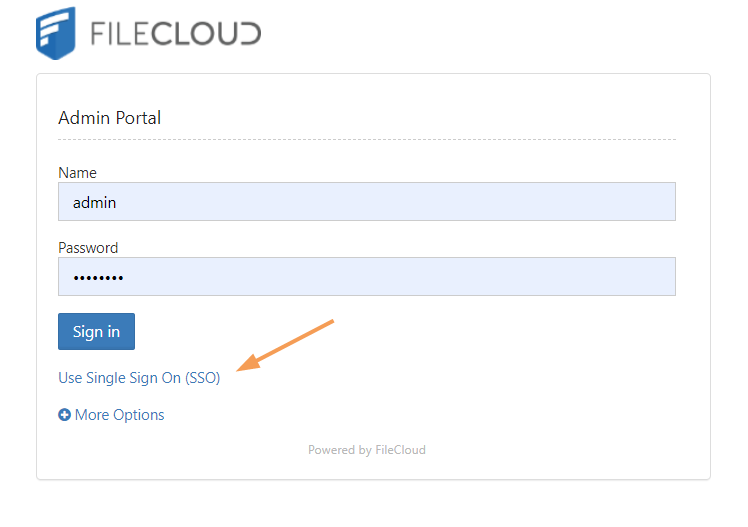
Default admin portal log-in screen


To only display the SSO log-in option:

In order to skip the FileCloud login page and send the user directly to the SAML SSO page you must add a setting to the cloudconfig.php file, as shown below. You can configure this option for the user portal login page and the admin portal login page.

To only display the SSO log-in option in the user portal:
This configuration option is available starting with FileCloud Version 19.3, It supports skipping the login page when the user accesses FileCloud with a domain name or with a full URL. 

  1. In the admin portal, go to Customization, and select the General  tab, and then the Login sub-tab.

  2. Check Show SSO Link and Show Login Options, and save your changes.
  3. Open the configuration file:
    Windows: XAMPP DIRECTORY/htdocs/config/cloudconfig.php
    Linux: /var/www/config/cloudconfig.php
  4. To only display the SSO log-in option:

    define("TONIDOCLOUD_SSO_DIRECT_ONLY", "1");

    An earlier version of this option is also effective in version of FileCloud prior to 19.3, but this redirect is only effective if the user specifies a domain name rather than a full URL. Instead of the above setting, use:

    define("TONIDOCLOUD_SSO_DIRECT", "1");

    When users enter the log-in page they will see:

To return to displaying other log-in options:

define("TONIDOCLOUD_SSO_DIRECT_ONLY", "0");


To display only SSO log-in in the admin portal:

Starting with Version 20.1, FileCloud supports skipping the login page when the admin accesses FileCloud with a domain name or with a full URL.

  1. Open the configuration file:
    Windows: XAMPP DIRECTORY/htdocs/config/cloudconfig.php
    Linux: /var/www/config/cloudconfig.php
  2. To only display the SSO log-in option:

Enter:

 define ("TONIDOCLOUD_SSO_DIRECT_ONLY_ADMIN", "1");

An earlier version of this option is also effective in versions of FileCloud prior to 20.1, but this redirect is only effective if the user specifies a domain name rather than a full URL. Instead of the above setting, use:

 define("TONIDOCLOUD_SSO_DIRECT_ADMIN", "1");


To enable secure cookies when using SimpleSAML to authenticate, proceed on the following.

  1. Open the SimpleSAML configuration file:
    Windows: XAMPP DIRECTORY/htdocs/thirdparty\simplesaml\config\config.php
    Linux: /var/www/config/thirdparty/simplesaml/config/config.php

  2. Change session.cookie.secure from FALSE to TRUE:

    'session.cookie.secure' => true,
  3. (Optional) For better cookie security set the session.cookie.samesite attribute to Strict or Lax according to the environment's needs.
    If the FileCloud site is embedded in an external site, it may be necessary to leave this setting null or set it to None to enable cookie sharing with the external site.

    'session.cookie.samesite' => 'Strict',
IssueDetails
Avoid Open Redirect

FileCloud may be vulnerable to an open redirect when SSO is implemented.

  • An open redirect is an application vulnerability that takes a parameter and redirects the user to the supplied parameter value without any validation.

This can be avoided by configuring the following setting:

  1. Navigate to the following directory:

    <FileCloud WEB ROOT>/thirdparty/simplesaml/config
  2. Open the following file for editing:

    config.php
  3. Add the following line:

     'trusted.url.domains' => array()

Restrict the Available

Admin Login Resources

The FileCloud admin portal can possibly allow 2 administrative login interfaces:

  • One at admin API interface: /admin
  • One at simpleSAML admin resource: /simpleSAML.

This can be avoided by changing the log level to "PROD" in SSO settings under settings in FileCloud admin interface. This will disable the SSO admin page under simpleSAML.

The password to the SSO admin page under /simpleSAML can be changed under 'auth.adminpassword' key in <FileCloud WEB ROOT>/thirdparty/simplesaml/config/config.php

Use the following table to read about issues that you may encounter and how to resolve them.

IssueSolution
FileCloud is hosted behind a Proxy

When FileCloud is hosted behind a proxy server, SAML will not automatically work.

Go to <FileCloud WEB ROOT>/thirdparty/simplesaml/config/filecloudconfig.php

Add Proxy Server Information here.

Format is as follows user:password@yourproxyserverurl.com

define("TONIDOCLOUD_SAML_PROXY", "ADD PROXY INFO HERE");

System Timezone Settings

After setting SAML log level to DEV. Log file will be created under <FileCloud WEB ROOT>/thirdparty/simplesaml/log/simplesamlphp.log

SimpleSAML_Error_Exception: Error 2 - strftime(): It is not safe to rely on the system's timezone settings. You are *required* to use the date.timezone setting or the date_default_timezone_set() function.

Solution: date.timezone setting must be set explicitly in php.ini


FileCloud is hosted behing a reverse proxy

When FileCloud is hosted behind a proxy server, SAML will not automatically work.

Go to <FileCloud WEB ROOT>/thirdparty/simplesaml/config/config.php

set the base url to 'baseurlpath' => 'http(s)://YOURFILECLOUDOMAIN/simplesaml/'

Debug page loginhttps://YOURFILECLOUDDOMAIN/simplesaml/module.php/core/frontpage_welcome.php
FileCloud in HA (High Availability) envrionment with multiple servers

In this scenario, SimpleSAML will most likely not work with default configuration and will require to run Memcache to manage the session.

Go to <FileCloud WEB ROOT>/thirdparty/simplesaml/config/config.php

set the store.type => memcache

and set

'memcache_store.servers' => array(
array(
array('hostname' => 'localhost'),
),
),

where 'localhost' must be replaced with IP of memcache server as appropriate.

Autofill Username or Email on the IDP screen when configured
TONIDOCLOUD_SAML_DOMAINS_ALLOWED 

When autofill will only work when username or email address is sent through POST from the FileCloud login page to IDP. Therefore, ensure that the IDP metadata accepts requests through only POST. For example, if the Idp Metadata contains the following 2 similar lines, remove the Redirect and only have the POST

<md:SingleSignOnService Binding="urn:oasis:names:tc:SAML:2.0:bindings:HTTP-Redirect" Location="https://mailinator-raja.okta.com/app/mailinatororg747392_myidp_1/exkgimvocj18Exx9g4x6/sso/saml"/>
<md:SingleSignOnService Binding="urn:oasis:names:tc:SAML:2.0:bindings:HTTP-POST" Location="https://mailinator-raja.okta.com/app/mailinatororg747392_myidp_1/exkgimvocj18Exx9g4x6/sso/saml"/>


Integrating with other applications


Override the default SSO port

In FileCloud Versions 19.3 and higher, you can override the default SSO port.

To override the default port:

  1. Open cloudconfig.php:
    Windows Location: XAMPP DIRECTORY/htdocs/config/cloudconfig.php
    Linux Location: /var/www/config/cloudconfig.php
  2.  Add the following line:

    define("TONIDOCLOUD_SSO_FULLURL_OVERRIDE", "https://filecloud.test.com");

Use multiple memcache servers

In FileCloud Versions 20.3.2 and higher, you can use multiple memcache servers with SAML SSO to achieve high availability.

To use multiple memcache servers:

  1. Open cloudconfig.php:
    Windows Location: XAMPP DIRECTORY/htdocs/config/cloudconfig.php
    Linux Location: /var/www/config/cloudconfig.php
  2. Add the following lines, including a hostname for each of the memcache servers.

    In this example, the IP addresses of the servers are 79.97.83.70 and 79.97.83.71.

    function SSO_MEMCACHED_SERVERS() {
    return [
    [
    ['hostname' => '79.97.83.70'],
    ['hostname' => '79.97.83.71'],
    ],
    ];
    }