Collabora is open-source software that supports web-based, real-time document editing and collaboration. Users can create and edit word processing files, spreadsheets, presentations, and vector graphics without downloading additional software. For FileCloud admins and users, Collabora can be a complementary tool for file creation; these files can then be shared, managed, and protected with FileCloud's robust feature stack.
First though, Collabora must be integrated with FileCloud. In this blog post, we will review the steps to install standalone code for Collabora in Ubuntu 22.04 LTS, which can be integrated with FileCloud 22.1 and later.
Install Collabora in Ubuntu 22.04 LTS
First, we will need to add the Collabora official key and repository in our separate standalone server Ubuntu 22.04 LTS.
curl -fsSL https://collaboraoffice.com/downloads/gpg/collaboraonline-release-keyring.gpg | sudo gpg -o /usr/share/keyrings/collaboraonline-release-keyring.gpg –dearmor
echo "deb [ arch=amd64,arm64 signed-by=/usr/share/keyrings/collaboraonline-release-keyring.gpg ] https://www.collaboraoffice.com/repos/CollaboraOnline/CODE-ubuntu2204 ./" | sudo tee /etc/apt/sources.list.d/collabora.list
Then we will install the Collabora code:
apt-get update -y
apt-get install apt-transport-https ca-certificates -y
apt install coolwsd code-brand -y
The output should match the following:

Once the installation completes, we will need to check that the service is up and running by executing this command:
systemctl status coolwsd
If Installation Fails:
The service may fail, likely because the TLS service is enabled by default.

To resolve this issue, we will disable TLS in coolwsd and enable TLS termination in reverse proxy. To do this, we must run the below commands and then restart the coolwsd service.
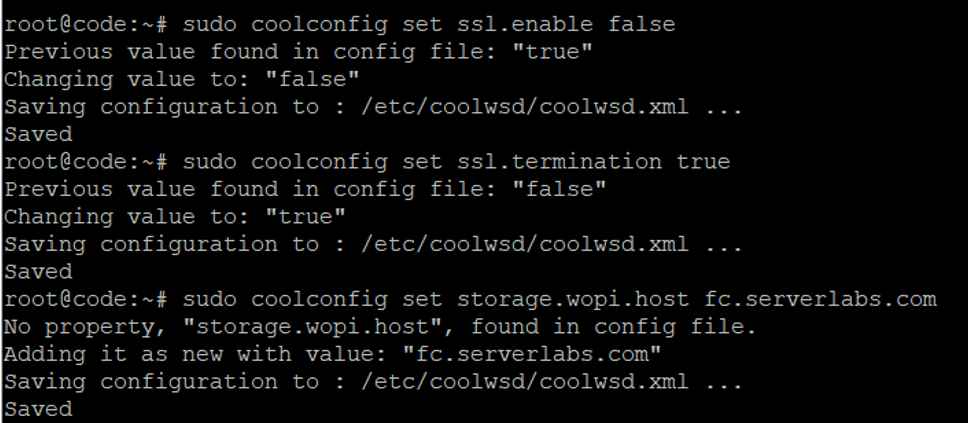
sudo coolconfig set ssl.enable false
sudo coolconfig set ssl.termination true
sudo coolconfig set storage.wopi.host <Your FileCloud FQDN>
Update URL Admin Credentials
In our example screenshots, we have used the URL: fc.serverlabs.com.
Additionally, we will need to set the admin password using the following command for security purposes:
sudo coolconfig set-admin-password
Which should return the following result:
root@code:~# sudo coolconfig set-admin-password
Enter admin username [admin]: admin
Enter admin password:
Confirm admin password:
Saving configuration to : /etc/coolwsd/coolwsd.xml ...
Saved
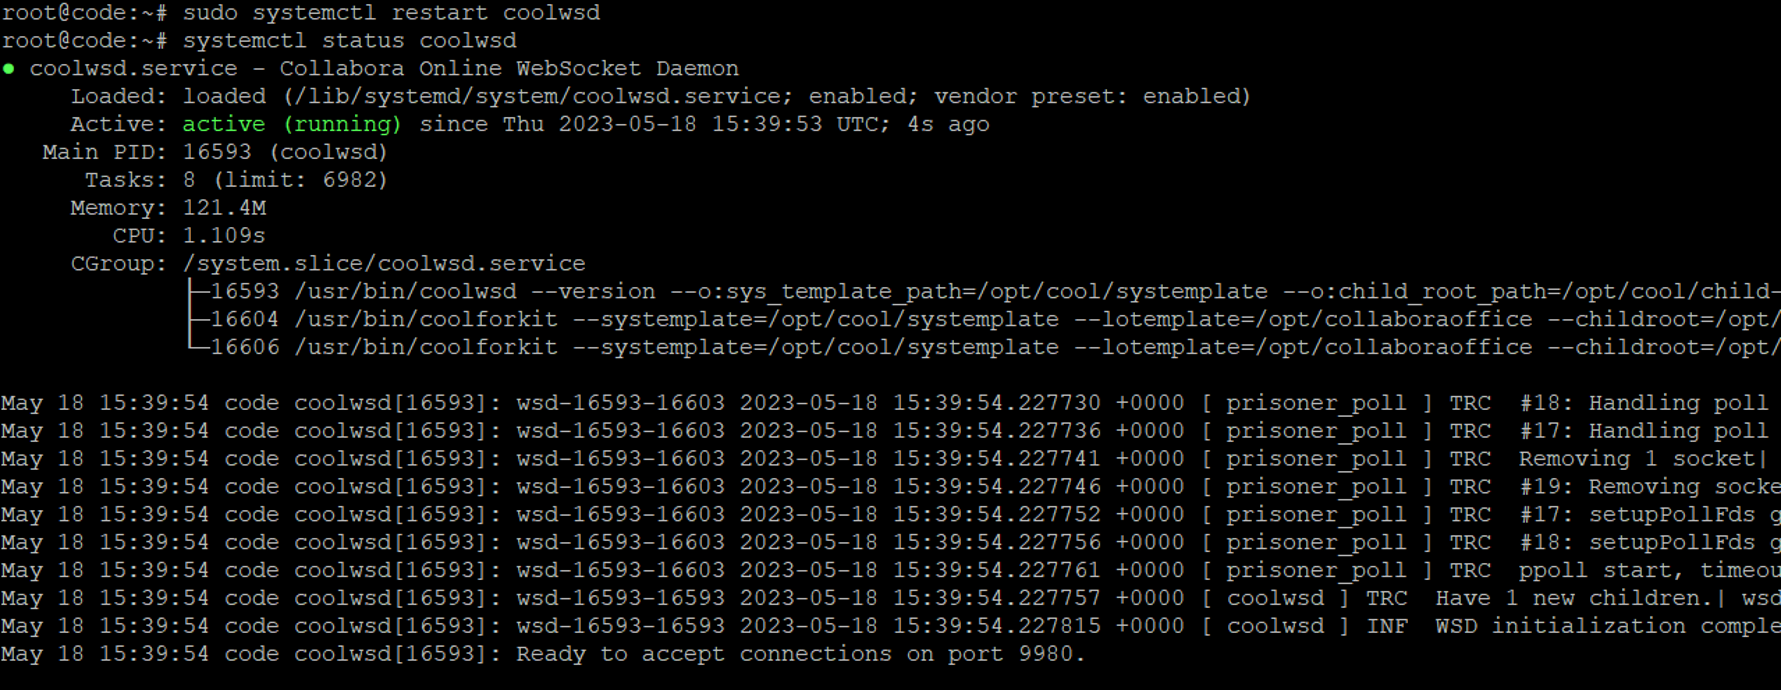
Once the above changes are completed, we can start the service:
sudo systemctl restart coolwsd
systemctl status coolwsd
We must ensure the FileCloud server URL and Collabora host name are added correctly in /etc/hosts to ensure the DNS name resolution is correctly pointed to the proper servers.
Configure Reverse Proxy in Collabora Server with Apache Webserver
Now we must configure a reverse proxy with Apache webserver on our Collabora server:
sudo add-apt-repository ppa:ondrej/apache2 -y
sudo apt update -y
apt-get install apache2 -y
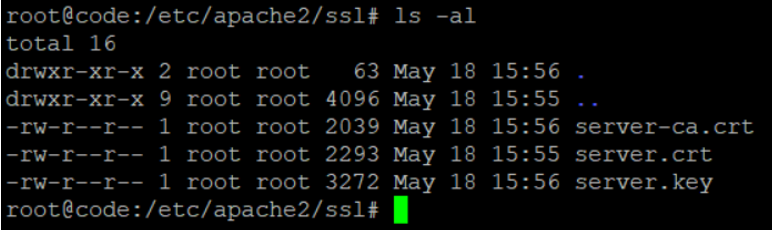
We will be configuring Collabora with an SSL certificate; we will place the SSL certificates in the directory: /etc/apache2/ssl
Below are the naming conventions we will be using:
- SSL certificate – server.crt
- SSLCAcertificate – server-ca.crt
- SSL key File – server.key
The file contents of folder /etc/apache2/ssl should match the screenshot below:
Now we will create the Apache virtualhost for CODE. We will create it under /etc/apache2/sites-available/collabora.conf
The contents of the file /etc/apache2/sites-available/collabora.conf are as below:
<VirtualHost *:443>
ServerName code.example.com
Options -Indexes

ErrorLog "/var/log/apache2/collabora_error"
# Encoded slashes need to be allowed
AllowEncodedSlashes NoDecode

# keep the host
ProxyPreserveHost On

# static html, js, images, etc. served from coolwsd
# loleaflet/browser is the client part of Collabora Online
ProxyPass /loleaflet http://127.0.0.1:9980/loleaflet retry=0
ProxyPassReverse /loleaflet http://127.0.0.1:9980/loleaflet
ProxyPass /browser http://127.0.0.1:9980/browser retry=0
ProxyPassReverse /browser http://127.0.0.1:9980/browser

# WOPI discovery URL
ProxyPass /hosting/discovery http://127.0.0.1:9980/hosting/discovery retry=0
ProxyPassReverse /hosting/discovery http://127.0.0.1:9980/hosting/discovery

# Capabilities
ProxyPass /hosting/capabilities http://127.0.0.1:9980/hosting/capabilities retry=0
ProxyPassReverse /hosting/capabilities http://127.0.0.1:9980/hosting/capabilities

# Main websocket
ProxyPassMatch "/cool/(.*)/ws$" ws://127.0.0.1:9980/cool/$1/ws nocanon

# Admin Console websocket
ProxyPass /cool/adminws ws://127.0.0.1:9980/cool/adminws

# Download as, Fullscreen presentation and Image upload operations
ProxyPass /cool http://127.0.0.1:9980/cool
ProxyPassReverse /cool http://127.0.0.1:9980/cool

SSLEngine on
SSLCertificateFile /etc/apache2/ssl/server.crt
SSLCertificateKeyFile /etc/apache2/ssl/server.key
SSLCertificateChainFile /etc/apache2/ssl/server-ca.crt

</VirtualHost>
After the file is created, run the below commands to enable mod_ssl and proxy modules, after which we will enable this site:
a2enmod proxy proxy_wstunnel proxy_http ssl
a2ensite collabora.conf
systemctl restart apache2
systemctl status apache2
Now we will check if the installation was success by running the command below:
curl -v https://<Collabora URL>/hosting/discovery

> GET /hosting/discovery HTTP/1.1
> Host: code.servercircus.com
> User-Agent: curl/7.81.0
> Accept: */*
>
* TLSv1.2 (IN), TLS header, Supplemental data (23):
* TLSv1.3 (IN), TLS handshake, Newsession Ticket (4):
* TLSv1.2 (IN), TLS header, Supplemental data (23):
* TLSv1.3 (IN), TLS handshake, Newsession Ticket (4):
* old SSL session ID is stale, removing
* TLSv1.2 (IN), TLS header, Supplemental data (23):
* Mark bundle as not supporting multiuse
< HTTP/1.1 200 OK
< Date: Thu, 18 May 2023 16:15:54
< Server: COOLWSD HTTP Server 22.05.14.3
< Content-Length: 32738
< Content-Type: text/xml
< Last-Modified: Thu, 18 May 2023 16:15:54
< X-Content-Type-Options: nosniff
< Vary: Accept-Encoding
<
<wopi-discovery>
    <net-zone name="external-http">
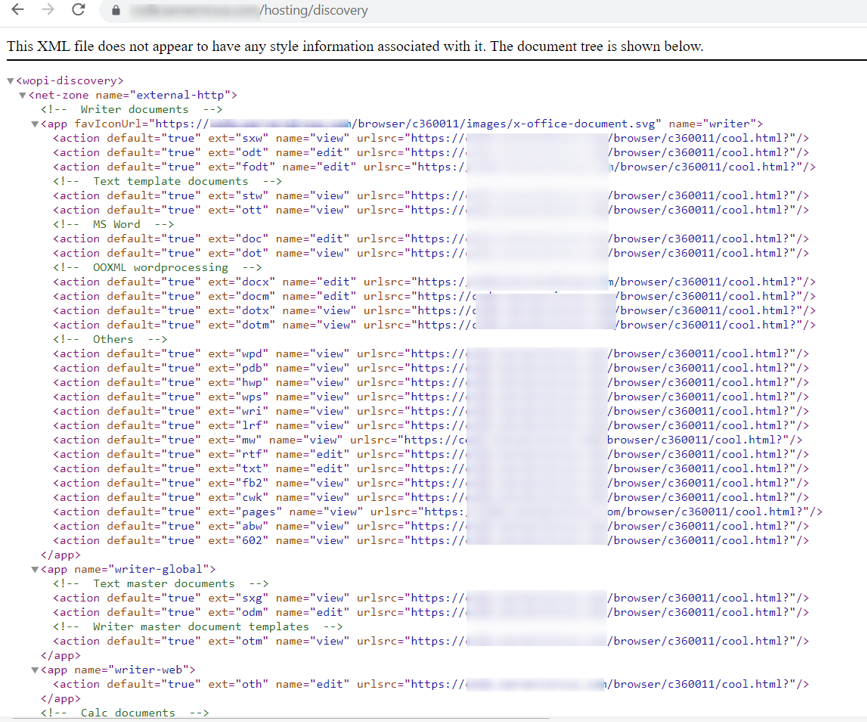
The above output shows a successful connection. We can also verify from the browser.
Integrate Collabora in FileCloud Admin UI
Now we will integrate Collabora in FileCloud through the web editing menu.
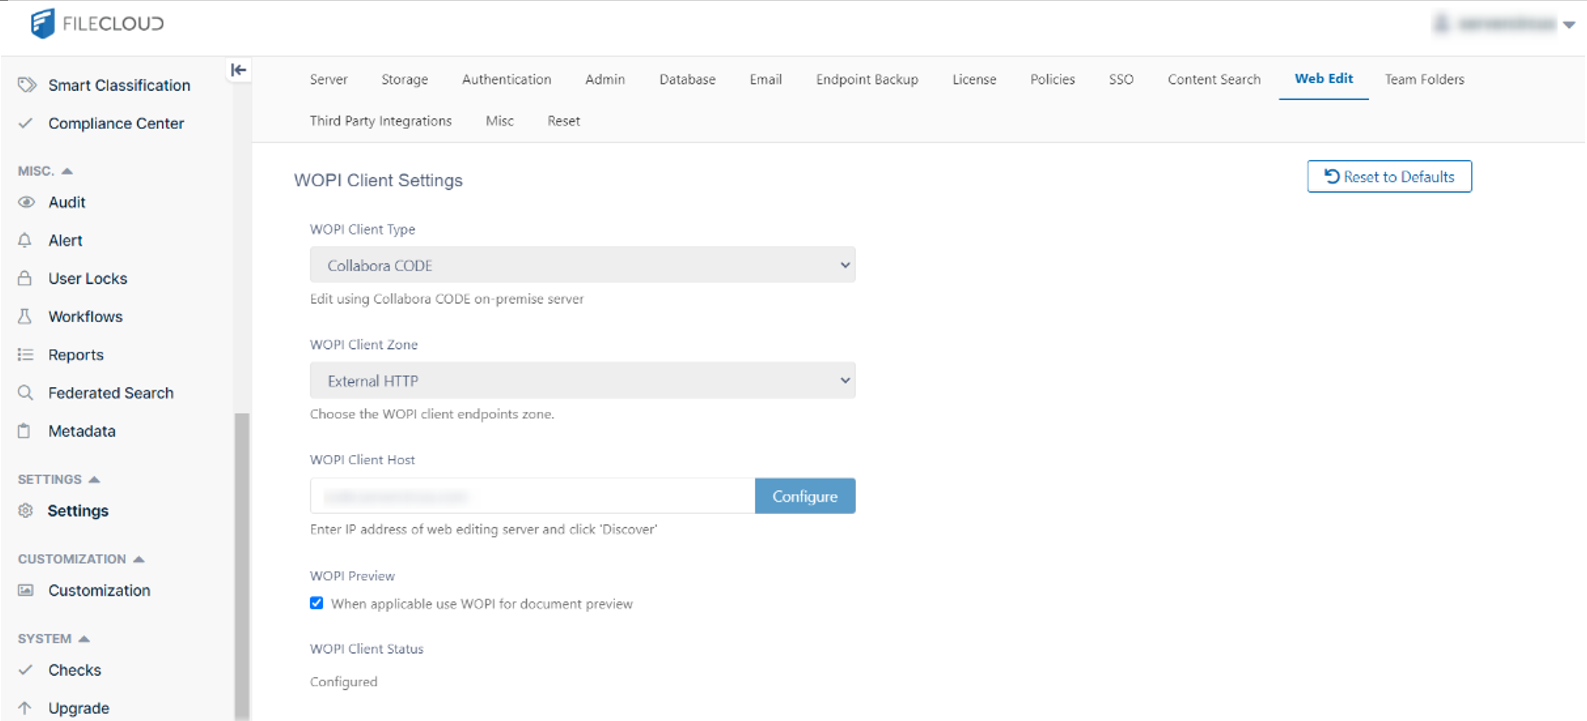
Log in to your FileCloud admin UI, then navigate to "Settings" and "Web Editing." From the WOPI Client Type dropdown menu, select Collabora CODE.
The WOPI Client URL should be CODE Collabora URL (no need to add https:// in front of URL). After configuration, your screen will match the screenshot below:
To enable web editing in the FileCloud user UI, navigate to Customizations >> General >> UI Features tab, and check the option "Show Online Edit Option". Click "Save" to register the changes.
After the changes are made, we will need to add the code Collabora URL in the .htaccess file of the FileCloud server.
- In Linux, the location is /var/www/html/.htaccess
- In Windows, the location is XAMPP\htdocs\.htaccess
In the below snippet, we used code.example.com as Collabora URL in the .htaccess file:
<IfModule mod_headers.c>
Header set X-Frame-Options "SAMEORIGIN"
Header set X-Content-Type-Options "nosniff"
Header set Strict-Transport-Security "max-age=31536000; includeSubDomains"
Header set X-XSS-Protection "1; mode=block"
Header set Content-Security-Policy: "default-src 'self' blob: *.live.com *.amazonaws.com *.core.windows.net www.google.com http://127.0.0.1:34320/v1/fileassociations *.autodesk.com code.example.com; \
    style-src 'unsafe-inline' 'self' *.autodesk.com; \
    script-src 'unsafe-inline' 'unsafe-eval' 'self' www.google.com www.gstatic.com  teams.microsoft.com *.teams.microsoft.com *.skype.com *.autodesk.com; \
    frame-src 'self' www.google.com *.live.com docs.google.com accounts.google.com code.example.com; \
    font-src 'self' data: *.autodesk.com; \
    img-src www.gstatic.com 'self' data: blob: *.duosecurity.com *.live.com *.amazonaws.com *.core.windows.net *.office.net *.autodesk.com code.example.com; \
    frame-ancestors 'self' teams.microsoft.com *.teams.microsoft.com *.skype.com *.my.salesforce.com; \
    worker-src 'self' blob: *.autodesk.com"
Header set Cache-Control no-cache="Set-Cookie"
</IfModule>
Conclusion
Congratulations! By following these step-by-step instructions, you will be able to integrate Collabora in FileCloud as standalone code in Ubuntu 22.04 LTS. Your users will now be able to use this open-source software to create, edit, and share files within the hyper-secure FileCloud environment.
For any further issues regarding Collabora integration with FileCloud, you can reach out to the FileCloud Support Team.
Article written by Nandakumar Chitra Suresh, Support Engineering Manager
Edited by Katie Gerhardt, Jr. Product Marketing Manager

By Katie Gerhardt
Jr. Product Marketing Manager