FileCloud is a hyper-secure file sharing and data governance solution. However, any solution is only as secure as the weakest link of the entire infrastructure. In this blog post, we will review 4 FileCloud tips to secure the host operating system; in this example, we will use Linux (RedHat 8.7) as a typical enterprise system of choice to host FileCloud Server.
This document will review the steps involved in securing the operating system, not the FileCloud platform configuration. For FileCloud configuration, check out the documentation available for FileCloud administrators. You can also learn how to set up FileCloud by watching our Admin Training videos through FileCloud University.
OS Installation Recommendations
This blog post is not intended to serve as instructions on how to configure an OS; however there are a few important points worth mentioning before exploring the hardening steps outlined below.
Installation Type
For our example OS, the Linux system (RedHat), the general approach of “less is more” can be quite helpful for the “Software Selection” step to build an efficient, secure, and reliable server. Less software means:
- Fewer security patches,
- Fewer background processes and services
- Better OS performance,
- Reduced risk of server exposures.
An ideal server installation will only include packages that are clearly understood. To achieve this with Linux Redhat software, select “Server” or “Minimal Install” for the base environment.
The “Server” option brings the minimal set of packages required for a server system that functions with common packages installed that support applications like FileCloud (without a variety of unnecessary packages). The “Minimal Install” option is also good but requires some manual packages installation on the later stages (especially during FileCloud installation) as some dependencies are not satisfied. This option is only recommended for advanced Server Administrators.
User Configuration
During the installation, it’s required to set the root password. Choose a strong password for this account. It is also recommended to create an additional user, which will be used to access the system. Never treat the root account as the one from which you login and work. The root account is for configuration and setup. In our example, we’ll use the fcadmin user as the default account to remotely access the server.
1. Create Admin Users with Root Level Permissions
Console Login
After successful RedHat installation, log in to the console using the root account and perform some initial system configuration tweaks.
Red Hat Enterprise Linux 8.7 (Ootpa)
Kernel 4.18.0-425.12.1.e18_7 .x86_64 on an x86_64

Activate the web console with: systemctl enable --now cockpit.socket

rhel8-secure-54 login: root
Password:
Last login: Fri Feb 24 22:15:28 on ttyl
[root@rhel8-secure-54 ~]#
First, we will prevent remote root login over the SSH. This step eliminates the risk of brute-force attacks targeting the root account directly.
Open the sshd configuration file using the editor of your choice (vi, nano, etc): vi /etc/ssh/sshd_config
[root@rhel8-secure-54 ~]# vi /etc/ssh/sshd_config
Find the line:
PermitRootLogin yes
Change to:
PermitRootLogin no
Save the file and close the editor. Then restart the sshd daemon using the following command: systemctl restart sshd
[root@rhel8-secure-54 ~]#
[root@rhel8-secure-54 ~]# systemctl restart sshd
[root@rhel8-secure-54 ~]#
Create Custom Admin Group
Create the group that will contain users who can reach the root level on the server. It is possible to have more than one administrative user for the server. It is good practice to have a personal ID assigned to each admin user and to use these unique IDs to reach the server instead of using a shared admin ID. This personal accountability is important from any compliance or cybersecurity perspective.
groupadd -g 10000 fcadmins
[root@rhel8-secure-54 ~]# groupadd -g 10000 fcadmins
[root@rhel8-secure-54 ~]#
Parameter -g says that this group will have the GID number 10000. The group name is fcadmins.
Add Users to the Custom Admin Group
Having a group without any users doesn’t make much sense. We created a user during the installation process, so now we can add this user to the newly created admin group. First confirm that the user exists:
id fadmin
[root@rhel8-secure-54 ~]# id fadmin
uid=1001(fadmin) gid=1001(fadmin) groups=1001(fadmin)
Add fadmin user to the fcadmins group and verify:
[root@rhel8-secure-54 ~]# usermod -a -G fcadmins fadmin
[root@rhel8-secure-54 ~]# id fadmin
uid=1001(fadmin) gid=1001(fadmin) groups=1001(fadmin), 10000(fcadmins)
[root@rhel8-secure-54 ~]# _
We can see that user fadmin is a member of 2 groups: fadmin (corresponding group is created automatically for each user) and fcadmins.
Allow Only Admin Group Members to Access Root Level
Only system administrators should have root level access permissions. This step will limit this access to the minimum required.
Open the file with the editor of your choice: /etc/sudoers
vi /etc/sudoers
Find the line:
%wheel ALL=(ALL) ALL
Comment the line out by adding the # sign at the beginning, and then add a new line below:
%fcadmins ALL=(ALL) ALL
Save the file.
Warning:
The sudoers file has read-only permissions for everyone (including root). However, the root user has the potential to force most every action (usually). For example, in the vi editor, it is possible to force a file save. As the root user, you can enter:
:w!
Then:
:q
This will save the file, even if read-only permissions are granted.
Checking Sudo Configurations
Log out of the root user account and log in as the fadmin user.
Red Hat Enteprrise Linux 8.7 (Ootpa)
Kernel 4.18.0-425.13.1.e18_7 .x86_64 on an X86_64

Activate the web console with: systemctl enable --now cockpit.socket

rhel8-secure-54 login: fadmin
Password:
[fadmin@rhel8-secure-54 ~1$
When logged in, call command: sudo su -
Provide the fadmin user password when prompted. If everything is correct, the shell with # sign should be displayed, confirming that the user has achieved root level permissions. This can be additionally confirmed by entering the command: whoami
[root@rhel8-secure-54 ~]# whoami
root
[root@rhel8-secure-54 ~]# _
Now we can set up the remote login. Log out of the console by typing exit two times.
2. Enable Key-Pair Authentication for Remote Login via SSH
Generating the RSA Keys
The most common method to log in remotely to Linux systems is via Secure Shell (ssh). This protocol uses an encrypted channel to establish communication and is considered a secure mechanism. It can be even more secure when authentication uses key pairs (private-public RSA key). This will eliminate the risk of weak passwords and will completely eliminate password guessing with brute force attacks – covered later in this post.
The key pair generation looks very similar on Windows (10 and 11) and Linux. To generate the keys in Windows, first open the cmd window; in Linux (workstation), open the terminal. Our example will be presented using Linux (Fedora 37).
Open terminal session and type: ssh-keygen
On all questions, hit enter. Doing so will generate two files. In our case, these files are as follows:
- public key: /home/user1/.ssh/id_rsa.pub
- private key: /home/user1/.ssh/id_rsa
A detailed example on Windows is also available by visiting the Microsoft documentation.
Copy Public Key on the Target Host
To allow for the possibility of authenticating using the key pair, the public key must be placed on the target host. This can be done easily from a Linux workstation by calling command: ssh-copy-id fadmin@secure.filecloud.plIn
For our example, we will be enabling remote login for fadmin to the destination host. For our example, the destination host is the full DNS name of my target system: secure.filecloud.pl. The destination can also be a direct IP address.
The command will ask if the fingerprint of the target host should be saved (yes by default) and will prompt for the password for the target user fadmin. The next login attempt should not require the password at all – this user will now have full remote access without relying on password-based security methods.
Turn off Password-based Authentication for SSH.
When we are logged in to the target system as user fadmin, we can switch to the root.
Call command: sudo su -
Open the sshd configuration file using your preferred editor: vi /etc/ssh/sshd_config
Find the line containing:
PasswordAuthentication yes
Change to:
PasswordAuthentication no
Save the file and restart the sshd service: systemctl restart sshd
After completing this step, it will no longer be possible to log in as any system user based on password authentication. Only key-pair authentication is allowed. If you lose your private key, the only way to log into the system will be via console.
Now log out completely and log back in to confirm key-pair authentication is functioning correctly.
3. Harden Network Perimeter
Disable IPV6
IPV6 is the next-generation IP address family but not the only family. A majority of internet resources are still available on IPV4. Most setups utilize the IPV4 address family, so the IPV6 family can be disabled.
Log into your system using ssh and switch to root using the sudo su – command. Then create a new file: vi /etc/sysctl.d/ipv6.conf
Add this line:
net.ipv6.conf.all.disable_ipv6 = 1
Then save and close the file.
Apply the new kernel parameters: sysctl -p /etc/sysctl.d/ipv6.conf
[root@rhel8-secure-54 ~]# sysctl -p /etc/sysctl.d/ipv6.conf
net.ipv6.conf.all.disable_ipv6 = 1
[root@rhel8-secure-54 ~]#
The next step is to rebuild the initial RAM disk used during the OS boot process: dracut -f -v
Multiple messages can be displayed during this process. The end of the process should look similar to the screen capture below:

When the image is created successfully, reboot the system.
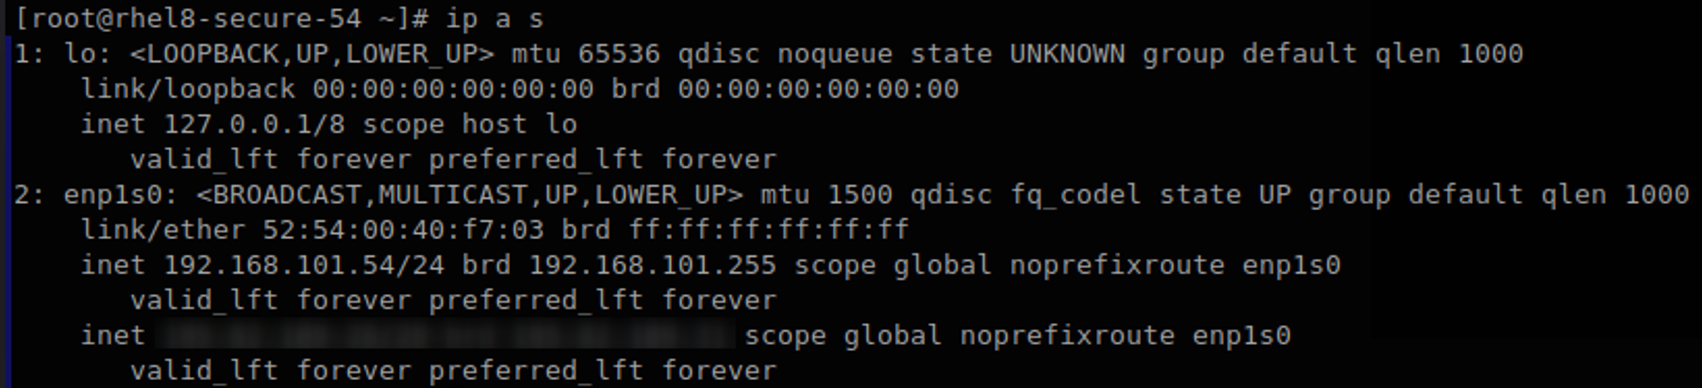
Once the system is back, login as fadmin and switch to root using sudo su -
Then verify if the IPV6 has been disabled by entering the command: ip a s
This command should only return IPV4 addresses:
Firewall Configuration
RedHat 8.x uses the firewalld mechanism to manage the internal firewall rules. All the rules translate to corresponding iptables.
First, we will remove unneeded services listed in the firewall. As the root user, call command: firewall-cmd --list-all
[root@rhel8-secure-54 ~]# firewall-cmd --list-all
public (active)
     target: default
     icmp-block-inversion: no
     interfaces: enpls0
     sources:
     services: cockpit dhcpv6-client ssh
     ports:
     protocols:
     forward: no
     masquerade: no
     forward-ports:
     source-ports:
     icmp-blocks:
     rich rules:
[root@rhel8-secure-54 ~]#
In the services list, we can see: cockpit, dcpv6-client and ssh. Out of these, we only need ssh for our server. Remove all other services from our configuration. Call commands:
firewall-cmd --remove-service cockpit --permanent
firewall-cmd --remove-service dhcpv6-client --permanent
firewall-cmd --reload
List all the rules again to see if the unnecessary services have been removed: firewall-cmd --list-all
[root@rhel8-secure-54 ~]# firewall-cmd --list-all
public (active)
     target: default
     icmp-block-inversion: no
     interfaces: enpls0
     sources:
     services: ssh
     ports:
     protocols:
     forward: no
     masquerade: no
     forward-ports:
     source-ports:
     icmp-blocks:
     rich rules:
[root@rhel8-secure-54 ~]#
With these changes, we can see that only ssh is allowed in the services section. This means that our server is allowing only ssh incoming traffic, which is quite secure; however, it will not allow FileCloud users to reach the FileCloud interface or resources.
At this stage, FileCloud installation can be performed according to these instructions. When the installation is completed, we can allow https traffic with the following commands:
firewall-cmd --add-service https --permanent
firewall-cmd --reload
firewall-cmd --list-all
Confirm that the services have been updated to include https:
[root@rhel8-secure-54 ~]# firewall-cmd --add-service https –permanent
success
[root@rhel8-secure-54 ~]# firewall-cmd --reload
success
[root@rhel8-secure-54 ~]# firewall-cmd --list-all
public (active)
     target: default
     icmp-block-inversion: no
     interfaces: enpls0
     sources:
     services: https ssh
     ports:
     protocols:
     forward: no
     masquerade: no
     forward-ports:
     source-ports:
     icmp-blocks:
     rich rules:
[root@rhel8-secure-54 ~]#
4. Set Up Brute Force Defenses
To protect the OS and FileCloud against brute force password guessing attacks, we are going to install and configure the fail2ban mechanism.
Installation
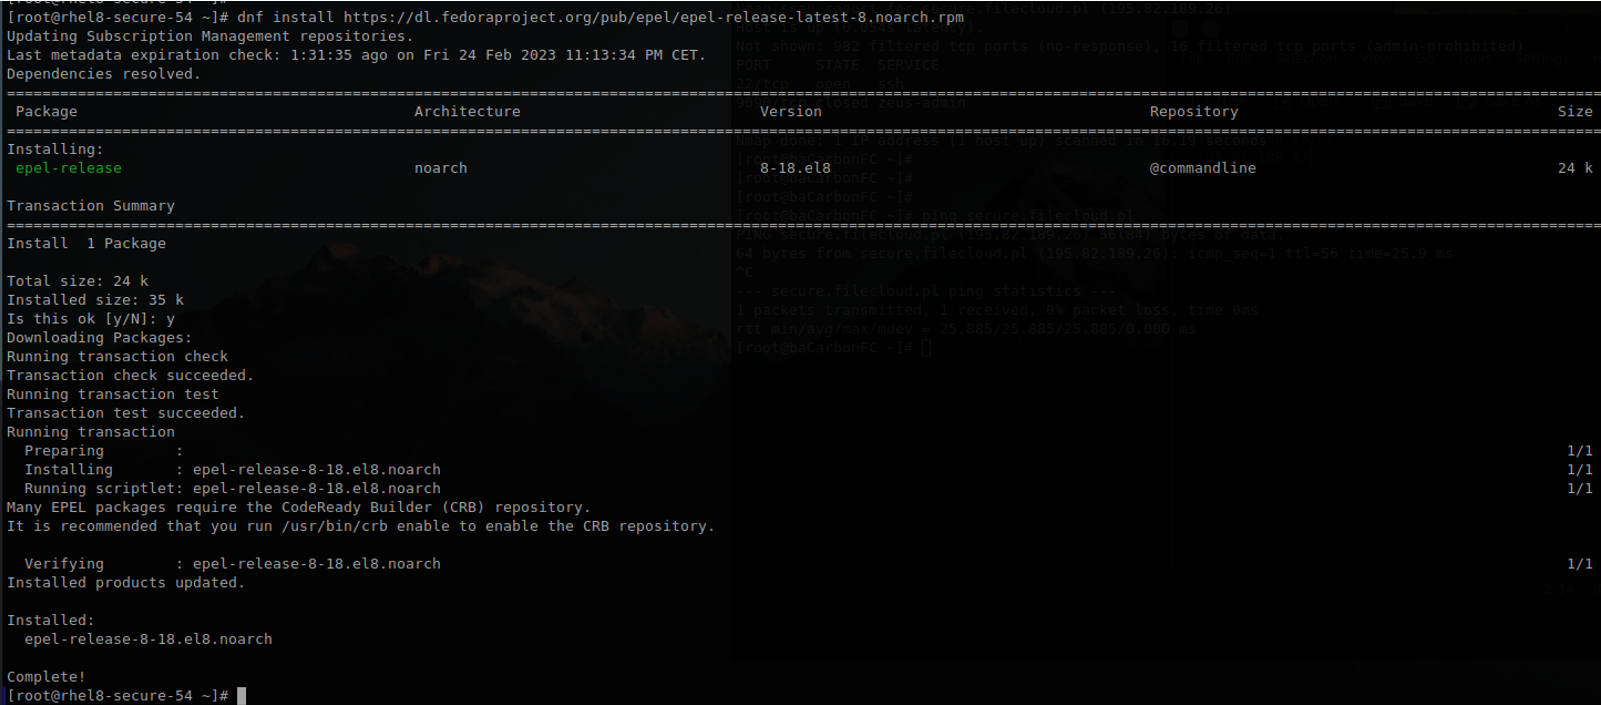
To install fail2ban on RedHat 8.x systems, we need to add the EPEL repository. Log in to the system as fadmin and switch to the root user using sudo su -
Call command: dnf -y install https://dl.fedoraproject.org/pub/epel/epel-release-latest-8.noarch.rpm
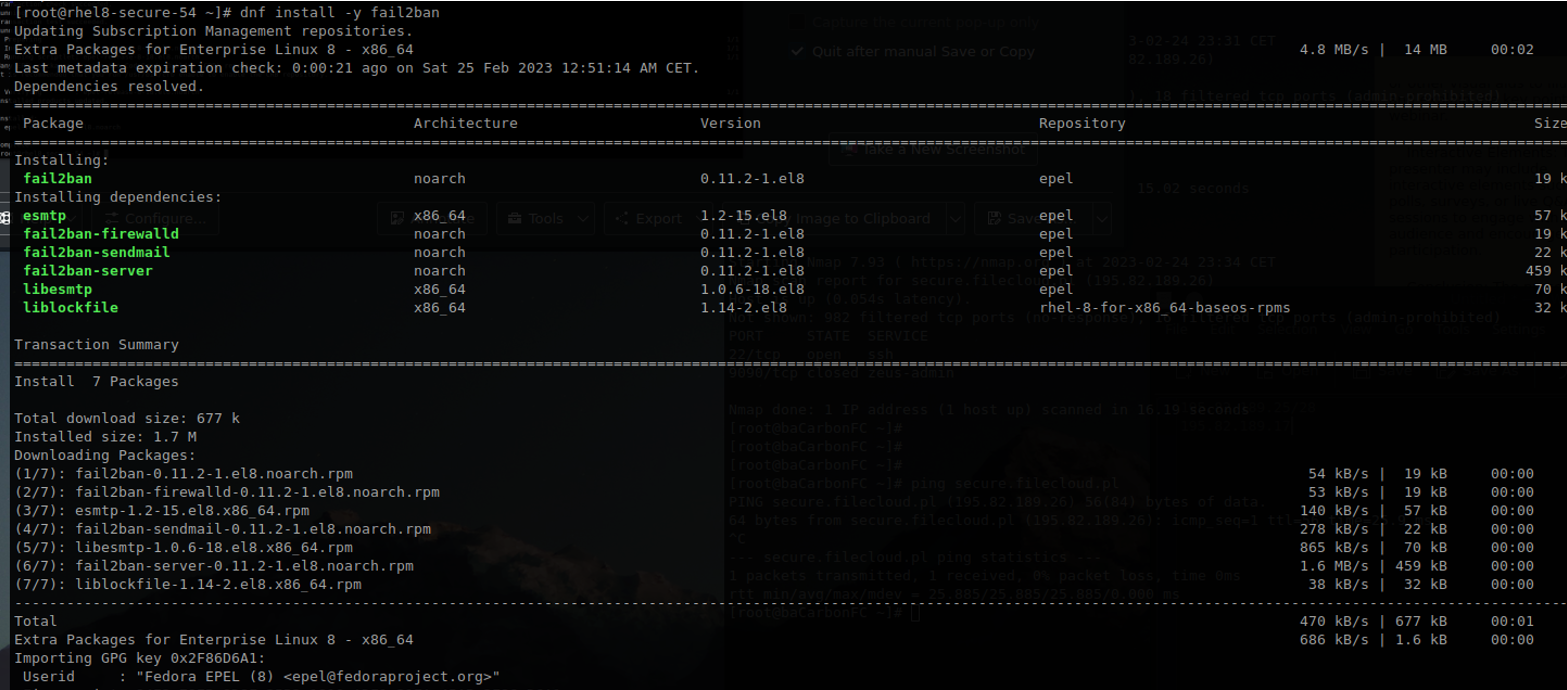
When the EPEL repository is enabled, we can install fail2ban: dnf install -y fail2ban
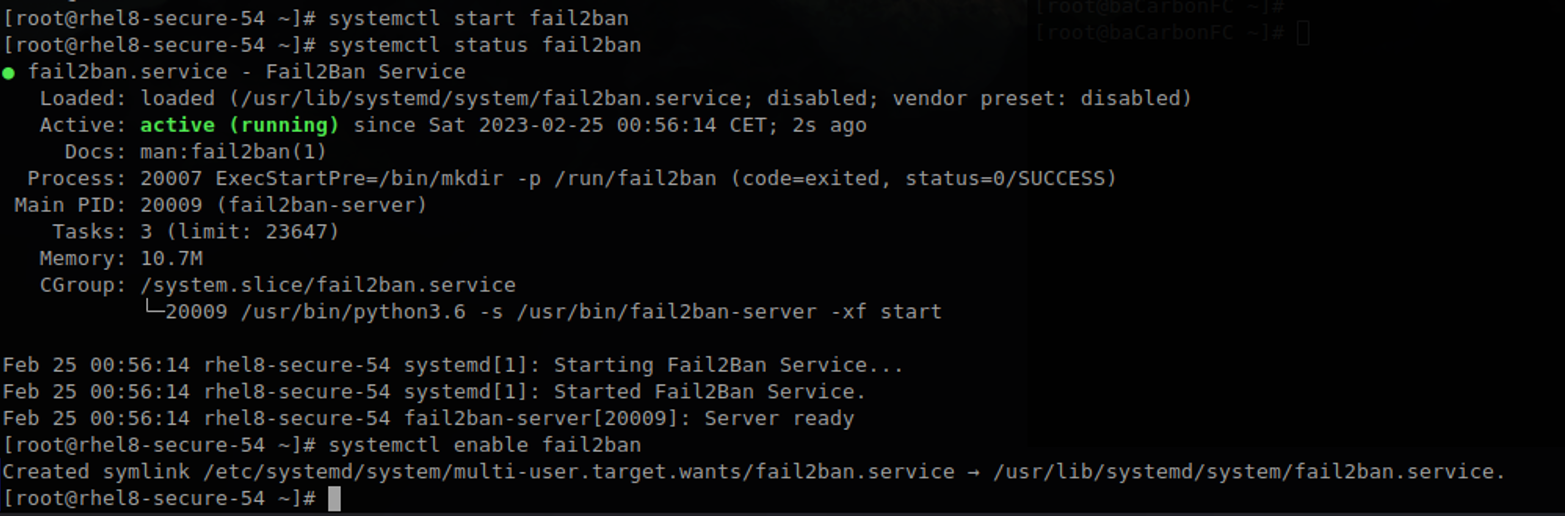
After fail2ban has been installed, we can enable the service:
systemctl start fail2ban
systemctl enable fail2ban
Initially, we need to prepare the global fail2ban customization. The software has some default settings, but we are going to tweak them a little. It is not recommended to edit the global default config, so we will prepare a local config.
Call command: cp /etc/fail2ban/jail.conf /etc/fail2ban/jail.local
Open the file: /etc/fail2ban/jail.local with your preferred editor:
vi /etc/fail2ban/jail.local
Find the line containing: ignoreip = 127.0.0.1/8
Remove # from the beginning of the line to un-comment.
You can then add the IPs or subnets that you are absolutely sure should never be blocked and will not be a source of any attacks. Once you have added the IPs, save and close the file. Then reload fail2ban with the command: systemctl restart fail2ban
Protecting SSH Service Against Brute Force Password Guessing
Log into the system as fadmin and switch to the root user using sudo su -
Create a local config for the sshd protection mechanism: vi /etc/fail2ban/jail.d/sshd.local
Add the following lines:
[sshd]
enabled = true
maxretry = 3
bantime = 5m
Save and close the file.
Restart the fail2ban service: systemctl restart fail2ban
After applying these changes, unsuccessful login attempts will be limited to three times before the IP address is blocked for five minutes. Take care while testing, as your management system may cut you off.
The status of the fail2ban can be displayed using this command: fail2ban-client status sshd
Preventing password guessing on the ssh service gives us the ability to recognize and block threatening hosts. With password authentication disabled, there is no risk that any attacking host will guess the password for any user. This kind of activity may lead to DoS, so cutting them off is a good way to optimize system security and stability.
Protecting FileCloud from Password-Guessing Attacks
The same mechanism can be adopted to protect the FileCloud application layer against password guessing and DoS attacks by multiple password entry. For this purpose, we need to perform some fail2ban configuration steps.
First, we need to create a new filter that will recognize failed authentication in the Apache logs.
Please create the following file: vi /etc/fail2ban/filter.d/filecloud.conf
Add the following content to the file:
[Definition]
failregex = <HOST>.*"POST \/.*\/(adminlogin|loginguest)\?.* HTTP\/1\.\d" 400.*
Then create another file: vi /etc/fail2ban/jail.d/filecloud.local
In this file, we will add information for the following parameters (defined below):
- filter – the name of the filter that will classify the log entries (created in previous step)
- logpath – the log file location that will be monitored by the filter
- maxretry – how many events in the row will trigger the action
- findtime – the time frame in which maxretry must occur for the activity to be treated as suspicious
- Bantime – the time (in seconds) for the suspicious host to be cut off, after which the IP will be un-banned.
We will set these parameters by adding the following content to the filecloud.local file:
[filecloud]
enabled = true
filter = filecloud
logpath = /var/log/httpd/access_log
maxretry = 3
findtime = 300
Bantime = 300
Restart the fail2ban daemon: systemctl restart fail2ban
Display the failcloud jail statistics. These statistics identify which log file is monitored by this jail rule, how many times any IP was banned, and the current ban list. For testing purposes, perform a failed login at least three times in the FileCloud admin panel or user interface. Repeat this failed login three times and then open the fail2ban filecloud jail statistics to confirm the list reflects currently banned IP addresses.
Secure Host Operating Systems: Conclusion
In the IT world, one of the biggest traps is considering any system 100% secure. Each system should always be considered vulnerable if enough effort or money is spent to breach a protected system.
One of the many responsibilities of a system administrator is to make a breach as difficult as possible. By following the steps detailed above, you can support a secure host operating system that will be a little harder to scan, investigate, and plan a potential directed attack.
All typical and standard protection solutions are also known to potential attackers, so custom and self-developed mechanisms can be considered a front-line defense to secure a host operating system. Securing operating systems against common attack types such as password guessing and DoS attacks is the beginning of system security. Implementing these measures can also serve to prevent weak passwords and to disable password-based login mechanisms entirely.
Additionally, it is important to regularly check for security advisories and install security patches for your operating system and hosted software. Security advisories are released on a cycle according to the OS vendor (like RedHat) and should be implemented promptly.
For more FileCloud cybersecurity tips, check out our white paper on Security FAQs or contact our support team!
Article written by Marek Frueauff, Solutions Architect
Edited by Katie Gerhardt, Jr. Product Marketing Manager

By Katie Gerhardt
Jr. Product Marketing Manager