
FileCloud is a hyper-secure file storage, sharing and collaboration platform that provides a powerful set of tools for admins and users to manage their data. This includes High Availability (HA) architecture support and content management functionalities, specifically content search via FileCloud’s Solr integration.
Solr is an open-source content indexing and search application developed and distributed by Apache. This application is included with FileCloud installations.
Pacemaker and Corosync are open-source software solutions maintained by ClusterLabs. These solutions provide cluster management capabilities to client servers. Specifically, Pacemaker is a resource manager tool used on computer clusters for HA architecture, whereas Corosync supports cluster membership and messaging.
By configuring Solr HA in FileCloud with Pacemaker and Corosync, the admin can strengthen redundancy configurations, improve overall resiliency of backend software components, including quorate and resource-driven clusters, and provide fine-tuned management capabilities within and between nodes.
This step-by-step guide will outline how to manually configure Solr HA with Pacemaker and Corosync in FileCloud.
Software Components
solr01 – Solr host – cluster member
solr02 – Solr host – cluster member
solr03 – quorum-device – quorum for cluster
solr-ha – proxy-ha host
NFSShare – NFS resource which can be mounted on solr01 and solr02
The example laid out in this blog post uses CentOS 7 (CentOS Linux release 7.9.2009 (Core)).
The installation instructions for Pacemaker and Corosync clusters remain the same, regardless of the Linux distributor (Ubuntu, Fedora, RedHat, or Debian).
Installation and Configuration Instructions
Step 1: Prepare the Cluster
Install all available patches using the following command:
Command(as root):
yum update
After installing the necessary patches, reboot the system. This step must be completed for all three hosts: solr01, solr02, and solr03.
Then, the package that provides necessary nfs-client subsystems must be installed.
command(as root):
yum install -y nfs-utils
Next, wget must be installed.
command(as root):
yum install -y wget
Step 2: Install Solr and Prepare the Cluster Environment
Installing Solr in your FileCloud instance is (naturally) a critical part of configuring Solr HA. As indicated above Solr can be broken down into specific Solr hosts that are members of a cluster. These hosts must be individually configured.
Prepare Clean OS
Beginning with Solr01, prepare a clean Linux-based OS (such as the example we are using, Centos7). You may also use other operating systems according to your preference.
Download FileCloud
On the clean OS, download the FileCloud installation script: filecloud-liu.sh (official installation script).
If any issues arise related to the REMI repo, the alternative can be used: https://zerg.codelathe.com/url/qj2ny2yrvtzehjsk
Create a Folder
Create the following folder: /opt/solrfcdata
Run the Command
Command(as root):
mkdir /opt/solrfcdata
Mount the NFS Filesystem
The NFS filesystem should be mounted under the following:
Command(as root):
mount -t nfs ip_nfs_server:/path/to/nfs_resource /opt/solrfcdata
Start Solr Installation
Next, start the solr component installation from using FileCloud installation script:
command(as root):
sh ./filecloud-liu.sh
Follow the instructions until reaching the selection screen.
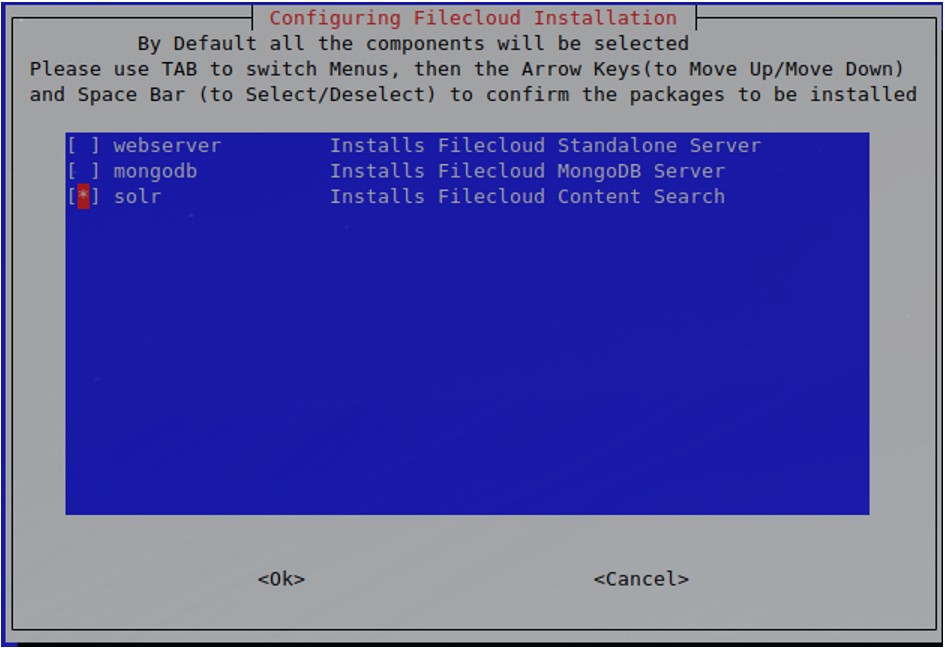
Select the “solr” option and click “enter.” The installation process may take a few minutes. Wait for confirmation that installation has been completed.
Bind Solrd to External Interface
Host: solr01, solr02
Solrd will, by default, try to bind to the localhost only. Modify the file so that solr binds to the external interface.
Modify the following file: /opt/solr/server/etc/jetty-http.xml
Change the following line in the file.
Original Line:
<Set name="host"><Property name="jetty.host" default="127.0.0.1" /></Set>
New Line:
<Set name="host"><Property name="jetty.host" default="0.0.0.0" /></Set>
Change System Daemon Control to System
Solr was started with the FileCloud installation. Before proceeding, stop the Solr service.
Host: solr01, solr02
command(as root):
/etc/init.d/solr stop
Remove the following file: /etc/init,d/solr
command(as root):
rm /etc/init.d/solr
Create a new file:
command(as root):
touch /etc/systemd/system/solrd.service
Edit this new file and copy the contents specified below to this file:
command(as root):
vi /etc/systemd/system/solrd.service
Copied Content:
### Beginning of File ###
[Unit]
Description=Apache SOLR
[Service]
User=solr
LimitNOFILE=65000
LimitNPROC=65000
Type=forking
Restart=no
ExecStart=/opt/solr/bin/solr start
ExecStop=/opt/solr/bin/solr stop
### End of File ###
Save the file before continuing.
Verify New Service Definition is Working
Host: solr01, solr02
command(as root):
systemctl daemon-reload
systemctl stop solrd
It should not return any errors. Start the service:
command(as root):
systemctl start solrd
systemctl status solrd
Expected Output:

Remove Folder Contents
Folder: /opt/solrfcdata
Host: solr02
Critical Note: THIS COMMAND SHOULD BE ISSUED ONLY ON solr02.
command(as root):
systemctl stop solrd
rm -rf /opt/solrfcdata/*
Update Firewall Rules
Complete this step whenever needed, as in the below example on CentOS.
Host: solr01, solr02
command(as root):
firewall-cmd --permanent --add-port 8983/tcp
firewall-cmd --reload
With these steps completed, the Solr installation has been carried out to successfully prepare the environment for HA clusters.
Step 3: Set Up Pacemaker
Host: solr01, solr02, solr03
Edit /etc/hosts File
Add the entries for all 3 cluster nodes, so that the file reads as follows:
coresponding_ip    solr01
coresponding_ip    solr02
coresponding_ip    solr03
Example:
File: cat /etc/hosts
127.0.0.1      localhost localhost.localdomain localhost4 localhost4.localdomain4
::1                 localhost localhost.localdomain localhost6 localhost6.localdomain6
192.168.101.59 solr01
192.168.101.60 solr02
192.168.101.61 solr03
Install Cluster Packages
hosts: solr01 and solr02
command(as root):
yum -y install pacemaker pcs corosync-qdevice sbd
Enable and Start the Main Cluster Daemon
hosts: solr01 and solr02
command(as root):
systemctl start pcsd
systemctl enable pcsd
Update Passwords for the Cluster User
hosts: solr01, solr02
Set the same password for all hosts for the hacluster user.
command(as root):
passwd hacluster
Provide the hacluster user with the login credentials, as these will be necessary in later steps.
Open Network Traffic on Firewall
hosts: solr01 and solr02
command(as root):
firewall-cmd --add-service=high-availability –permanent
firewall-cmd --reload
Authorize Cluster Nodes
hosts: Solr01
command(as root):
pcs cluster auth solr01 solr02
Username: hacluster
Password: “secret_password” set in the previous step.
Expected Output:
solr01          Authorized
solr02          Authorized
Create Initial Cluster Instance
hosts: solr01
command(as root):
pcs cluster setup --name solr_cluster solr01 solr02
Start and Enable Cluster Instance
hosts: solr01
command(as root):
pcs cluster start --all
pcs cluster enable --all
Step 4: Set Up QDevice – Quorum Node
Install Software Required for Quorum-only Cluster Node
Install the required software on solr03 (quorum-only cluster node).
Host: solr03
command(as root):
yum install pcs corosync-qnetd
Start and Enable the PCSD Daemon
Host: solr03
command(as root):
systemctl enable pcsd.service
systemctl start pcsd.service
Configure QDevice (Quorum Mechanism)
Host: solr03
command(as root):
pcs qdevice setup model net --enable –start
Open Firewall Traffic
Open the firewall traffic (if required – below example on CentOS)
Host: solr03
command(as root):
firewall-cmd --permanent --add-service=high-availability
firewall-cmd --add-service=high-availability
Set the Password for HA Cluster User
Set the password for the hacluster user on solr03.
Host: solr03
command(as root):
passwd hacluster
Provide the password to the HA cluster user. This password should be the same password used for solr01 and solr02.
Authenticate QDevice Host in the Cluster
Host: solr01
command(as root):
pcs cluster auth solr03
Username: hacluster
Password:
Add Quorum Device to the Cluster and Verify
Host: solr01
command(as root):
pcs quorum device add model net host=solr03 algorithm=lms
Verification:
Host: solr01
command(as root):
pcs quorum status
Expected Output:
Quorum information
------------------
Date:             Wed Aug  3 10:27:26 2022
Quorum provider:  corosync_votequorum
Nodes:            2
Node ID:          1
Ring ID:          2/9
Quorate:          Yes

Votequorum information
----------------------
Expected votes:   3
Highest expected: 3
Total votes:      3
Quorum:           2
Flags:            Quorate Qdevice

Membership information
----------------------
    Nodeid      Votes    Qdevice Name
         2          1    A,V,NMW solr02
         1          1    A,V,NMW solr01 (local)
         0          1            Qdevice
Step 5: Install Soft-Watchdog
The module softwatchdog should load automatically after rebooting the system.
Host: solr01, solr02
command(as root):
echo softdog > /etc/modules-load.d/watchdog.conf
Reboot solr01 and solr02 to Activate Watchdog
Host: solr01, solr02
command(as root):
reboot
Carry out the reboots in sequence:
- reboot solr01 and wait until it comes back
- reboot solr02
Step 6: Enable SBD Mechanism in the Cluster
Enable sbd
Host: solr01, solr02
command(as root):
pcs stonith sbd enable
Restart Cluster so pkt 1 Takes Effect
Host: solr01
command(as root):
pcs cluster stop --all
pcs cluster start --all
Verify the SBD Mechanism
Host: solr01
command(as root):
pcs stonith sbd status
Expected Output:
SBD STATUS
<node name>: <installed> | <enabled> | <running>
solr01: YES | YES | YES
solr02: YES | YES | YES
Step 7: Create Cluster Resources
Create Cluster Resource with NFSMount
Host: solr01
command(as root):
pcs resource create NFSMount Filesystem device=192.168.101.70:/mnt/rhvmnfs/solrnfs directory=/opt/solrfcdata fstype=nfs --group solr
Legend:
The parameter device should point to the nfs server and nfs share being used in the configuration.
Verification:
Host: solr01
command(as root):
pcs status
Expected Output:
Cluster name: solr_cluster
Stack: corosync
Current DC: solr01 (version 1.1.23-1.el7_9.1-9acf116022) - partition with quorum
Last updated: Wed Aug  3 12:22:36 2022
Last change: Wed Aug  3 12:20:35 2022 by root via cibadmin on solr01

2 nodes configured
1 resource instance configured

Online: [ solr01 solr02 ]

Full list of resources:

Resource Group: solr
     NFSMount   (ocf::heartbeat:Filesystem):    Started solr01

Daemon Status:
  corosync: active/enabled
  pacemaker: active/enabled
  pcsd: active/enabled
  sbd: active/enabled
Change the Recovery Strategy for the NFSMount Resource
Host: solr01
command(as root):
pcs resource update NFSMount meta on-fail=fence
Create Cluster Resource – solrd
Host: solr01
command(as root):
pcs resource create solrd systemd:solrd --group solr
Verification:
Host: solr01
command(as root):
pcs status
Expected Output:
Cluster name: solr_cluster
Stack: corosync
Current DC: solr01 (version 1.1.23-1.el7_9.1-9acf116022) - partition with quorum
Last updated: Wed Aug  3 12:25:45 2022
Last change: Wed Aug  3 12:25:22 2022 by root via cibadmin on solr01

2 nodes configured
2 resource instances configured

Online: [ solr01 solr02 ]

Full list of resources:

 Resource Group: solr
     NFSMount   (ocf::heartbeat:Filesystem):    Started solr01
     solrd      (systemd:solrd):        Started solr02

Daemon Status:
  corosync: active/enabled
  pacemaker: active/enabled
  pcsd: active/enabled
  sbd: active/enabled
Set Additional Cluster Parameters
Host: solr01
command(as root):
pcs property set stonith-watchdog-timeout=36
pcs property set no-quorum-policy=suicide
Step 8: Configure haproxy on Dedicated Host
Install haproxy on Clean OS
Our example uses CentOS.
Host: solr-ha
command(as root):
yum install -y haproxy
Configure the haproxy
Configure the haproxy to redirect to the active solr node.
Host: solr-ha
backup file: /etc/haproxy/haproxy.cfg
command(as root):
mv /etc/haproxy/haproxy.cfg /etc/haproxy/haproxy.cfg_bck
Create an Empty File
File: /etc/haproxy/haproxy.cfg
Add Content
Add the content below into the empty file.
#### beginning of /etc/haproxy/haproxy.cfg ###
global
    log         127.0.0.1 local2
    chroot      /var/lib/haproxy
    pidfile     /var/run/haproxy.pid
    maxconn     4000
    user        haproxy
    group       haproxy
    daemon
    stats socket /var/lib/haproxy/stats
defaults
    mode                    http
    log                     global
    option                  httplog
    option                  dontlognull
    option http-server-close
    option forwardfor       except 127.0.0.0/8
    option                  redispatch
    retries                 3
    timeout http-request    10s
    timeout queue           1m
    timeout connect         10s
    timeout client          1m
    timeout server          1m
    timeout http-keep-alive 10s
    timeout check           10s
    maxconn                 3000

frontend solr_front *:8983
        default_backend solr_back

backend static
    balance     roundrobin
    server      static 127.0.0.1:4331 check

backend solr_back
        server solr01   solr01:8983 check
        server solr02   solr02:8983 check
#### beginning of /etc/haproxy/haproxy.cfg ###
Ensure that parameters solr01/solr02 point to the full DNS name or to the IP of the cluster nodes.
Start haproxy
Host: solr-ha
command(as-root):
systemctl enable haproxy
systemctl start haproxy
Solr service will be available on host solr-ha on port 8983 – independent of where it is really running, either on solr01 or solr02.
Conclusion
Congratulations! If you followed these step-by-step instructions, you will have successfully configured Solr with high availability along with Pacemaker and Corosync. This configuration will serve to improve redundancy and security for your critical data.
For any questions on Solr or High-Availability architecture, schedule a consultation or configuration support session.
Article written by Marek Frueauff, Solutions Architect
Edited by Katie Gerhardt, Junior Product Marketing Manager
Appendix – Glossary of Terms
Below are the key terms used in this article, listed in alphabetical order.
| Term |
Definition |
| Cluster |
The group of servers or other IT systems, which primary purpose is to realize similar or exactly the same function to achieve one or both of the outcome’s: High Availability or Load Balance. |
| Cluster Quorum |
Server or other system that is part of the cluster and performs a particular role: verify which production cluster nodes (servers) can be communicated and their health status. In cluster members are missing, the cluster quorum system decides if the remaining servers can operate and continue providing services or if it should be treated as unhealthy. There is a risk of the split brain situation. The main purpose of the cluster quorum system is to avoid the split brain scenario. |
| Corosync |
Corosync is a typical part of High Availability architecture set up in Linux or Unix systems and usually exists alongside pacemaker. Corosync is the communication engine responsible for keeping cluster nodes (servers) in sync state. |
| Firewall |
Software or hardware which can inspect and manipulate based on the multiple rules the network traffic. The modern firewalls implementations can operate on multiple network layers (usually from 3 to 7) including the network frame content inspection. |
| Firewall-cmd |
The modern Linux build in firewall software implementation. |
| nfs |
Network File System – is the filesystem which by design is network related. It is common method to share file resources in the unix environment. Due to very long history related to this technology it has been implemented almost on all possible operating systems and became very popular and commonly used. |
| Pacemaker |
Open-source software involved in cluster resource management and part of a typical High Availability setup on Linux systems to provide modern functions and cluster management resources. |
| Proxy |
Software or hardware solution that provides a gateway between two networks separated by design. A proxy is usually installed between the public Internet and a local network and allows some communications between those network segments based on predefined rules. A proxy can also be used for other purposes, like load balancing: for example redirecting incoming connections from one network to multiple hosts in another network segment. |
| Proxy-HA |
The specific implementation of the proxy mechanism to provide High Availability service, which is usually correlated with a single host (server). In our example proxy-ha is used to verify where services are currently running (on which cluster servers) and redirect all incoming requests to the active node. |
| Resource Group |
A logical organization unit within the pacemaker cluster implementation that enables control of the dependencies between particular resources managed by the cluster. For example, the nfs server that shares files must be started after the filesystem where the files resists and additionally on the same cluster node (server) – this control can be easily achieved using Resource Groups. |
| QDevice |
The software implementation of the quorum functionality in the pacemaker cluster setup. This kind of functionality is being installed on the cluster host, which will perform the quorum role only, and will never provide any other services. |
| SBD |
Stonith Block Device – by design this the implementation of the additional communication and stonith mechanism on top of shared block device between cluster nodes (servers). In some cases, sbd can be used in the diskless mode (as in our example). To operate in this mode, the watchdog mechanism needs to be enabled/installed. |
| Solr |
Advanced and open-source search and indexing system maintained and developed by Apache. This mechanism is a part of the standard FileCloud installation. |
| Split Brain |
Very dangerous scenario in all cluster environments in which a node or nodes loses the ability to communicate with the rest of the node population due to an environment malfunction (most often due to lost network connectivity). In this situation, a separated node may “think” that it is the “last man standing” and calls up all cluster resources to begin providing all services. This resource demand is repeated by all cluster nodes, leading to disagreement on which node should remain active and which services the cluster should provide. Each cluster implementation has multiple built-in mechanisms to prevent this situation, which can easily lead to data corruption. One such mechanism is stonith, which is activated as soon as the node is loses its “quorate” status –indicating a high probability that the node is not visible by the rest of the environment. |
| Stonith |
Shut The Other Node in The Head is a mechanism that allows an immediate restart (without any shut down procedure) of any node in the cluster. This mechanism is extremely important to prevent potential data corruption by the wrong cluster node behavior. |
| SystemV |
The name of the former Linux approach to starting and stopping system services (daemons). |
| SystemD |
The name of the modern Linux approach to starting and stopping system services (daemons) and much more. Each modern Linux distribution now uses systemd as the main mechanism to manage system services. |
| Watchdog |
The software or hardware mechanism that works like a delayed bomb detonator. The watchdog is periodically pinged by the system (approximately every 5 seconds) to reset the countdown procedure. If the countdown reaches 0, watchdog will reset the operating system immediately. Watchdog is used with Pacemaker in clusters to ensure that nodes remain recognized within the cluster community. In the event of a lost connection (which is the typical reason behind the Split Brain scenario), Watchdog enables an immediate reboot of the node. |

Product Marketing Manager