With every passing year, our use of and dependence on digital data, both personal and professional, increases.
The loss of such data, in the form of blocked access, deletion, or corruption represents significant damage, particularly for enterprises and organizations. It is vital then for data storage solutions deployed in an IT environment to provide mechanisms that ensure the safety and accessibility of data. Local backups are one example.
This is where FileCloud comes in, providing a robust, enterprise-grade solution for utilizing, storing, and backing up data seamlessly and securely.
In this blog post, we describe the step-by-step process of setting up FileCloud to create local backups for user data to a Windows file server or computer. Doing so ensures valuable user data is always protected and readily available.
FileCloud Supports Local Backups for User Folders
FileCloud offers a specialized desktop application, ServerSync. You can use this client to create local backups of user data to a Windows computer or server. Installing the ServerSync application on a Windows computer (Server or Desktop version) allows you to sync multiple Team Folders with a specific local folder to achieve different objectives:
- Migrate local files to FileCloud.
- Sync local files with FileCloud.
- Download (back up) FileCloud to a local folder.
- Sync “NTFS” permissions from a local Windows Share to FileCloud Team Folders.
There is one important limitation to note: ServerSync only syncs with Team Folders, not individual user folders.
For enterprise IT managers backing up user data through FileCloud, the simple solution is to migrate and store user folders within FileCloud’s Team Folders. This blog post will walk through the process of how to configure Team Folders for user file storage. Then, the post will detail how to configure ServerSync for local backups to a Windows file server.
1. Create a Team Folder for User Files
The first step is to create a new root-level Team Folder to hold all the user files and folders (data that would otherwise be stored in FileCloud’s “My Files” folder).
Log into your admin UI and go to Team Folders to create a new folder; in our example, we will name it “Users”:
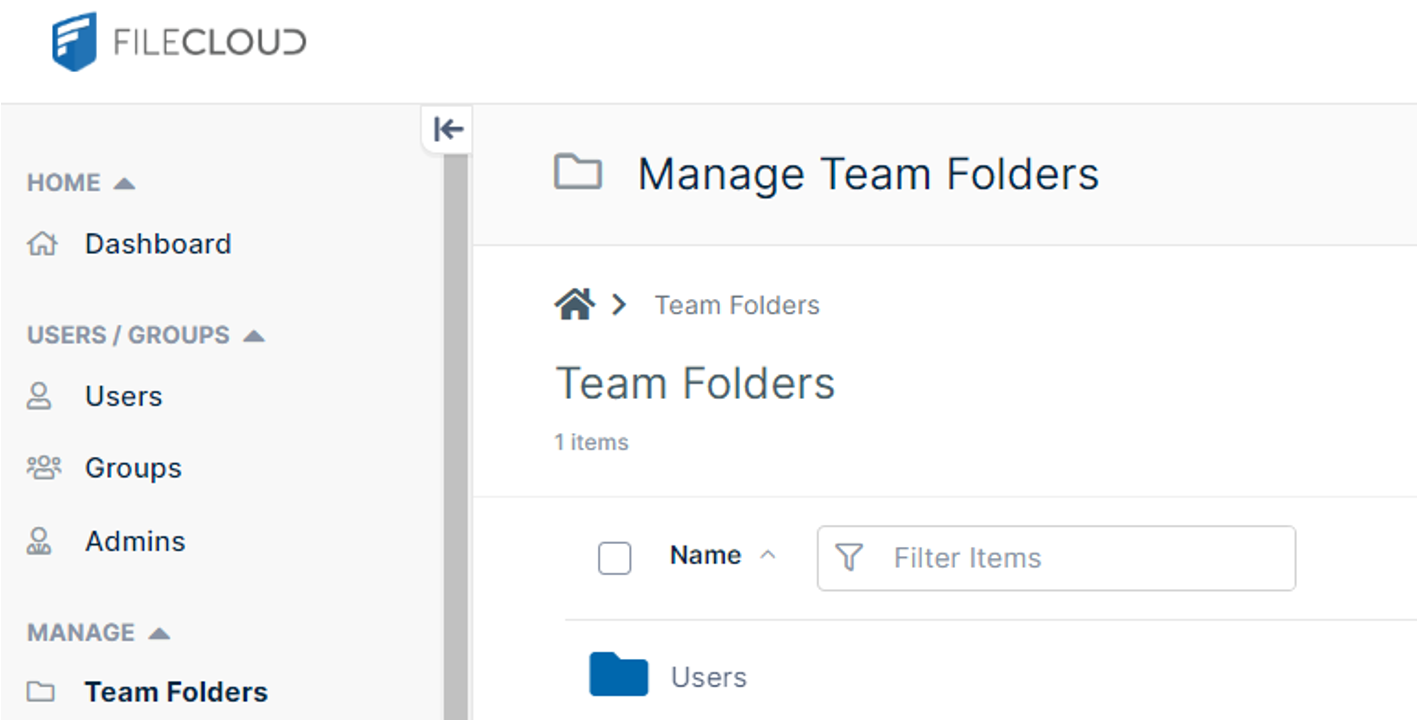
We don’t need to share this root-level folder with any users. Instead, we will go inside the folder and create a folder for each Full User in our system. In our example, we have two users, Jane Doe and Jone Doe, so we will create a folder for each of them.
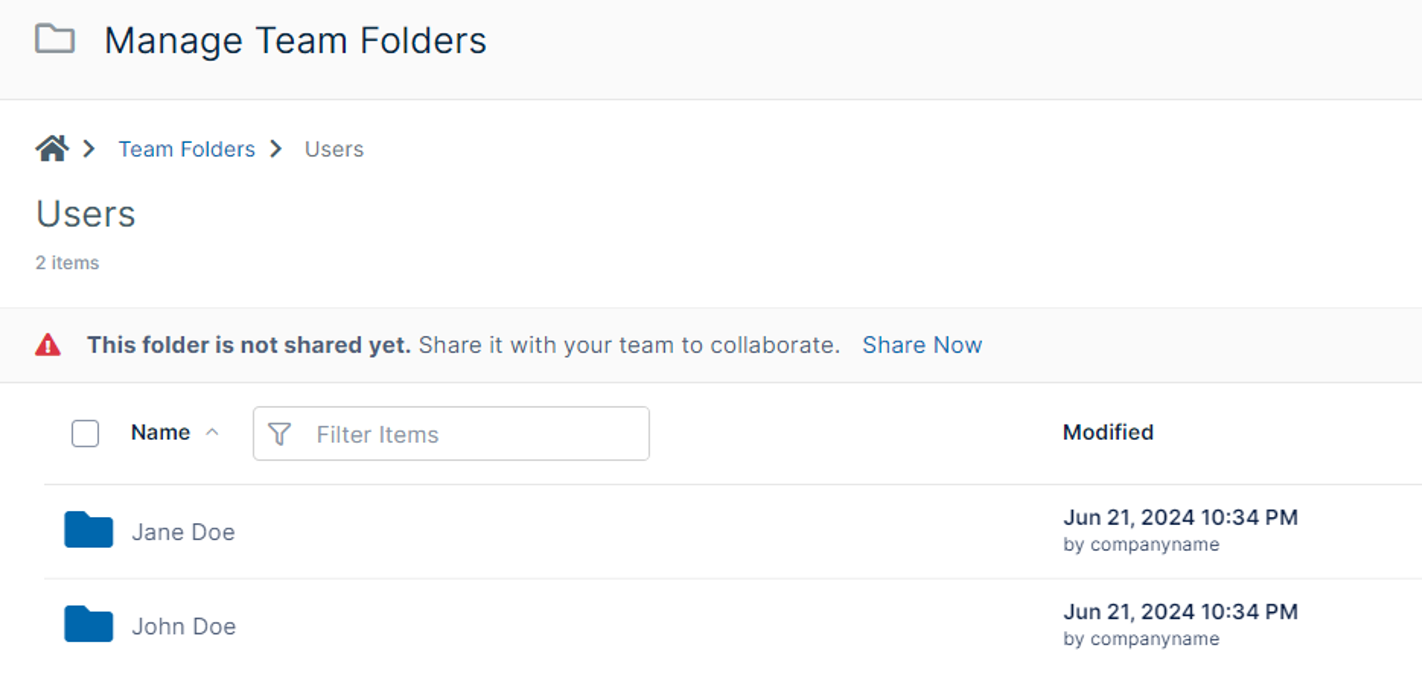
2. Share the User Folder
With the folders in place, now we can “share” them with their respective user. For example:
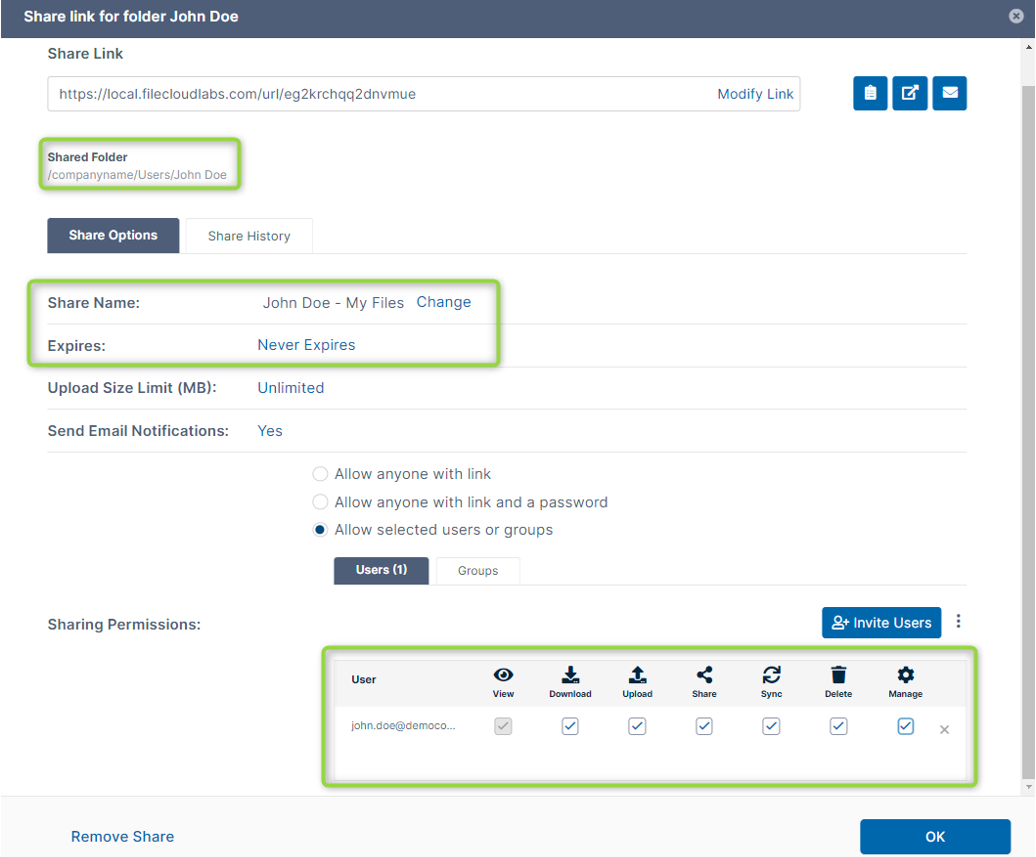
In the share pictured above, we modified the following values:
- Share name: “John Doe – My Files”
- Expires: “Never Expires”
- Permissions: all options ticked
3. Migrate “My Files” Folder to Team Folders
This step is likely the most time-sensitive, depending on the amount of files for each user.
To migrate the data, first we need to download the complete list of files from the user; for this task, we need to click on the Users tab in the left sidebar. This will open the Users dashboard, where we can edit each user.
Clicking edit on a specific user will open up the User Details pane:
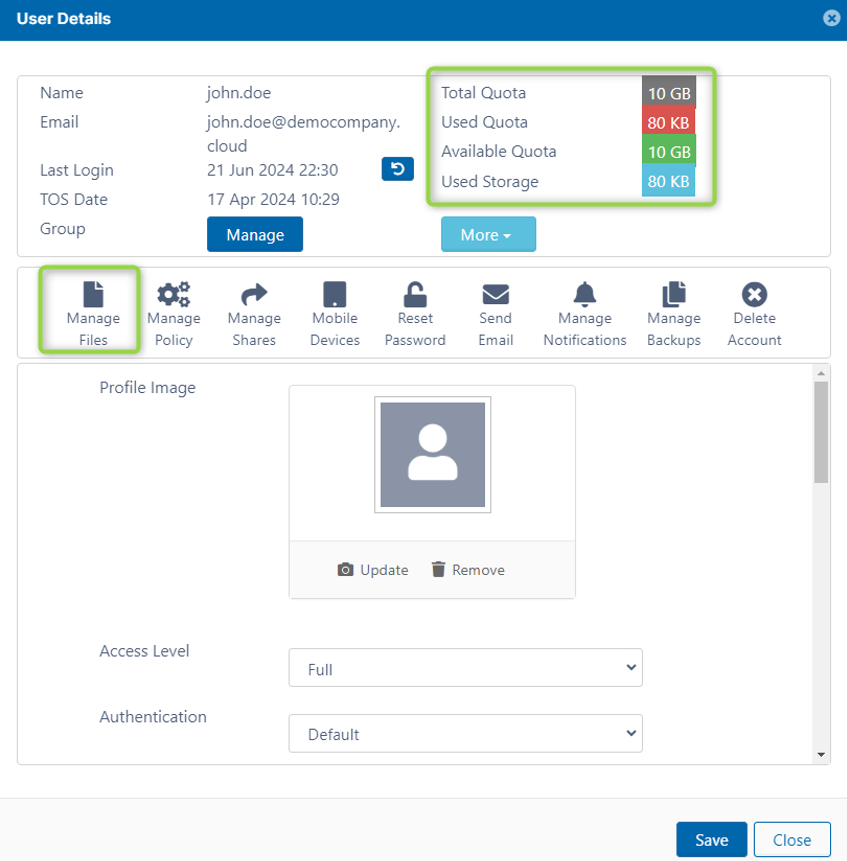
From this pane, you can see the amount of data that will be migrated (Used storage). By going to “Manage Files,” you can view and download all their data:
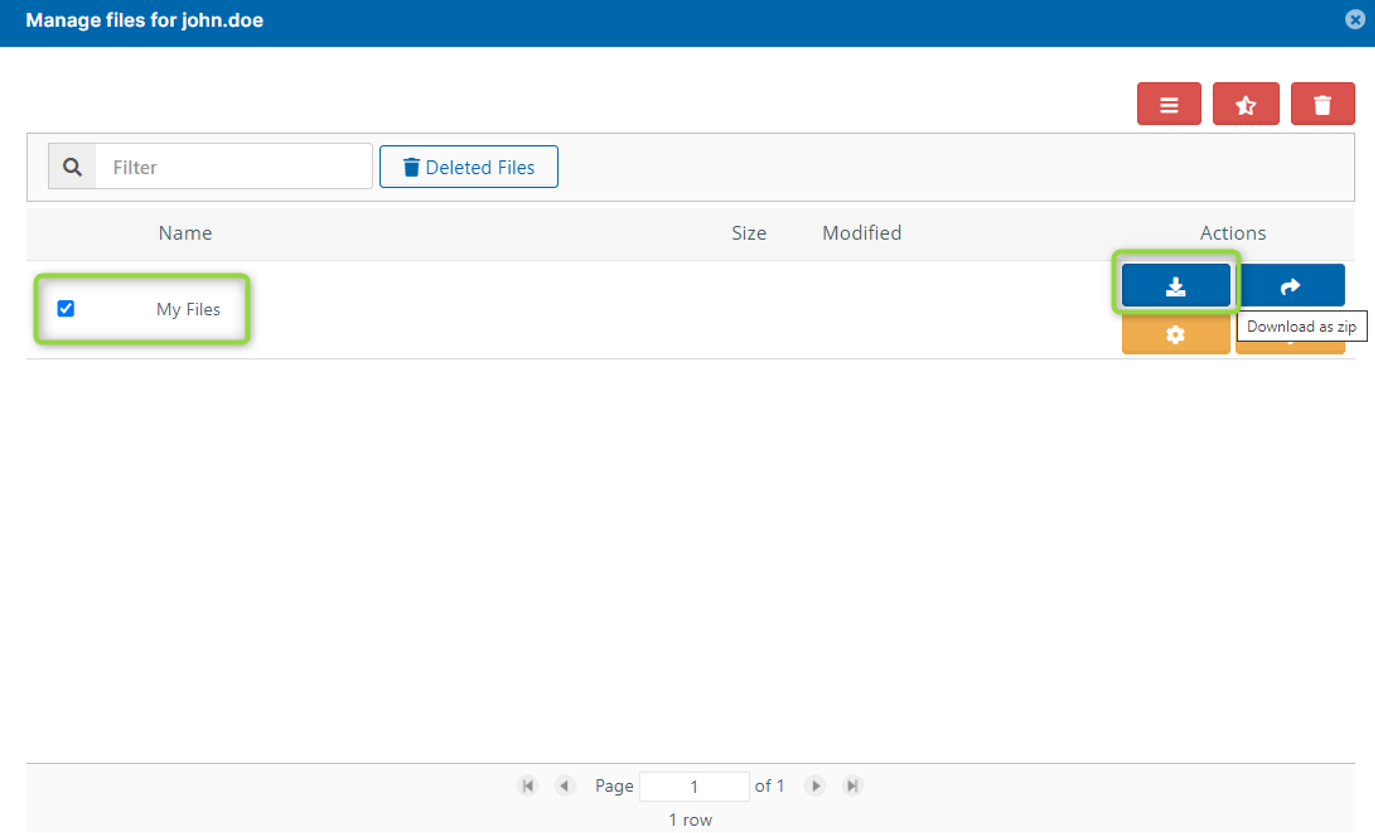
Select the download option to create a Zip file containing all the content in the user's “My Files” folder. Once the Zip file has finished downloading, extract the contents and compare with the user’s “My Files” folder.
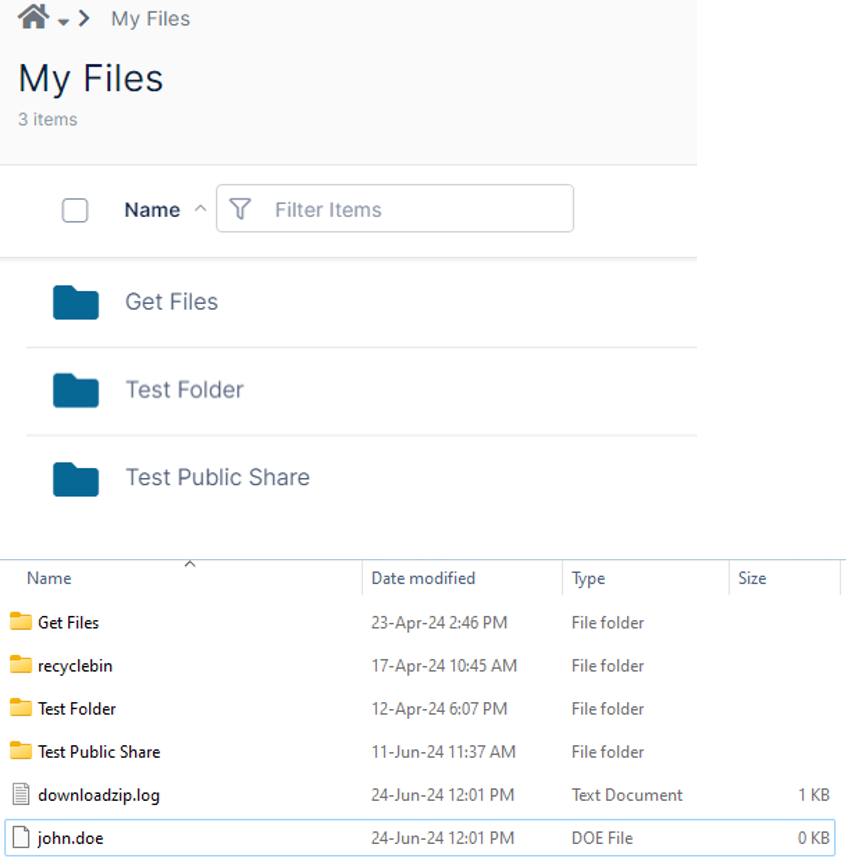
The extracted data includes a few folders that should not be uploaded to the new user folder in Team Folders.
- recyclebin folder
- log
- doe DOE file
You can choose to either upload or shred the recyclebin folder; the other two files are for reference only. The log file helps identify if any file or folder failed to download (for example, larger files greater than 3GB may not be included in the Zip file).
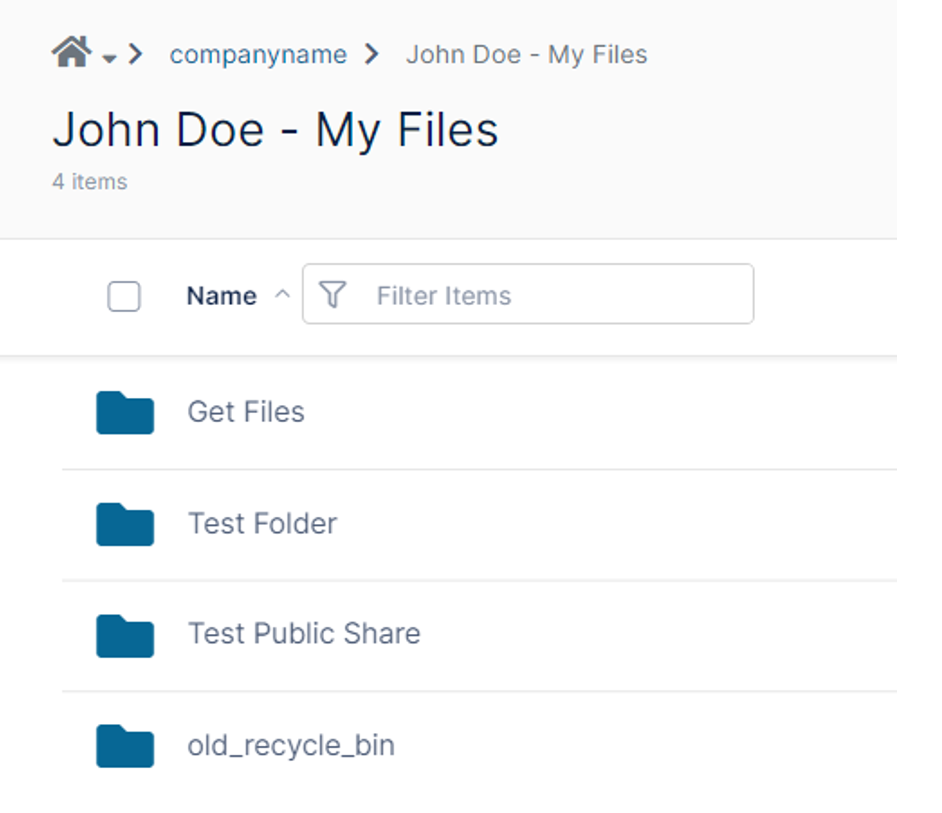
In our example, we will upload the recyclebin folder as “old_recycle_bin” for the user’s ease of reference. To begin the upload, we will open the John Doe folder (Team Folders > Users > John Doe – My Files) and select the desired files (by either clicking on the upload option and selecting files and folders or by dragging and dropping them into the new user folder).
After uploading, the user can view the files at Team Folders > Users > John Doe – My Files.
4. Disable My Files
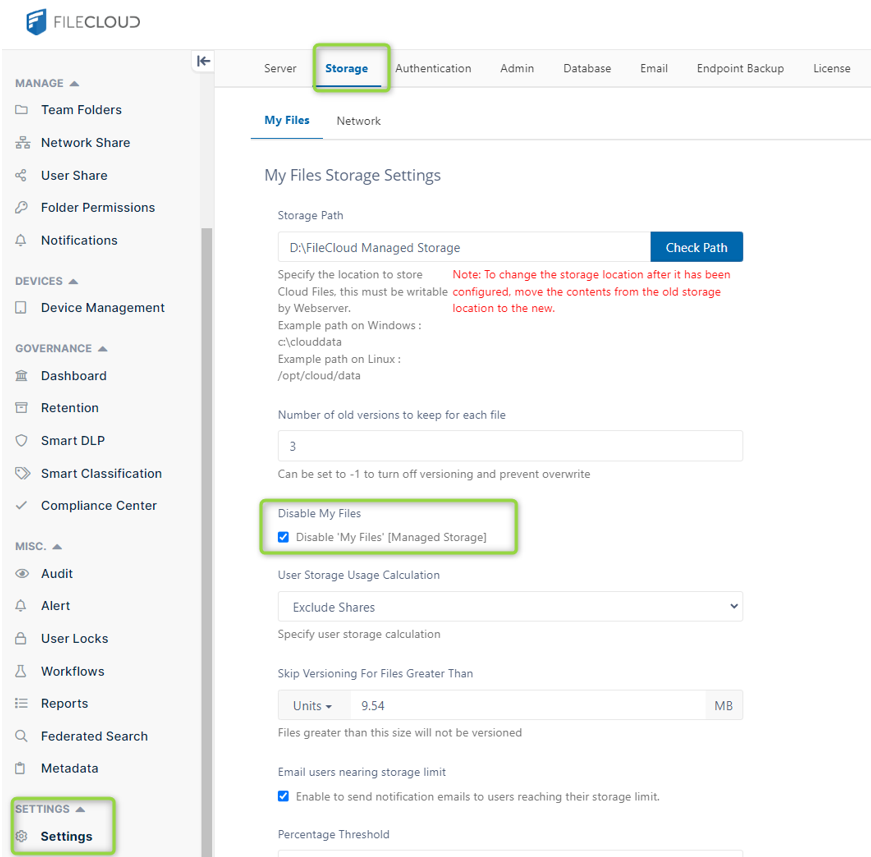
Once all the user’s My Files content has finished migrating to the new Team Folder / My Files folder, we can turn off the “My Files” functionality.
Navigate to the Storage dashboard in the Admin portal by clicking on Settings in the left sidebar, then click on the Storage tab. Check the option to “Disable My Files” and hit “Save.”
5. Make a Shortcut for New "My Files" Folder
Now that we have migrated the data and users can access their data via Team Folders, we recommend creating a shortcut to the new My Files folder in the UI.
Navigate to Team Folders / User and “star” the new folder (for example, John Doe – My Files). By favoriting the folder, users will have quick access to the new "My Files" folder in the “Starred documents” section.
6. Initiate Sync to Create Local Backups with ServerSync
Our final step is to install and configure ServerSync to back up all our data.
To download, log into your client portal (not the admin portal) with the credentials used to purchase FileCloud; find ServerSync in the list of “Other downloads.”
Once downloaded, follow the installation instructions. To finish setting up ServerSync, we will need login credentials for our Team Folders. If you have not yet set a Team Folders password, this can be done through the admin portal. Click on Settings in the left sidebar of the admin portal, then select the Team Folder tab. Next click “Manage” to open the Team Folder Account Details pane. This is where you can manage the folder and set a password.
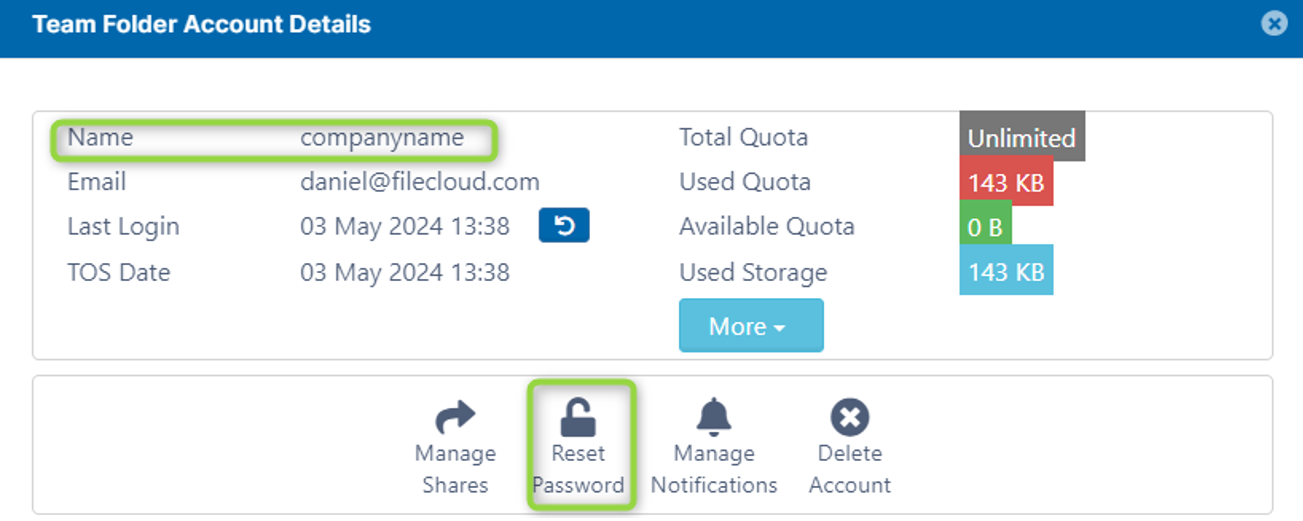
With a Team Folders password set, we can now log into ServerSync using the Server URL and these credentials. Here, we can configure the folders we want to sync.
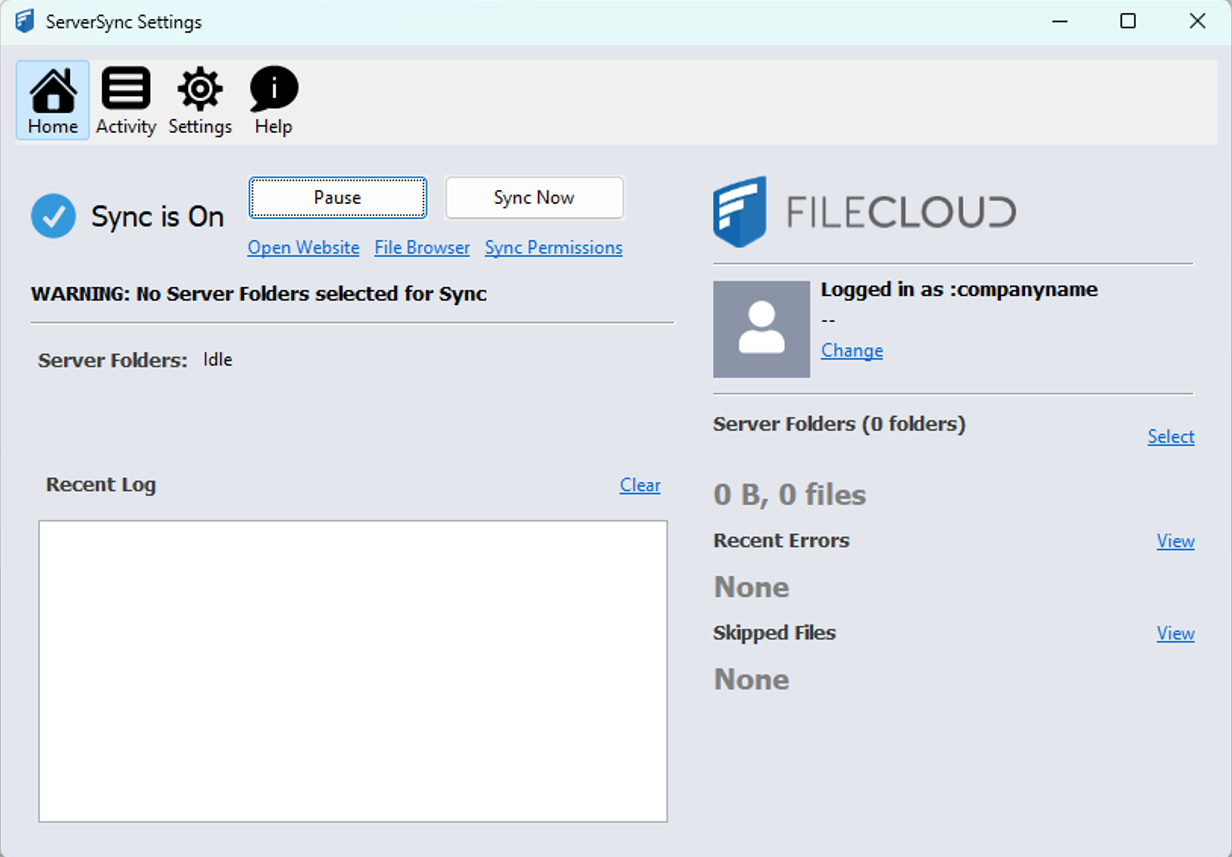
To do this, click on Settings at the top of the pane. Then select Server Folders. The first time navigating to this location, it will be empty. To sync the “Users” folder within Team Folders, click on “Add Folder”, then select the remote folder “My Files / Users,” and choose your local folder.
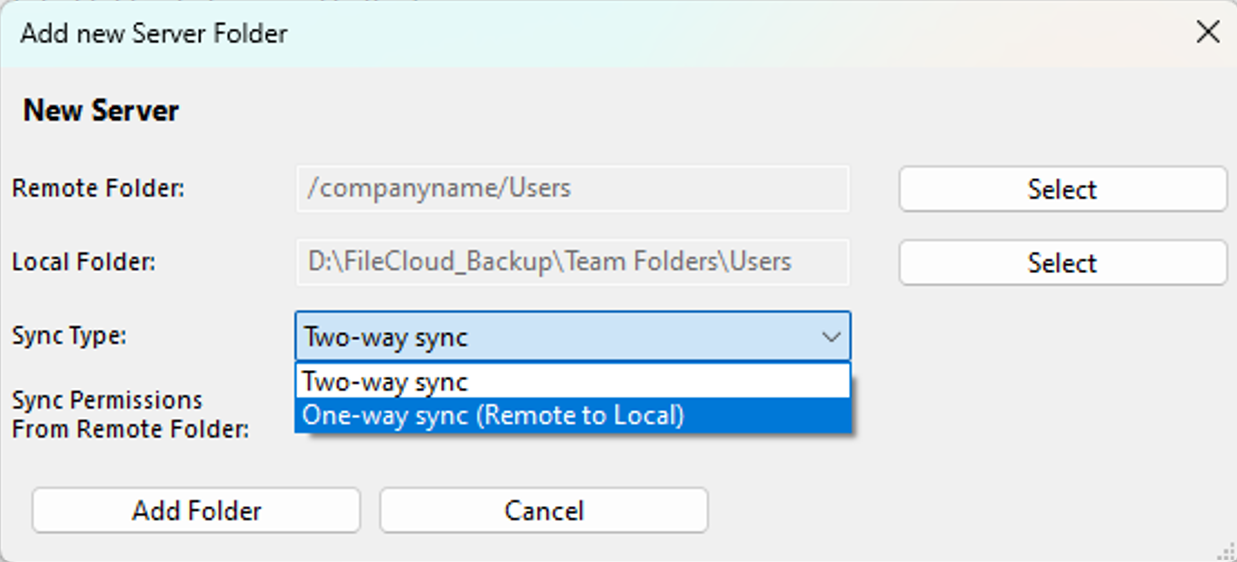
Since the purpose of this synchronization is to create local backups for user data, we recommend selecting one-way sync (faster); if, on the other hand, you will be changing the local files that need to be updated back to the server, select two-way sync.
Note: There is no need to sync permissions. This option is used to sync local NTFS permissions to the FileCloud instance.
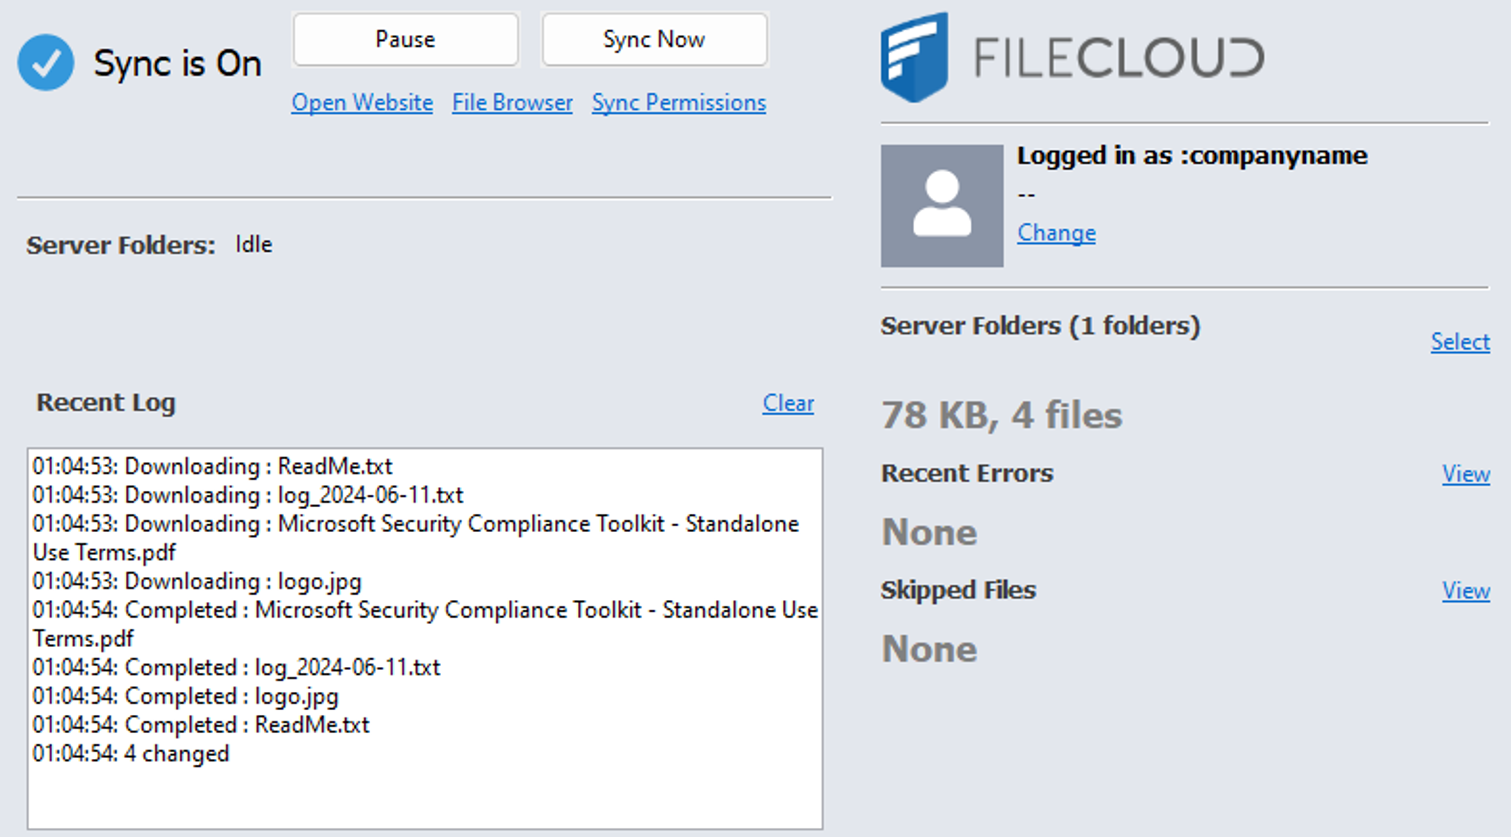
Once you have added the folder to ServerSync, the client will begin syncing remote folders to the local Windows machine.
Limitations of Using Team Folders as User File Storage
There are some key elements to consider when you decide to use the Team Folders as the central location for Users data:
- Team Folders utilizes all the storage available; there is no simple method to restrict how much storage you can assign to individual users.
- Consequently, the only way to see how much storage quota users have absorbed is to run a custom report – the admin dashboard will no longer show this information upfront.
- Adding or deleting user folders within Team Folders must be done manually (unless you leverage the FileCloud API to automate user provisioning processes and account creation/deletion workflows).
Local Backups with ServerSync Support Data Redundancy & Disaster Recovery
Backing up an organization’s user folders to a local Windows file server with FileCloud is an effective way to ensure data remains secure and accessible. By following the steps outlined in this guide, you can set up automated backups, manage user files, and gain peace of mind knowing that digital assets are protected against loss.
FileCloud not only provides a robust local backup solution but also offers a range of features to enhance enterprise data management and governance.
Interested in learning more? Check out our on-demand demo or register for a free trial!
Written by Daniel Alarcon, Senior Manager, Customer Onboarding and Enablement
& Katie Gerhardt, Jr. Product Marketing Manager

By Katie Gerhardt
Jr. Product Marketing Manager