You’ve signed up for FileCloud Online — thank you!
Now what do you do?
The following guide will answer the most frequently asked questions after signing up and help identify the first steps to connect users with your FileCloud environment.
How do I change my admin password?
You chose a team name when you signed up for a new FileCloud Online account. That team name will be your FileCloud Online Site Name, for example:
Team Name: my_company
FileCloud Online URL: my_company.filecloudonline.com
When you sign up for your FileCloud trial or when you purchase your new subscription, you will receive an email with your login credentials as an admin and as a user.
It’s important to note that the admin account does not count toward your license; this is the main admin account to configure FileCloud settings, add/remove users, and handle other administrative tasks. This admin account does not have a user account or allocated storage.
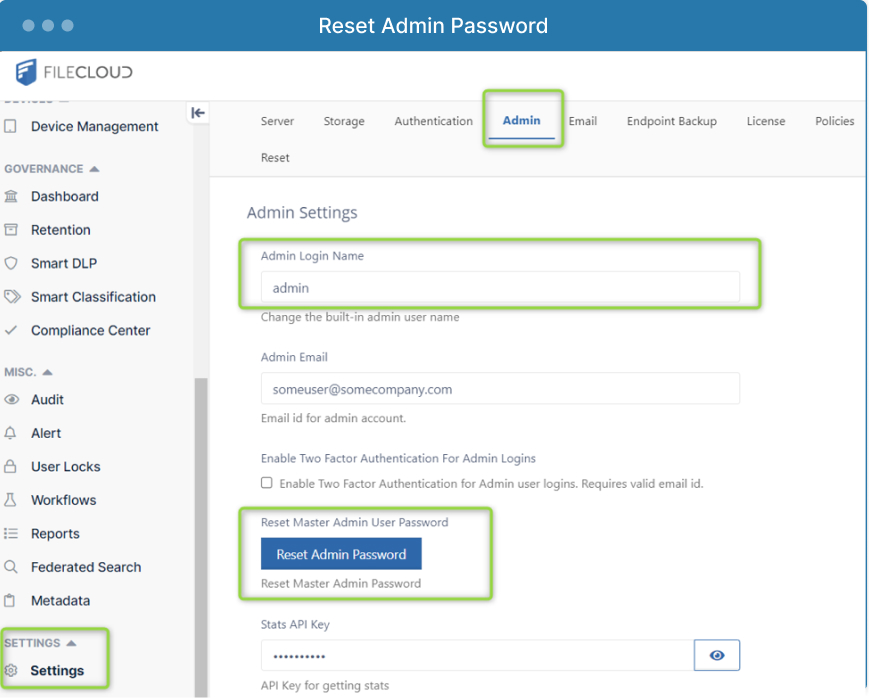
We recommend that you change the admin account name and password for better security. To check off this task, log in to the admin UI and go to: > Settings > Admins > Reset Admin Password.
Once the password is updated, the admin user interface will log you out and ask you to log in again.
How do I add a company user to FileCloud?
A company user will most likely need a “Full” license.
What is the difference between Full, Guest, and External Users?
You can see a detailed difference table in our documentation, but to keep it simple, here are the main differences:
- Full User: Company users that will use FileCloud to collaborate and share files with external users and that you want to allocate personal storage (“My Files”). This user type counts toward your license tally.
- Guest User: Company users that will use FileCloud to collaborate and share files with external users but “only” from Team Folders or specific shares you grant them access to; they don’t have storage allocated. This user type counts toward your license tally.
- External User: All user accounts that will be added by you or your user that will be recipients of shares and only have access to what is shared with them. These accounts do not use a license seat. You can add as many external users as you need, as long as their email accounts don’t use the same domain as your company accounts. For example, if your company domain is company.com, your external accounts can’t use that domain as an external user. For more details about this restriction, please check our documentation.
Adding a new “Full” user account is possible via the admin user interface. Log in to the admin UI and go to: Users > Add User.
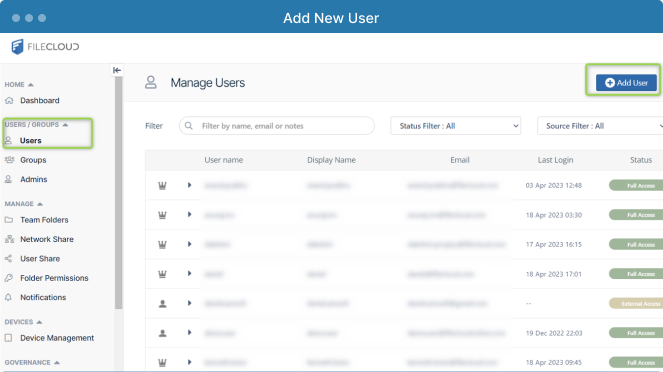
A new user dialog box appears:
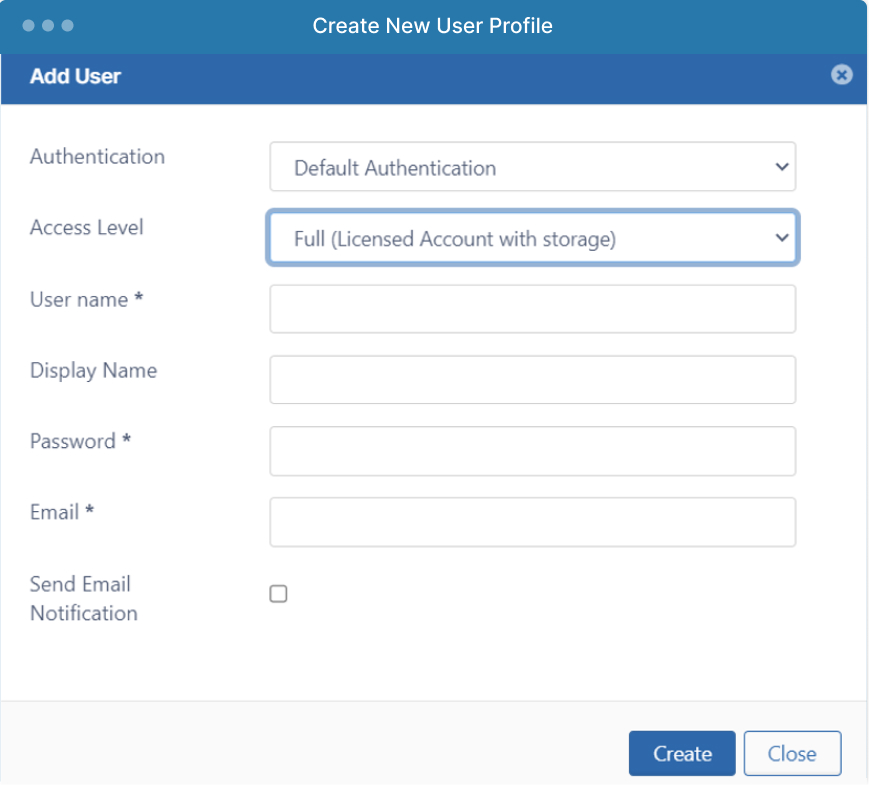
If we want to add John Doe (johndoe@company.com) as a full user, we input the following information:
Authentication — Default Authentication
Access Level — Full (Licensed Account with storage)
User name* — johndoe
Display name — John Doe
Password* — ********
Email* — john.doe@company.com
If we decide to “Send email notification” to the user, an additional option to include the password will show. Use this option to include the password in the welcome email.
Why are accounts limited to 2 GB of personal space?
When you configure FileCloud for the first time, all “Full” user accounts are assigned 2 GB of storage by default.
I purchased 2 TB; where is the rest of the storage?
Using FileCloud Online gives you the ability to allocate user storage across two different locations:
- Personal storage (a.k.a. “My Files”) — this is personal storage allocated to the user that only the user can access.
- Team Folders — this is a shared space where users can store and collaborate on team files; for example, Human Resources, Sales, Engineering, Account, Management, etc. All these folders have control access that can be modified so only certain users are granted access.
Default values:
- Every Full User account gets 2 GB of storage.
- Team Folders do not have a limit and can use as much storage as is available to your subscription.
How do I change the personal storage (My Files) default quota?
All user accounts are associated with Policy Groups in FileCloud. Different policy groups can modify how users interact with FileCloud, and admins can adjust default settings for policies. For example:
I want my management team to have 50 GB of personal storage. For the Sales team, I want to allocate 10 GB of personal storage. I want to default to 5 GB for the rest of the company.
To make these changes, we will go to the admin UI: Settings > Policies
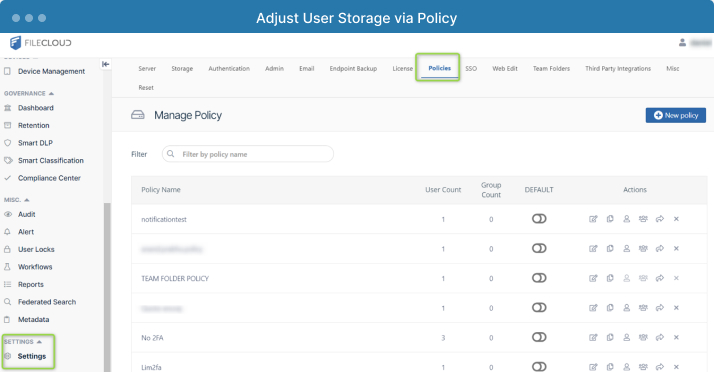
Step 1: Update the Default Policy
The first change we will make is the “Default” policy group to give 5 GB to users. Generally, this policy is identified as the “Global Default Policy,” which is turned on.
On the right side, we find the action control buttons. Click on the edit button to open and update the policy.
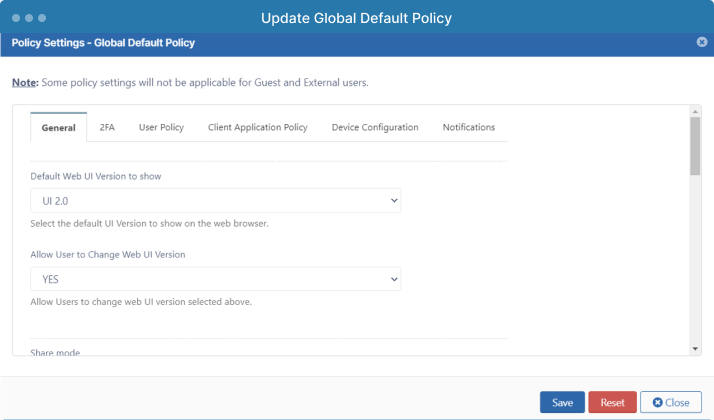
Here, we will find all the options available to customize by Policy Group; for now, we will focus on storage.
However, you can reference our documentation to learn about all the policy settings options, or you can check out FileCloud University Lesson 13: General Policy Tab (video).
Scroll down the General Policy Tab to locate the User Storage Quota. Choose the number of units in terms of GB. For our example, enter the value 5 to give the users 5 GB of personal storage. Hit save — we have now completed this task’s first step.
Step 2: Create a Policy for Specific User Groups (e.g., “Sales Team” and “Management Team”)
Now, we will add the Sales Team Policy to grant Sales team members 10 GB of space. We have two options to accomplish this:
- Create a new policy by clicking the button on the upper right corner and name the policy “Sales Team.”
- Duplicate the Global Default Policy and rename it “Sales team.”
When to use option #1?
When you want to create a blank new policy group with default values.
When to use option #2?
When you want to replicate all the settings you’ve already defined for the default policy group; for example, setting two-factor authentication. Any default values will be copied to the new group.
Generally, we recommend using option #2 so you don’t miss any specific values set for your users. Whichever option you used, there should be a new Policy group named “Sales team.” Edit the policy group and change the storage value to 10 GB. Then save the changes.
Repeat the process by duplicating the Sales Team (or the Global Default Policy) and renaming it “Management Team.” Then update the storage quota to 50 GB.
Step 3: Create User Groups (e.g., “Sales Team” and “Management Team”)
Though everything looks properly configured, how does FileCloud know which users are part of the management and sales teams?
Since we are configuring everything from scratch, we must create a “User” group for Management and Sales and assign their users. (This can also be done prior to creating new policies.)
Navigate to admin UI > Groups:
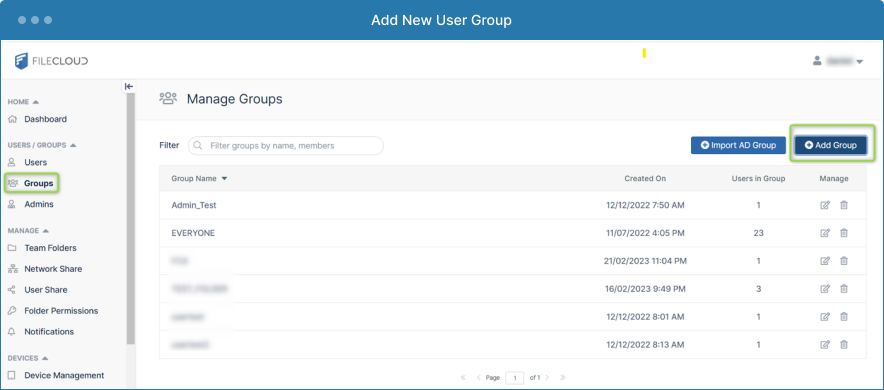
We are going to create two new groups: “Sales Team” and “Management Team”:
Once we click “Add Group,” we are prompted to manage the group members. For our example, we want to include John Doe as part of the sales team:
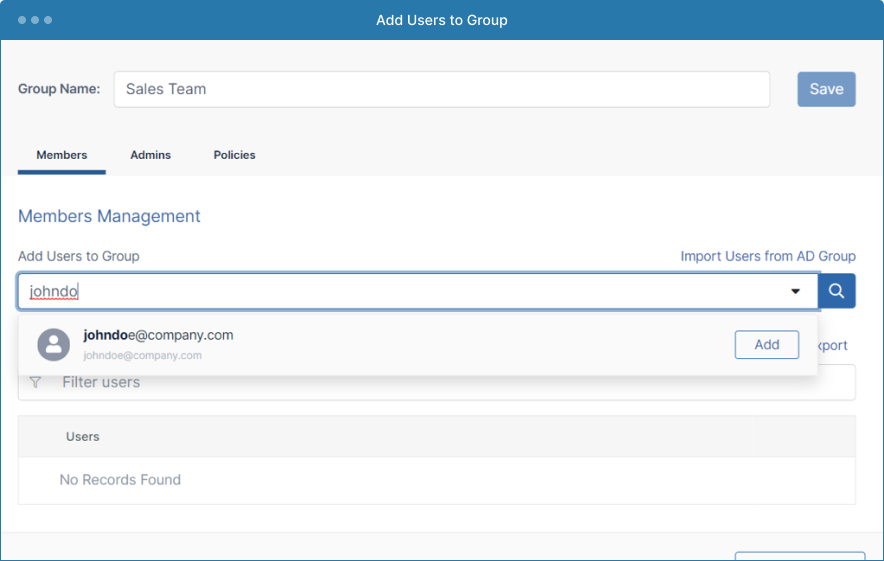
Once added, the user is listed in the group (and can be removed at any time if necessary).
Step 4: Update Group Policies
Next, we will go to the Policies tab in the “Manage Group” dialog box for the Sales Team.
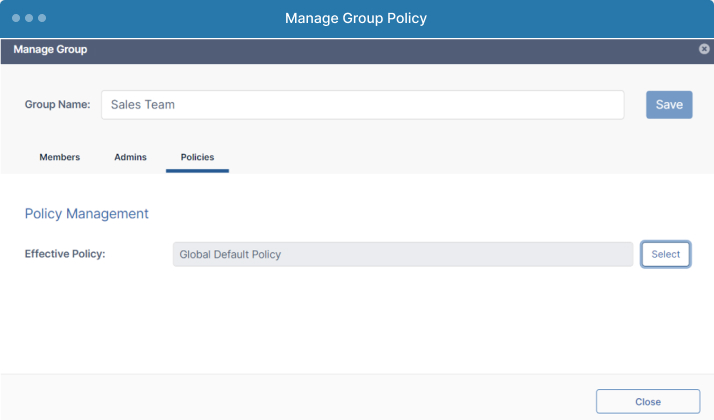
The effective policy for the group appears in the Policies tab under “Manage Group.” Clicking “Select” will open another dialog box that allows us to search and choose between existing policies. Select the “Sales Team” Policy Group we recently created from the list.
Now, repeat the process for the Management Team. First create the “Management Team” group, then add users. In our example, we will add Jane Doe to the Management Group. As with the “Sales Team” group, the policy for “Management Team” can be changed from the the Default Global Policy to the “Management Team” policy that we created earlier in this step-by-step example.
Great! We have created custom policy groups and storage allocation. You can learn more about policies through FileCloud University, Lesson 12: Overview of Policy Groups Settings (video).
How do I create a Team Folder for a specific group of users?
To create a Team Folder for our recently made groups, let’s go to admin UI > Team Folders:
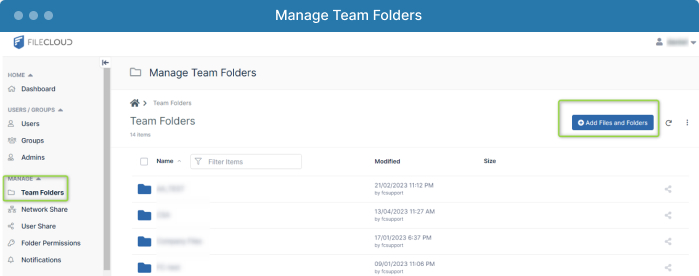
Step 1: Click the “Add Files and Folders” button; choose the New Folder option.
Step 2: Give the folder a name (e.g., “Sales Team”) and click save.
Step 3: Share the folder.
Now the folder has been created but not yet shared with anyone. Let’s share it with the “Sales Team” by clicking on the “Share Now” button.
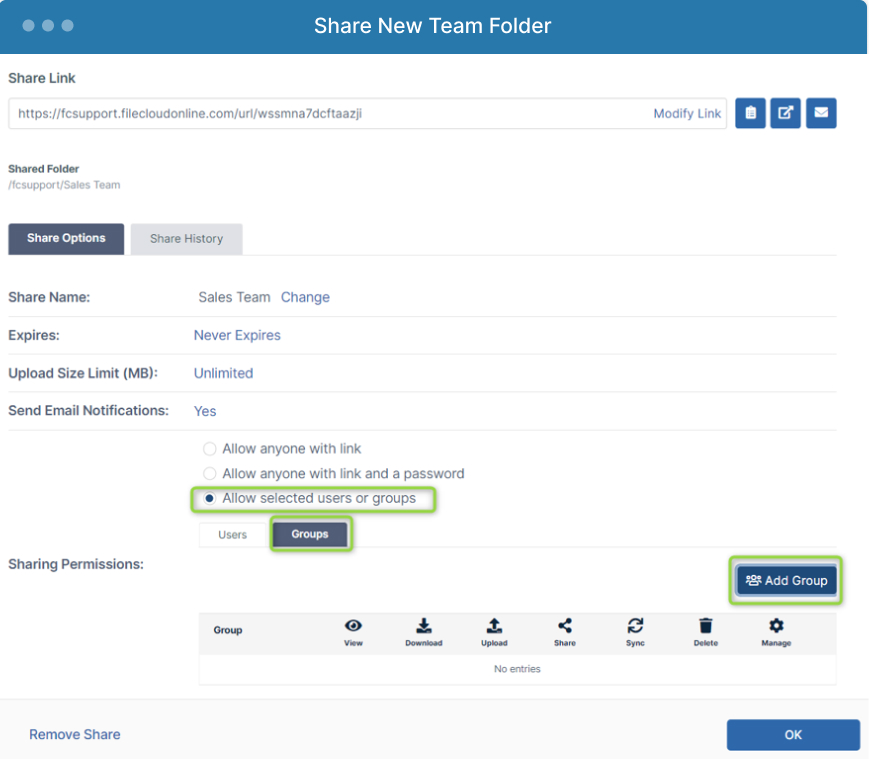
Step 4: Allow Share based on Groups.
In this Share window, make sure to choose “Allow selected users or groups,” as we want to limit who accesses this Team Folder. Then click the “Groups” button and “Add Group.” Then choose the “Sales Team” and click “Add.”
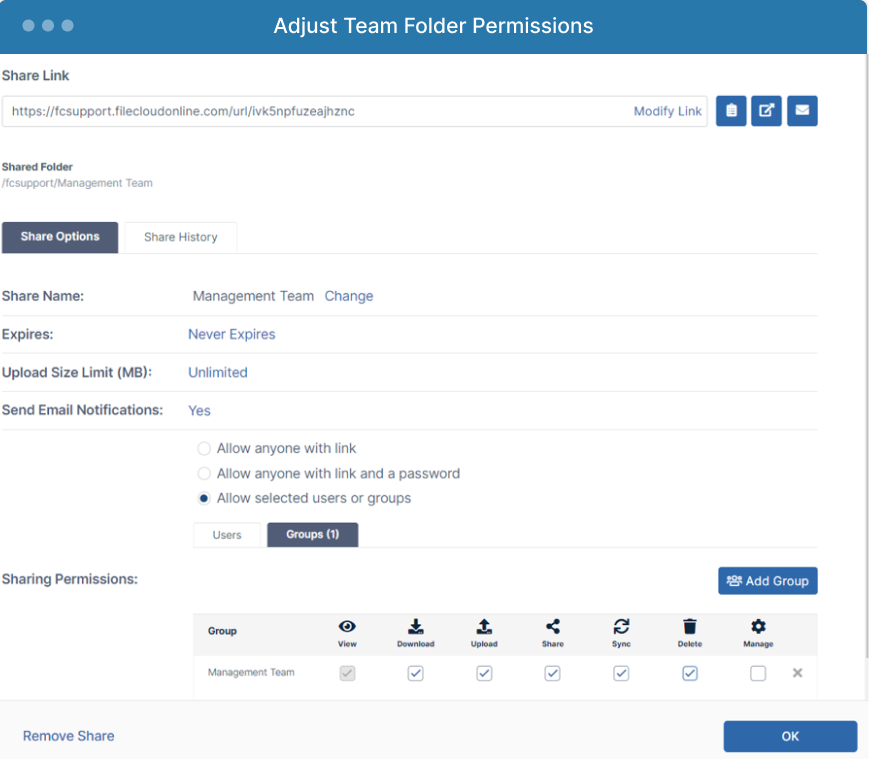
Step 5: Adjust Share Permissions for Group members:
After adding the group, click on the checkbox of each permission you want to grant to the team you add to the folder. Then click OK.
We will repeat the same process for the management team: create a Team Folder named “Management Team.” Then, share the new folder with the “Management Team” group (set share to private, add group, and assign permissions.)
Now, how does that look from the user end?
When Jane Doe logs in to the user UI, she will see the following:

As this user is part of the Management Group, they now have 50 GB of personal storage (My Files); we also granted access to the Management Team shared folder.
Now, what happens to John Doe from the Sales team?
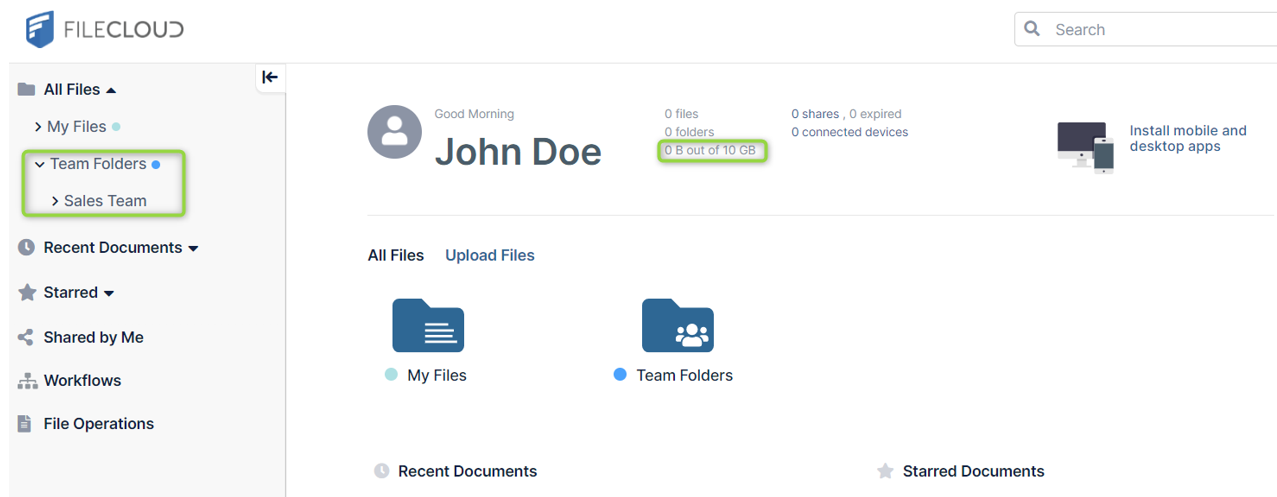
Once this user logs in, they will see 10 GB of personal storage (My Files) and will have access to the Sales Team shared folder.
To learn more about Managing Team Folders, check out FileCloud University Lesson 37: Managing Team Folders & Adding Folders (video).
If you have any questions about this setup, please stop by our online documentation, which reviews additional details about setting up and using FileCloud. You can also submit a ticket with our support team. We will follow up soon with more tips for getting started (Part 2)!
Article written by Daniel Alarcon, Technical Support Manager
Edited by Katie Gerhardt, Jr. Product Marketing Manager

Product Marketing Manager